F.3 - How to configure person provisioning
In this step you will create a 2nd enterprise application in Microsoft EntraID:
- 1st Enterprise Application: SSO and User provisioning
- 2nd Enterprise Application: Person provisioning (this documentation)
If you want only person provisioning, you still need two applications:
👉🏼 The first for SSO.
👉🏼 The second for person provisioning.
💡 The following fields are connected:
- First name (EntraID: given_name)
- Last name (EntraID: family_name)
- Email (EntraID: email)
- PersonGroup (EntraID: department → only if special mapping is applied, see step 4)
- Status (EntraID:
- Function (EntraID: title)
- Personal No. (EntraID: employee_id)
- Start Date (EntraID: timly_start_date --> only if special mapping is applied, see step 4)
- End Date (EntraID: timly_last_date --> only if special mapping is applied, see step 4)
- Manager (EntraID: timly_manager → only if special mapping is applied, see step 4)
- personnel_number (EntraID: timly_pers_no → only if special mapping is applied, see step 4)
- Dynamic attributes (should start with timly_*)
🛜 Timly-App
- Log in to Timly
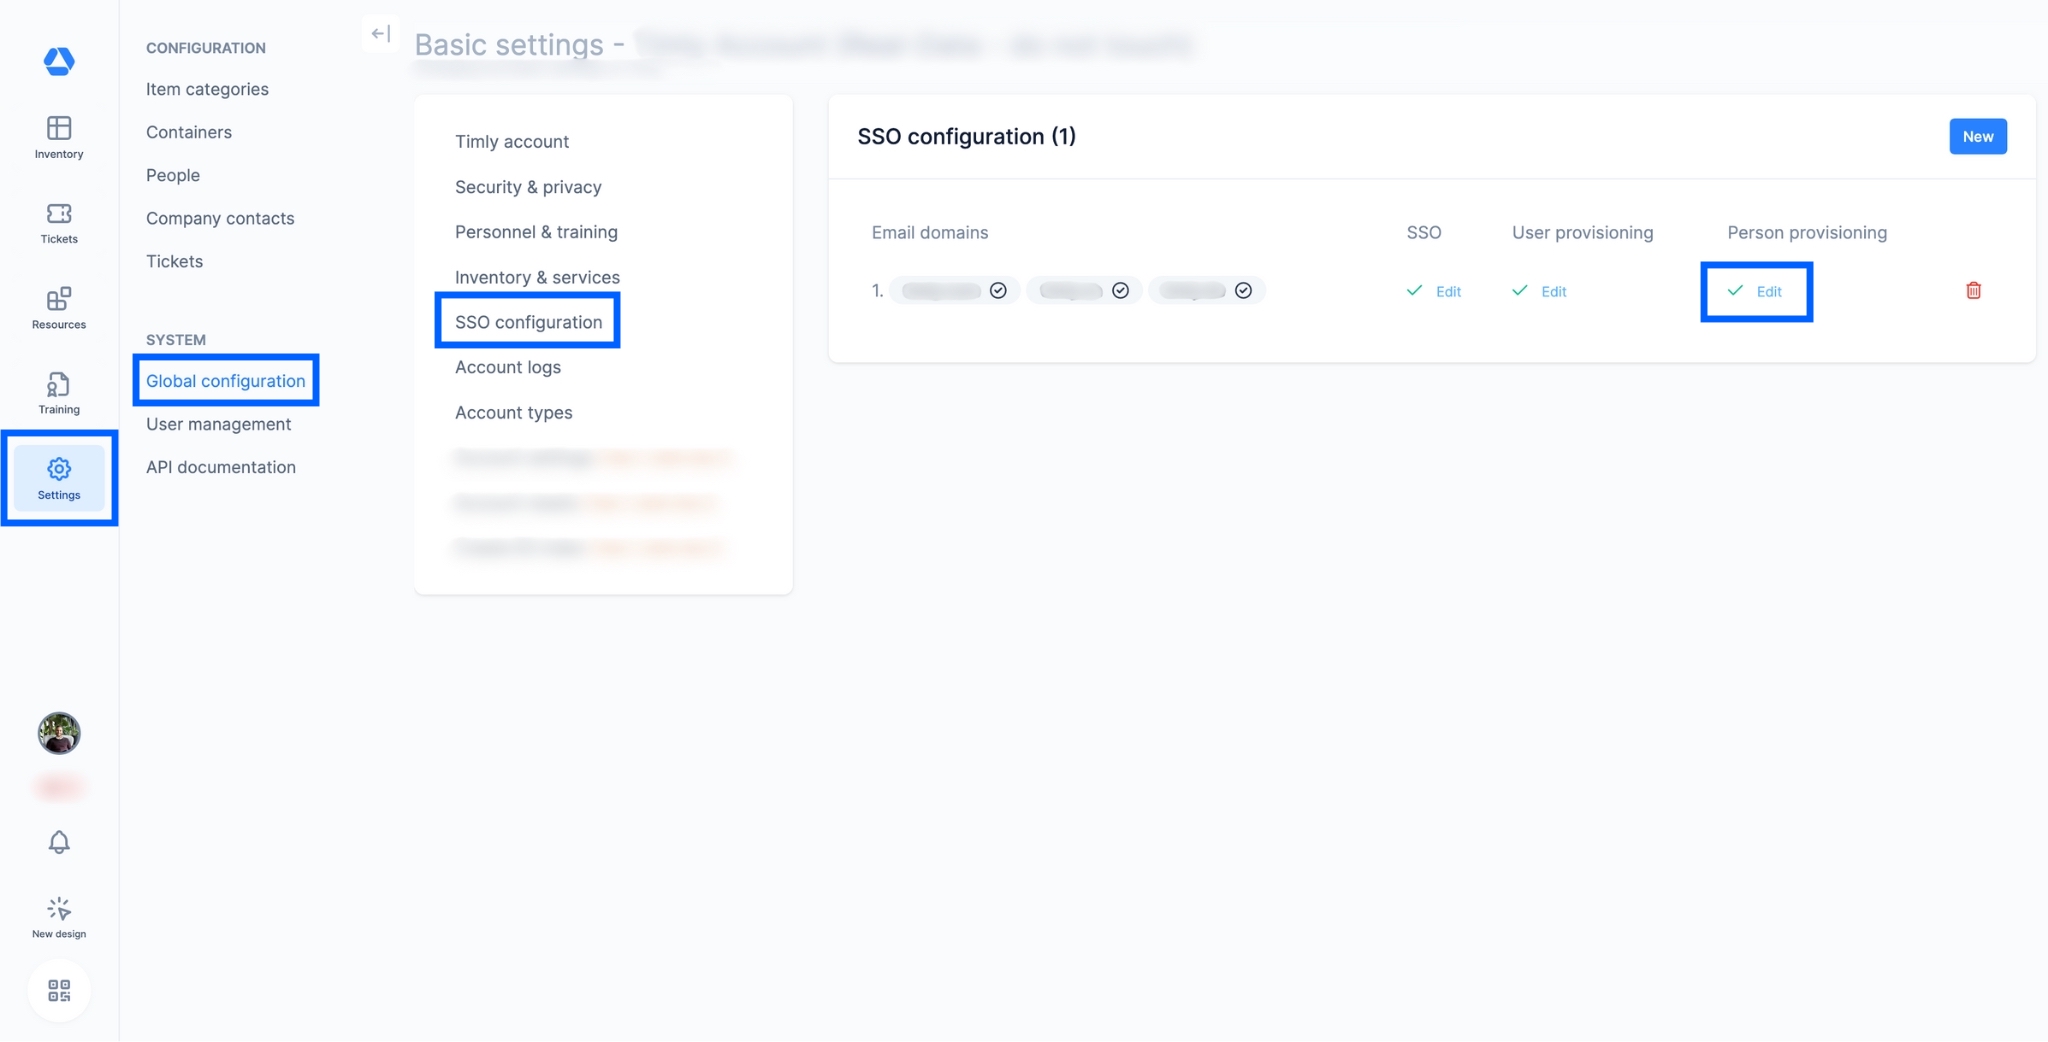
- Click on "Settings," then "Global configuration," and finally "SSO configuration"
- To set up user provisioning, click on "Edit" below "Person provisioning"
Step 1
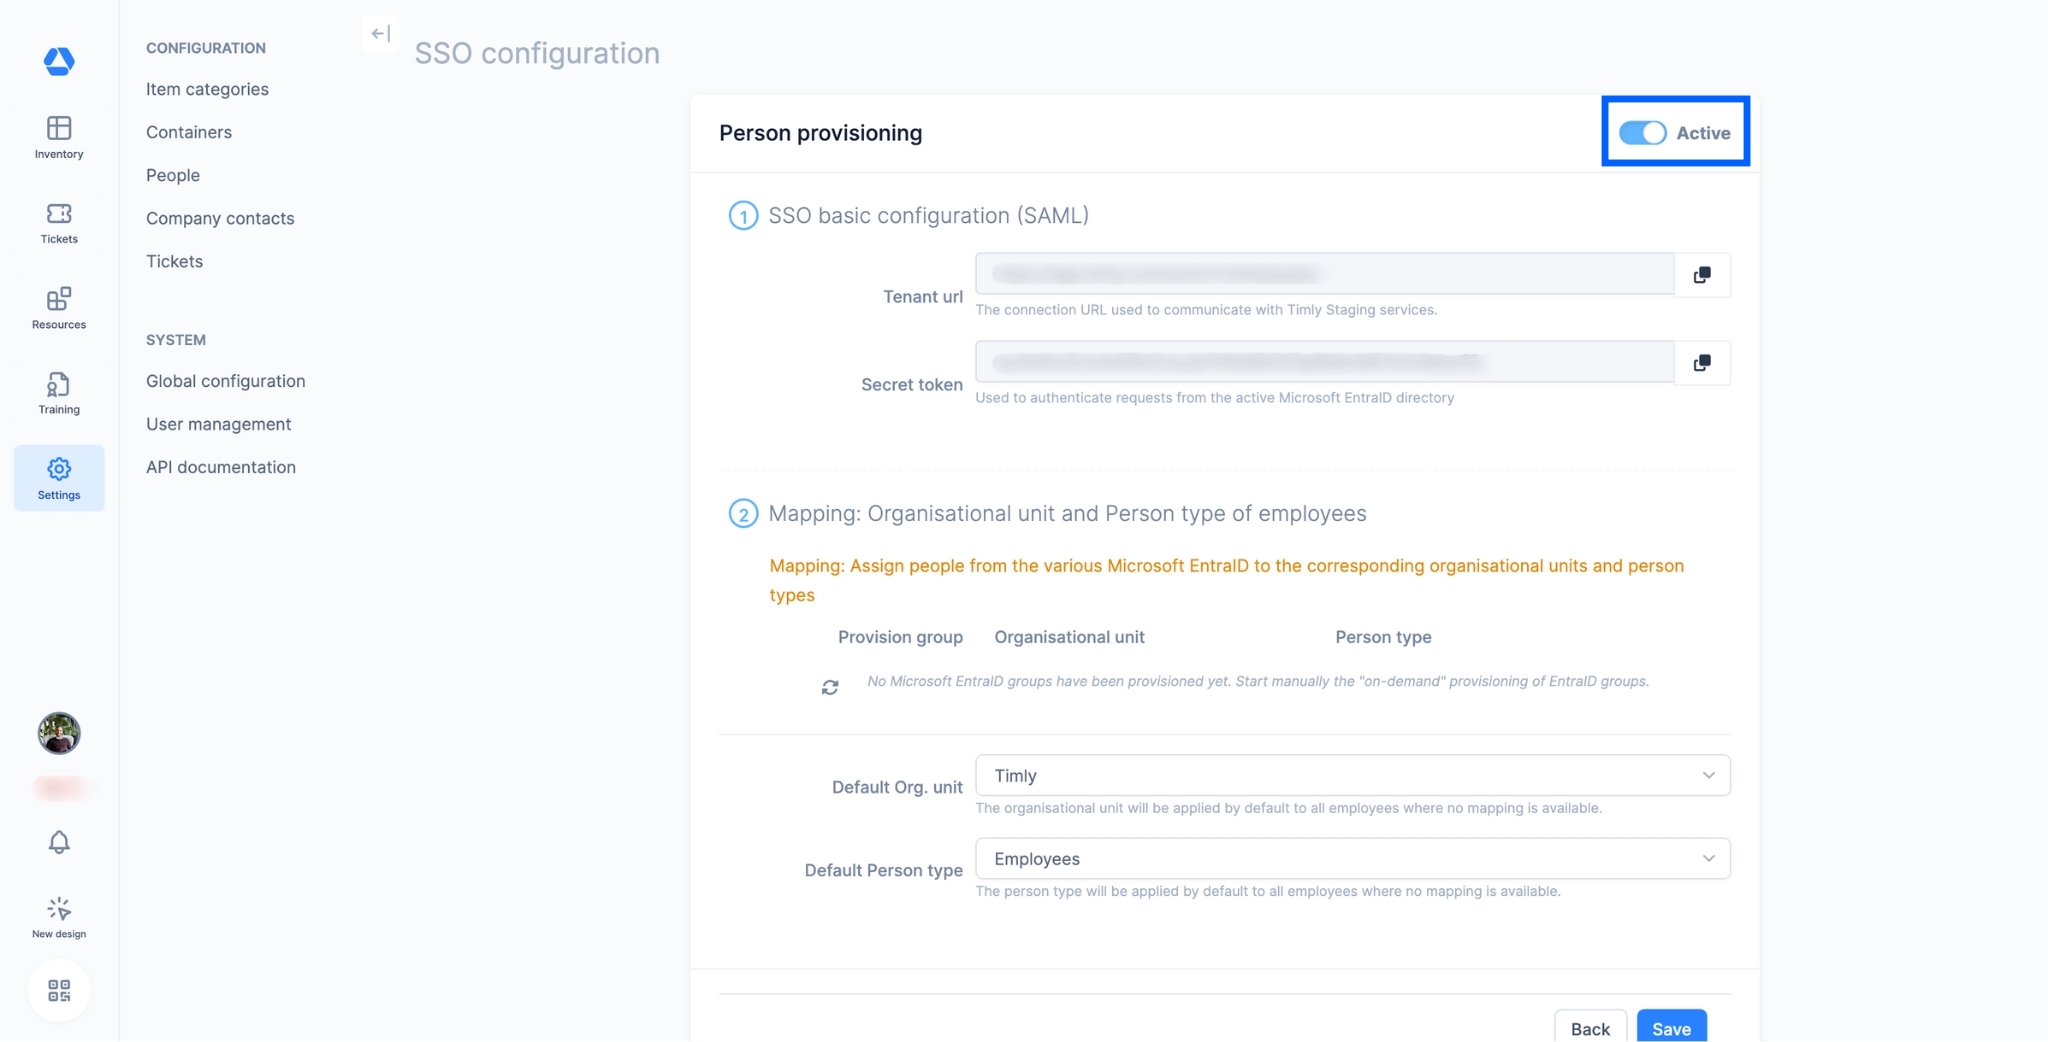
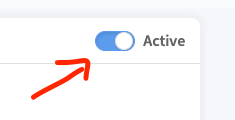
- Activate the person provisioning.
🛜 Microsoft Entra ID
Step 2

- Navigate to the "Enterprise applications" section (🇩🇪: "Unternehmensanwedung"; 🇫🇷: "Application d’entreprise").
Step 3
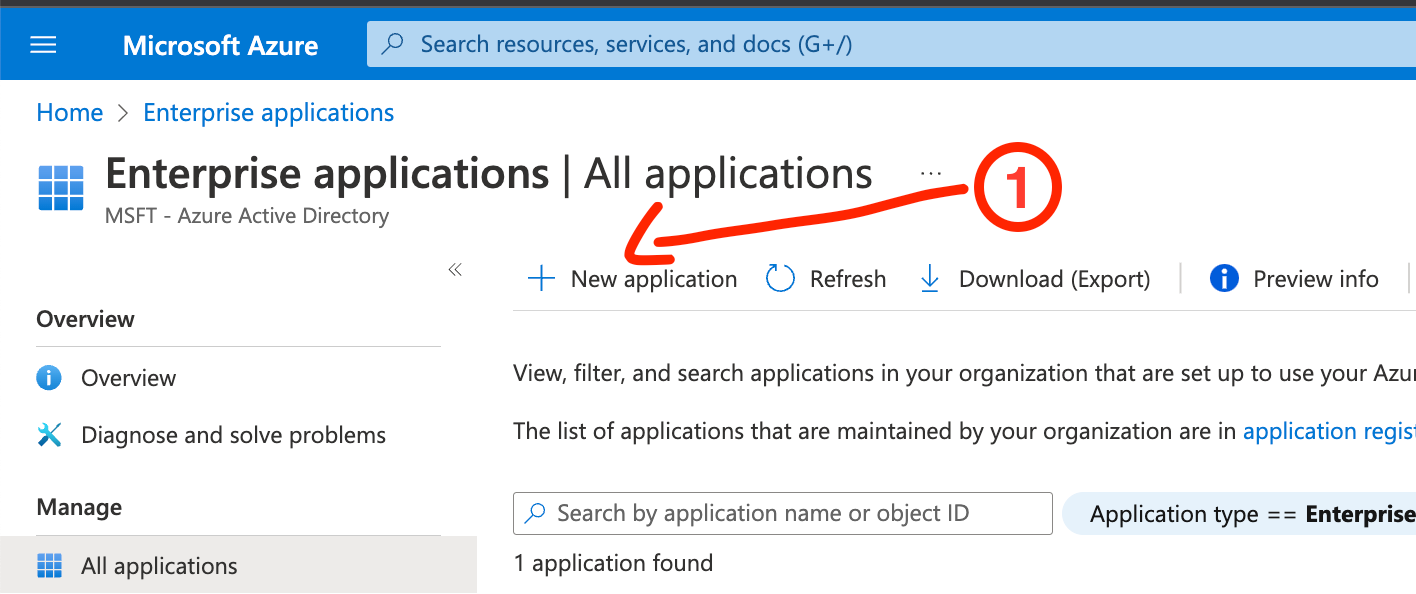
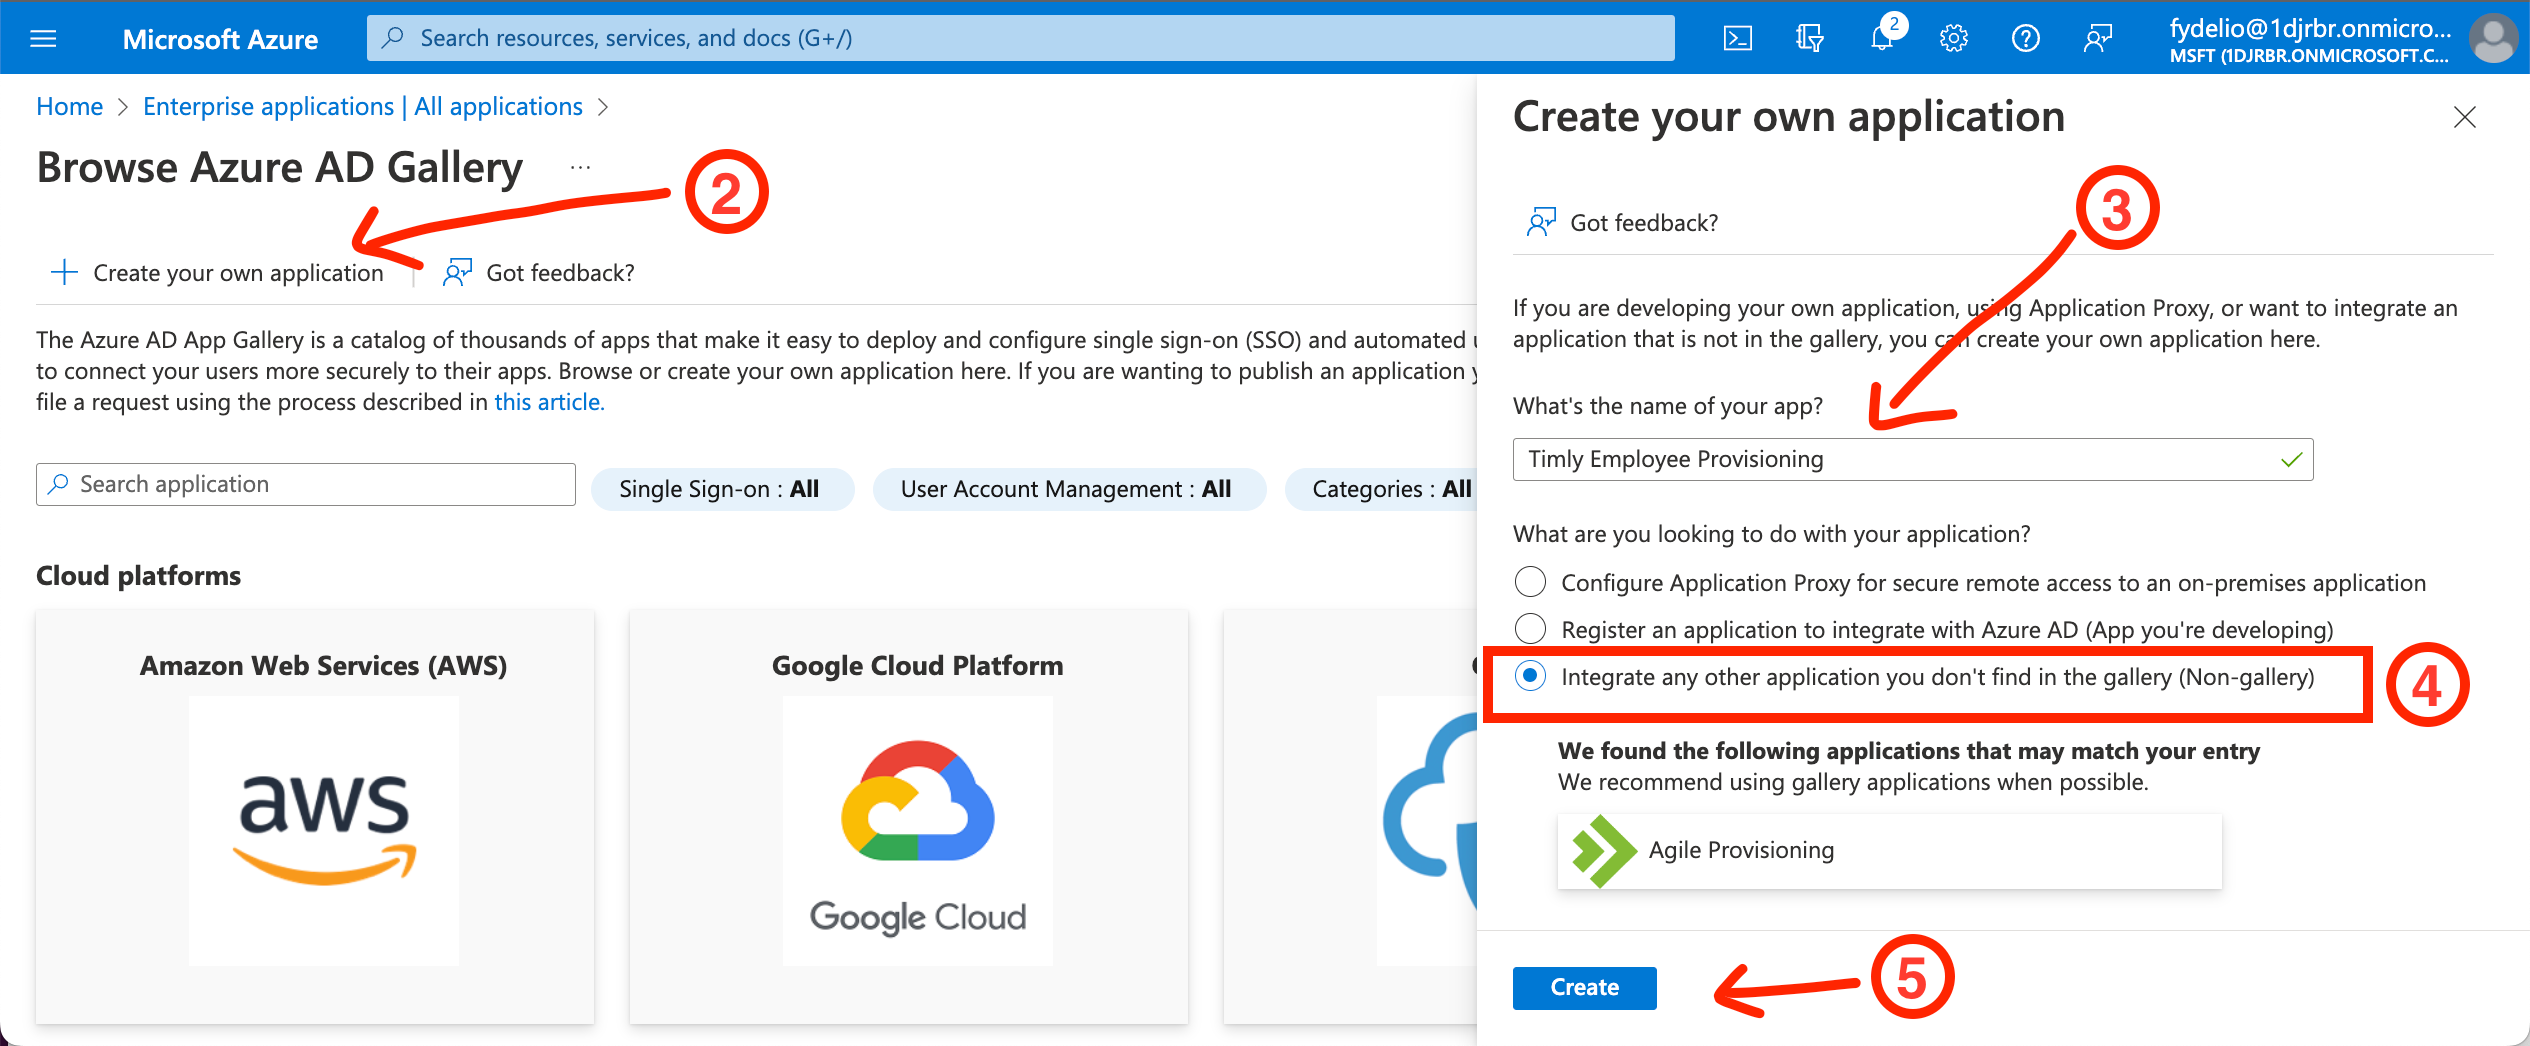
Create a new Enterprise Application (Ent.App).
- Click on “New Application”.
💡 You shouldn’t use the same Enterprise Application record as where you configured SSO - Click on “Create your own application”.
- Type in the name of the application.
💡 Recommended: “Timly Person Provisioning". Any other name works too. It’s just for you as a MS EntraID User to distinguish the app from other applications. - Radio button: Select the 3rd option.
- Click on "Create".
In this step you will create a 2nd enterprise application in Microsoft EntraID: - 1st Enterprise Application: SSO and User provisioning
- 2nd Enterprise Application: Person provisioning
→ Do not create a second SSO Entry in EntraID.
Step 4
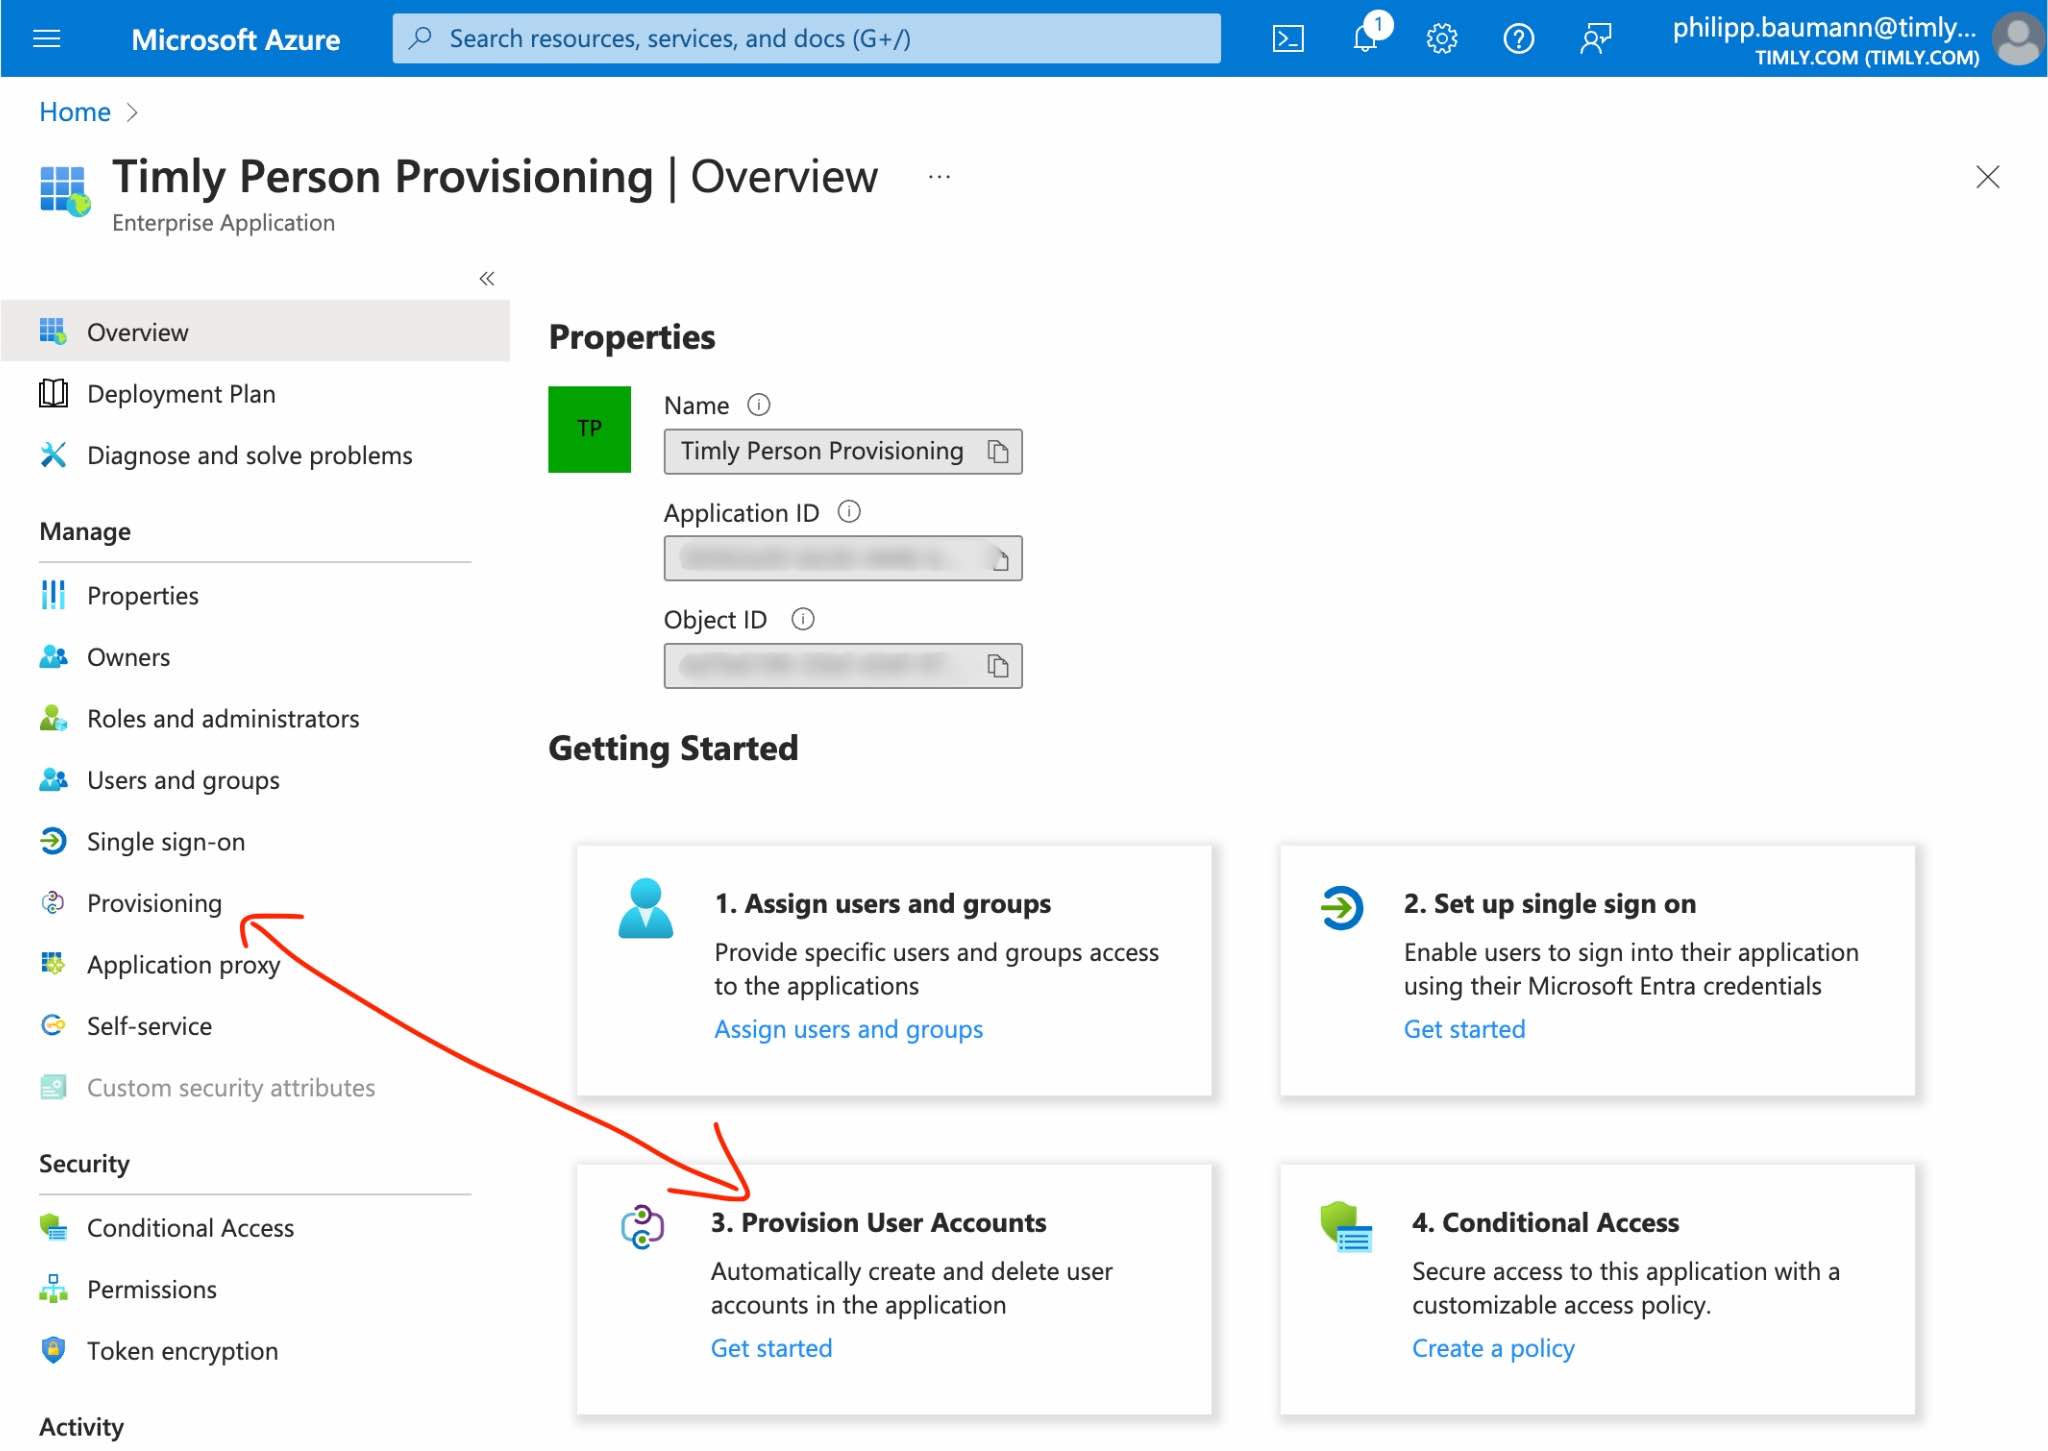
Navigate to Provisioning.
- Click either button.
Step 5
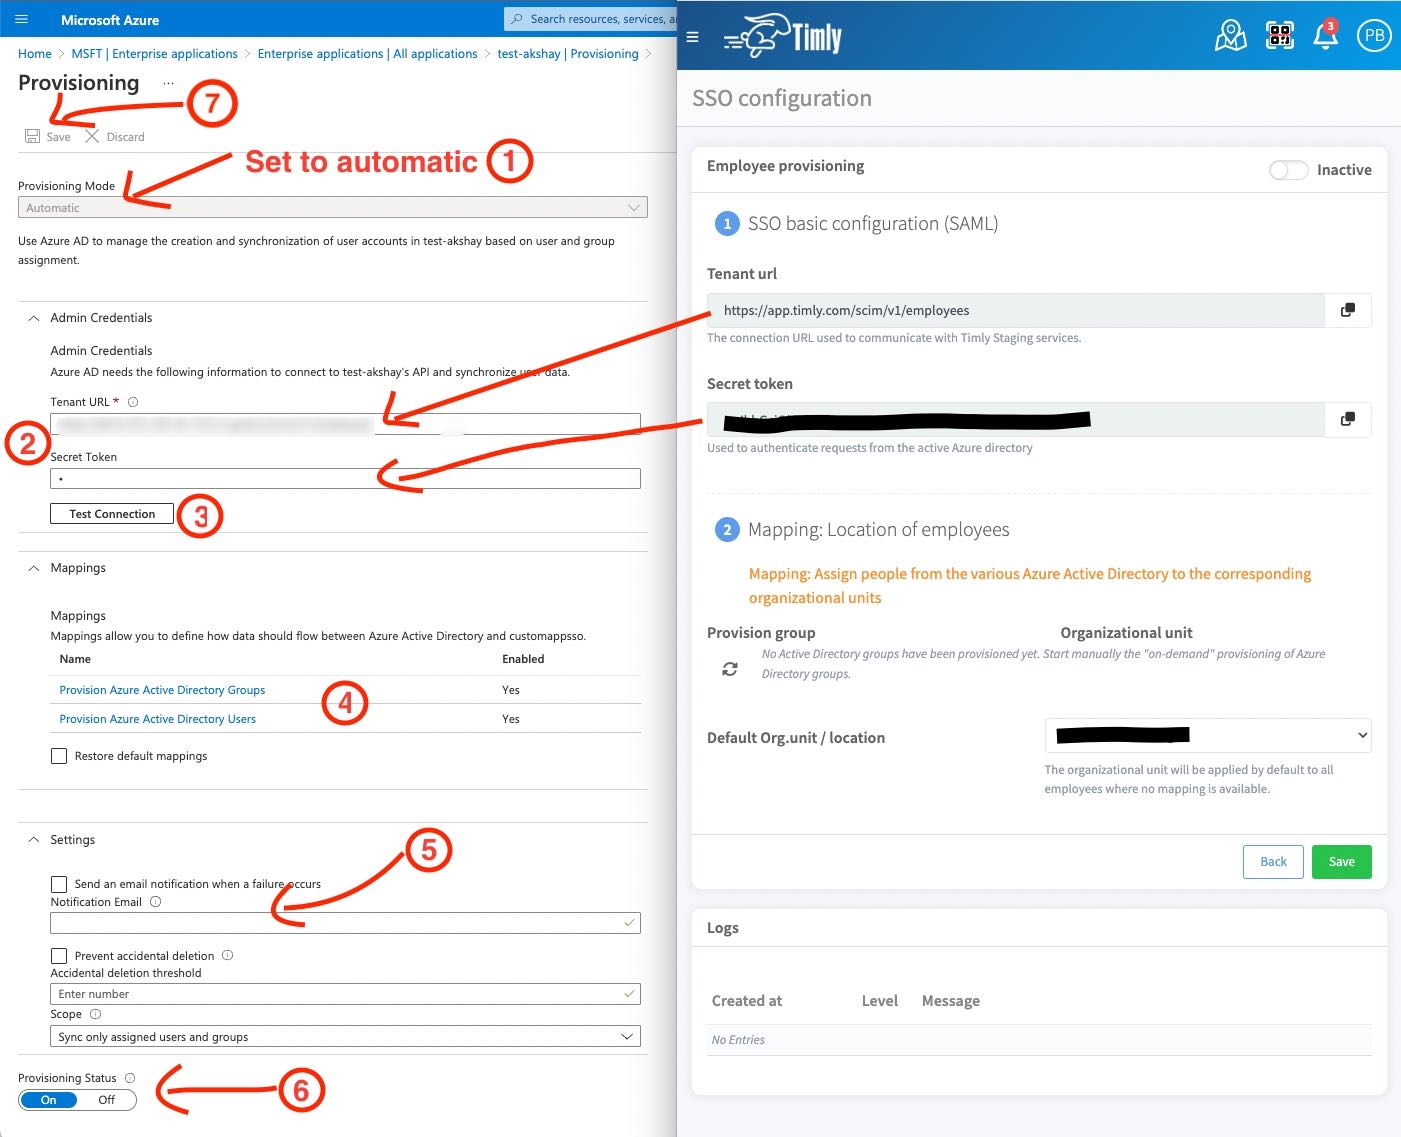
Configure Provisioning.
- Set Provisioning method from manual to automatic.
- Add credentials from the Timly application into the according fields.
- Test the connection if all of it works
💡 If it fails: Make sure you have activated Person Provisioning in Timly.
- Mappings → See STEPS 5 & 6
- Add an admin email: You will emails upon provisioning errors. That way you will be sure that all works.
- Activate provisioning.
- IMPORTANT!! Do not forget to save.
Step 6
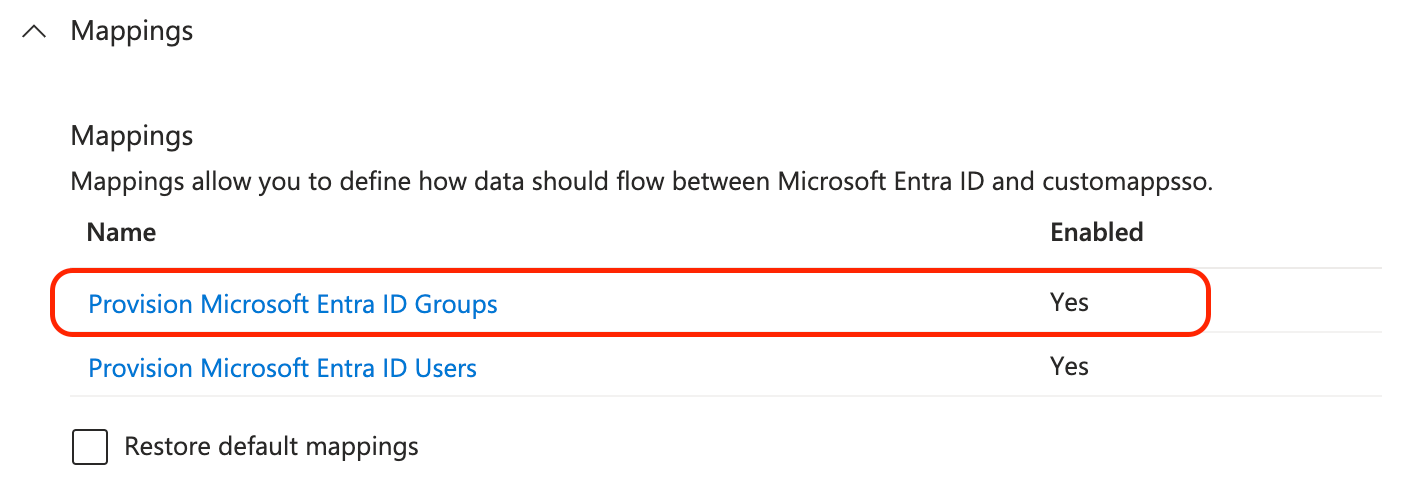
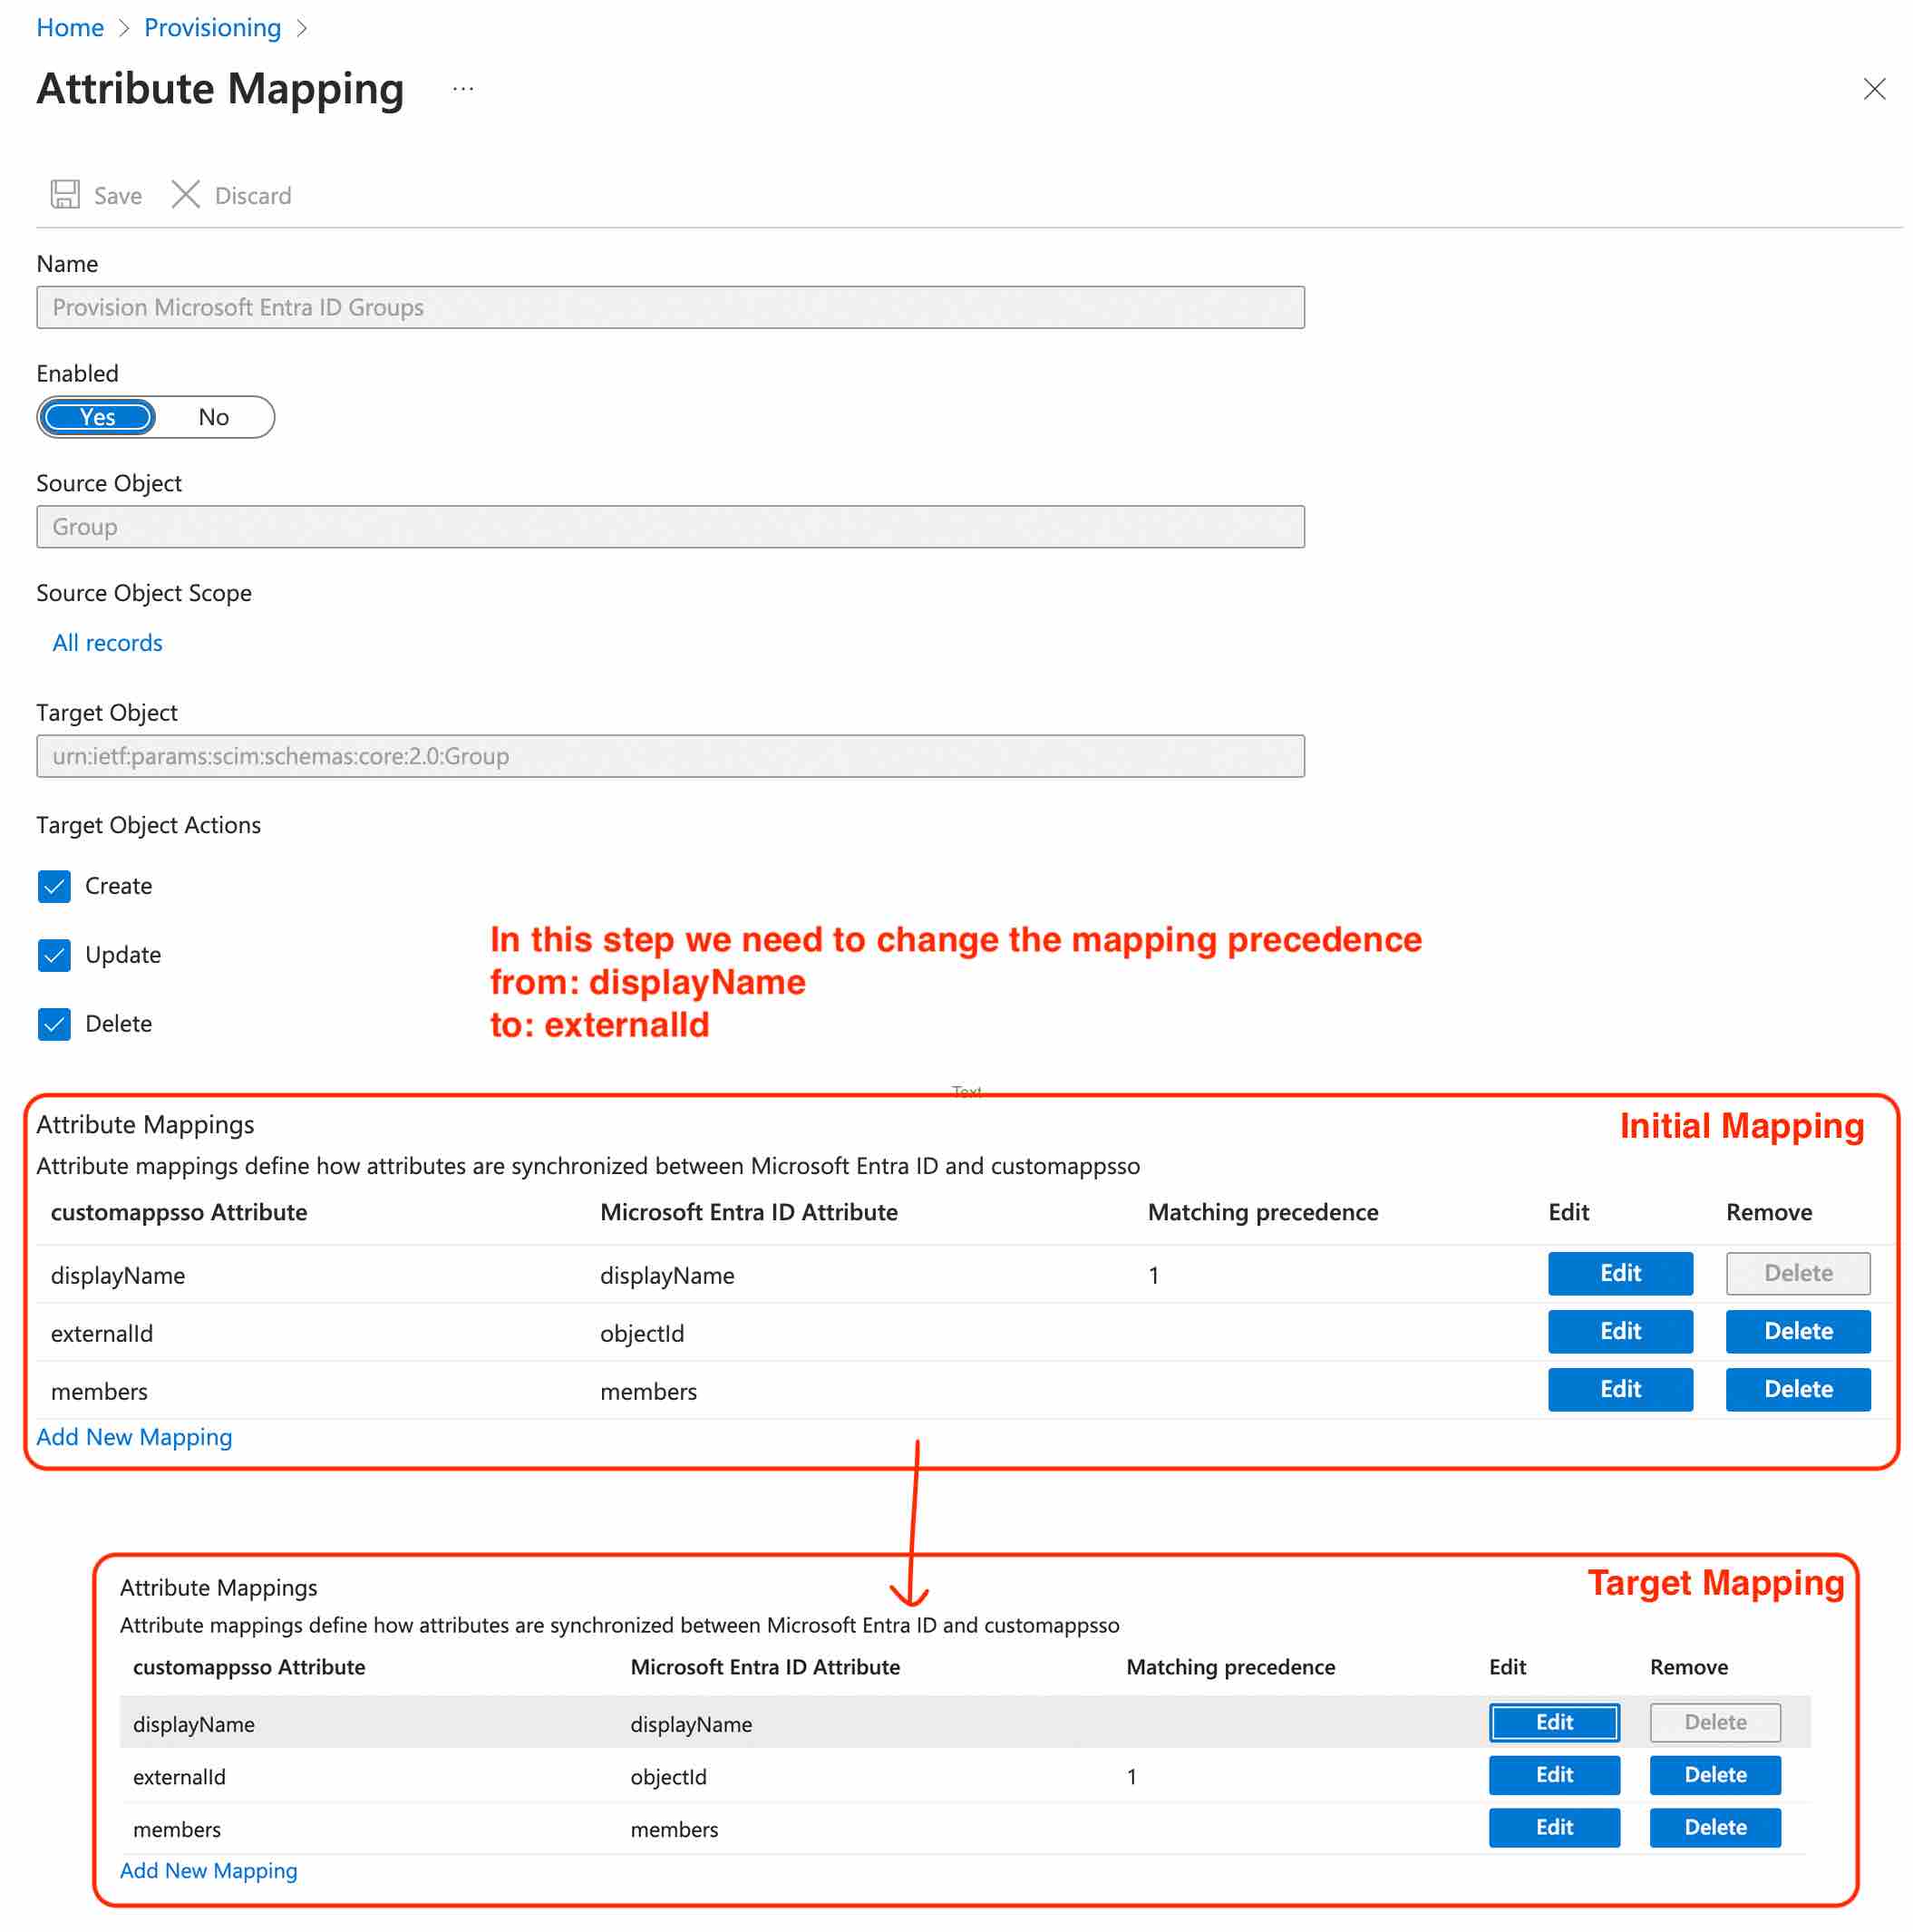
Set proper field mapping for AD User Provisioning.
(see previous step point no. 5):
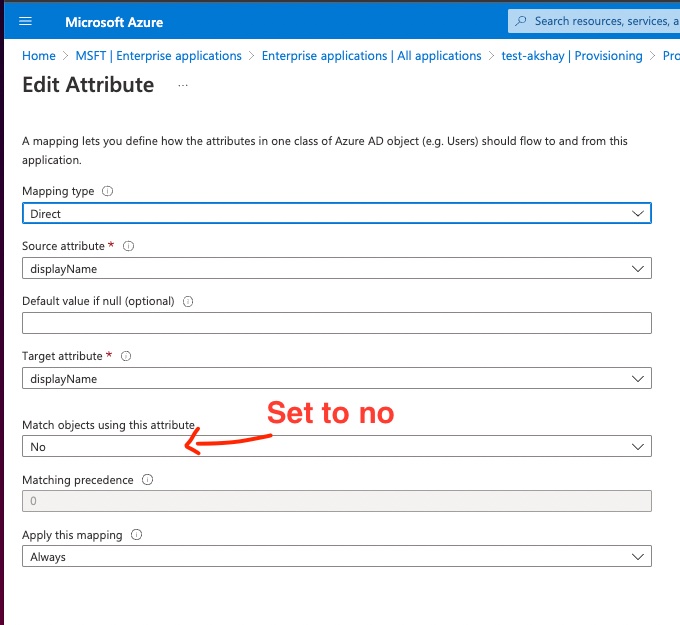
- Click on "Provision Microsoft Entra ID Groups Groups".
- Change the mapping precedence from "displayName" to "externalID".
Step 7
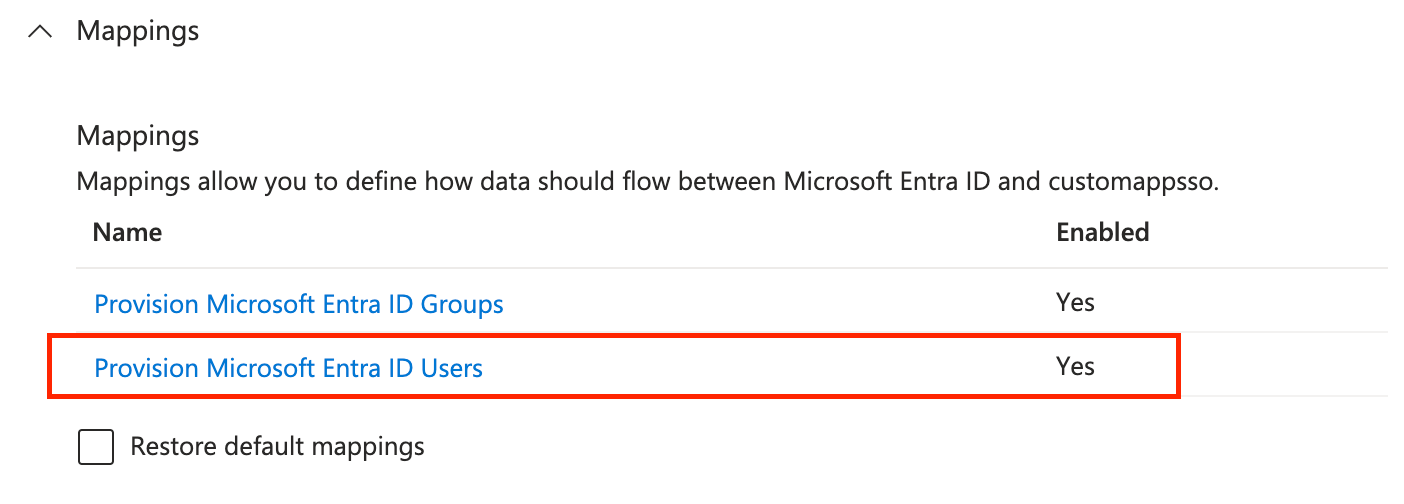
👆🏼 Initial setup
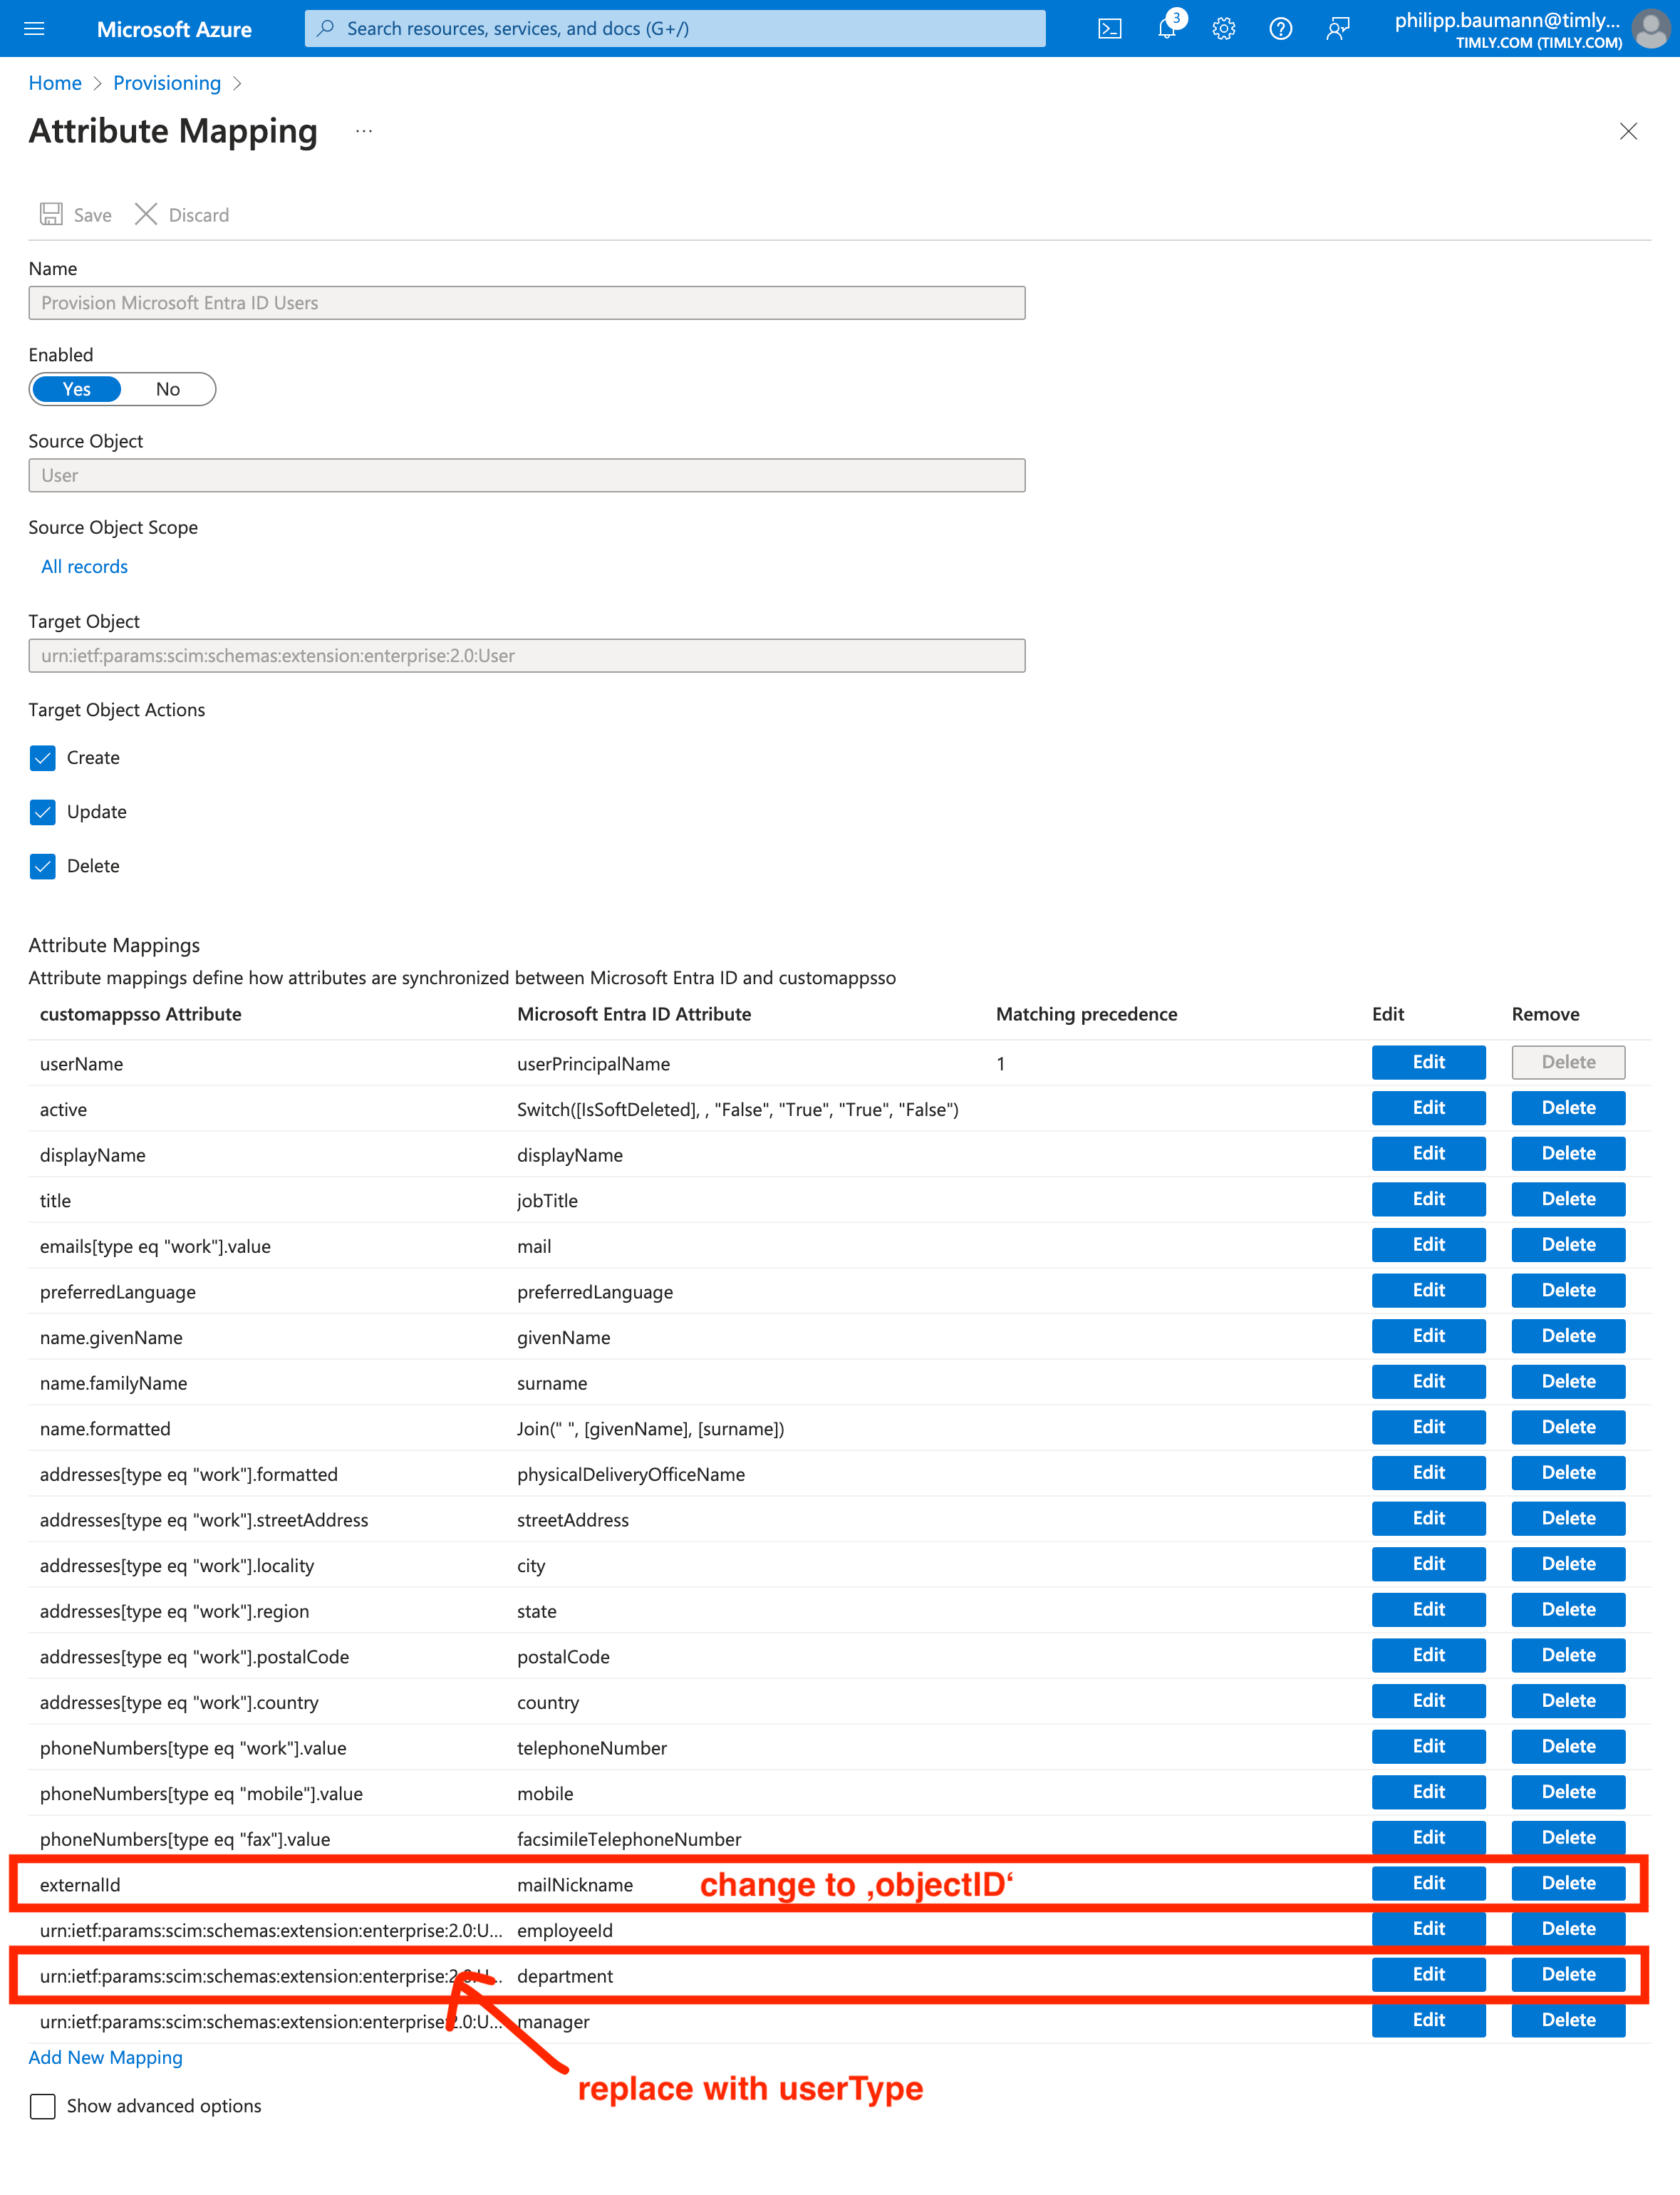
Set proper field mapping for EntraID User Provisioning.
(see previous step No. 6):
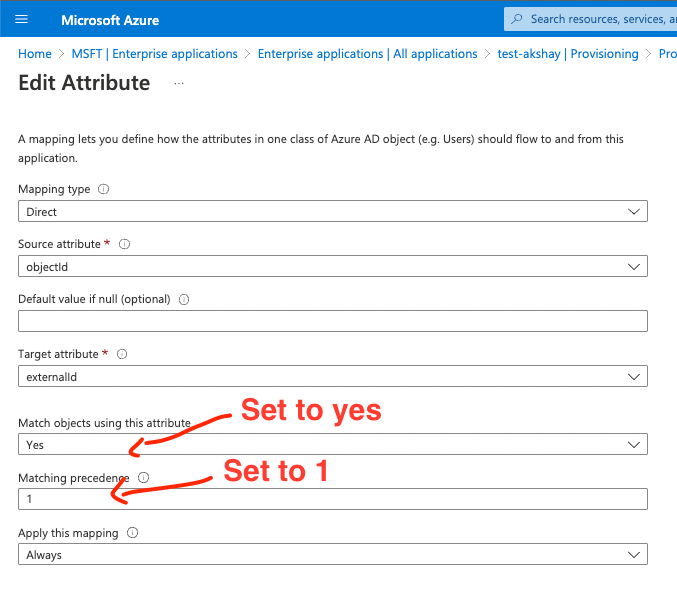
- Click on "Provision Microsoft Entra ID Users".
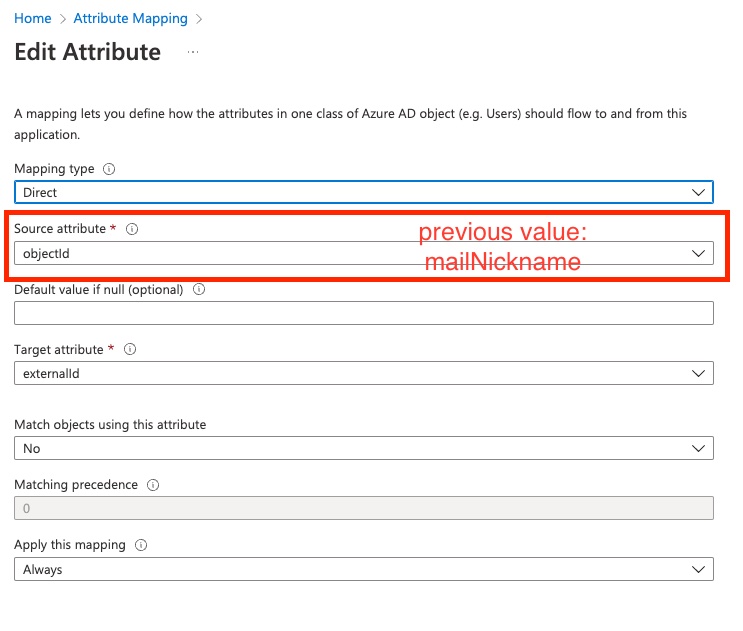
- Change "MailNickname" to "objectId".
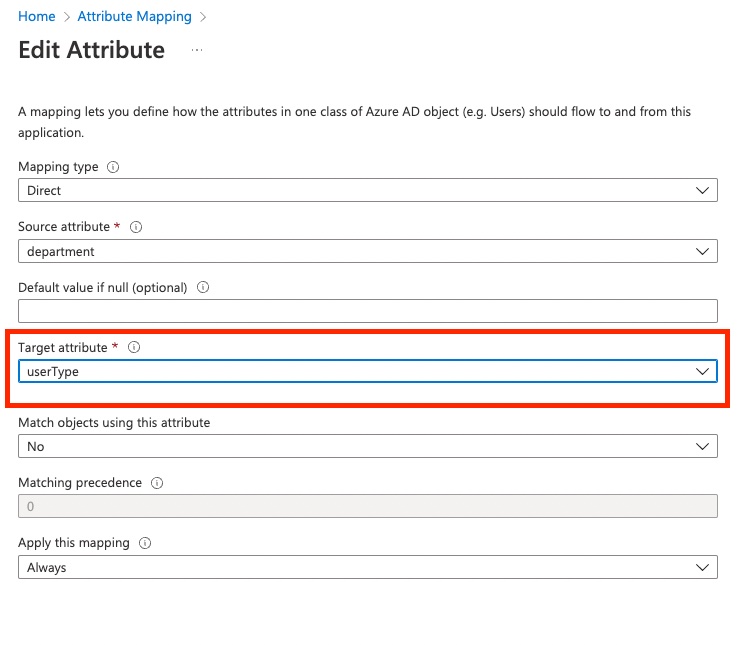
- Change department record "TargetAttribute" to "userType".
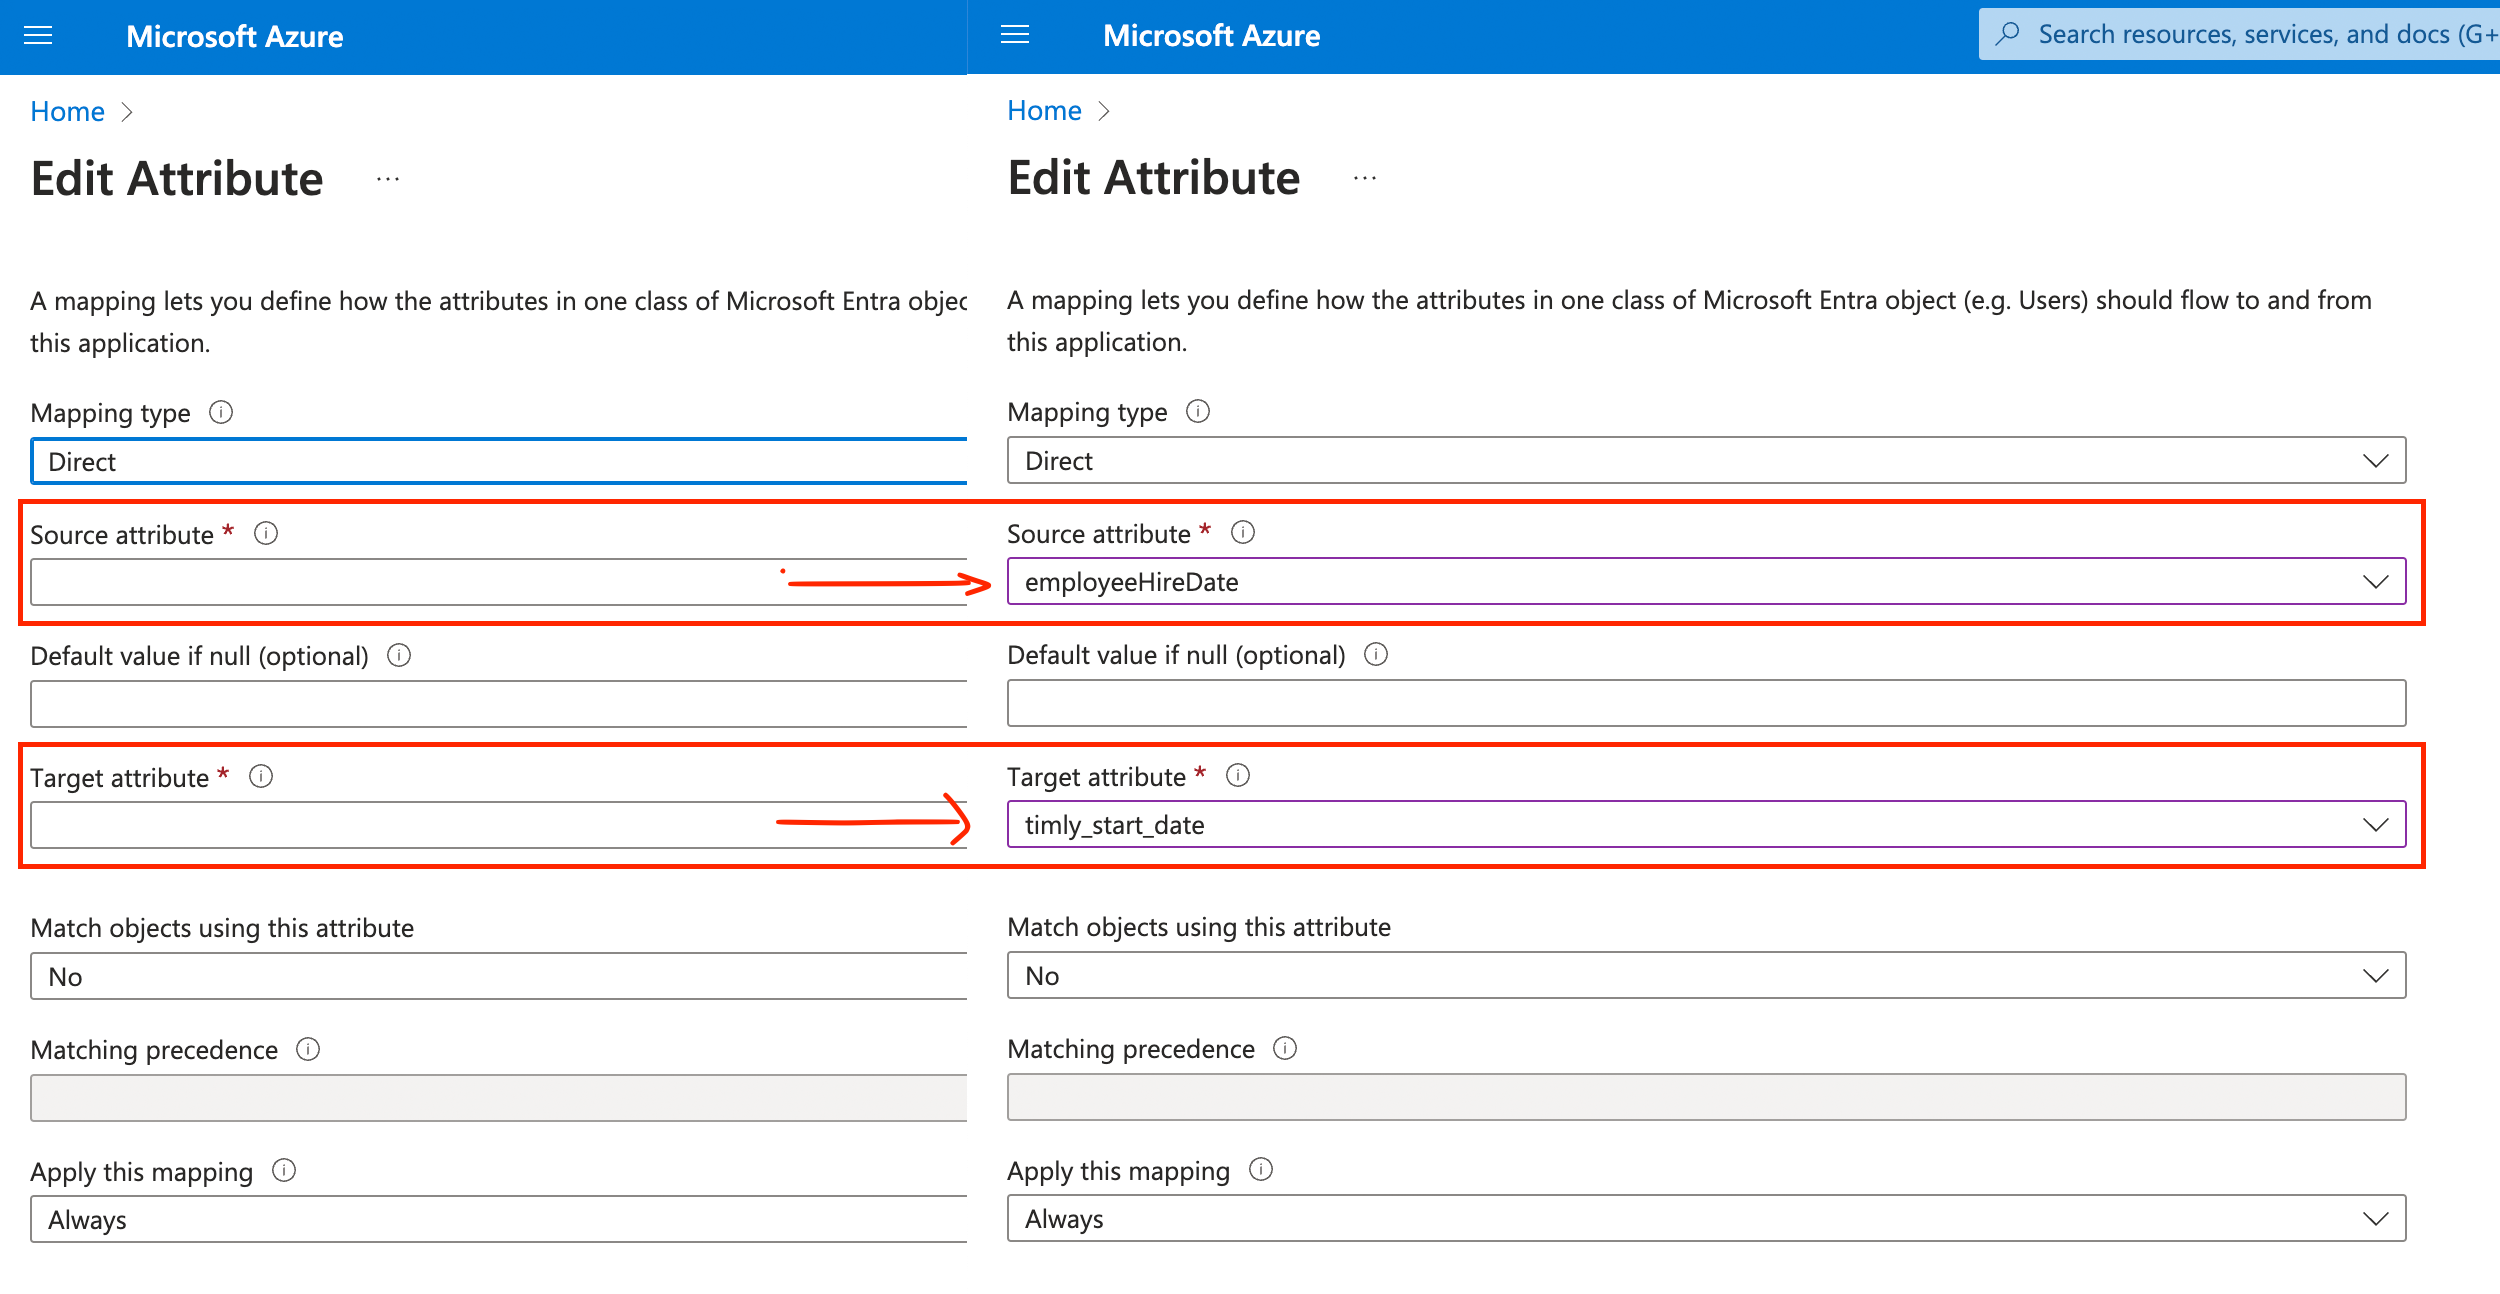
- Add "timly_start_date", "timly_last_date", "timly_manager",
"timly_pers_no" to be included in the synchronization process (optional) - Add any other attribute "start with timly_*" in the mapping list from "Edit attribute list for customappsso" and then map it with with the attributes using "add new mapping".
👆🏼 Mapping change: from "mailNickname" to "objectId"
👆🏼 Mapping change: Set "Target attribute" to "userType"
Optional
Configure additional fields for synchronizing between EntraID and Timly Person Profiles.
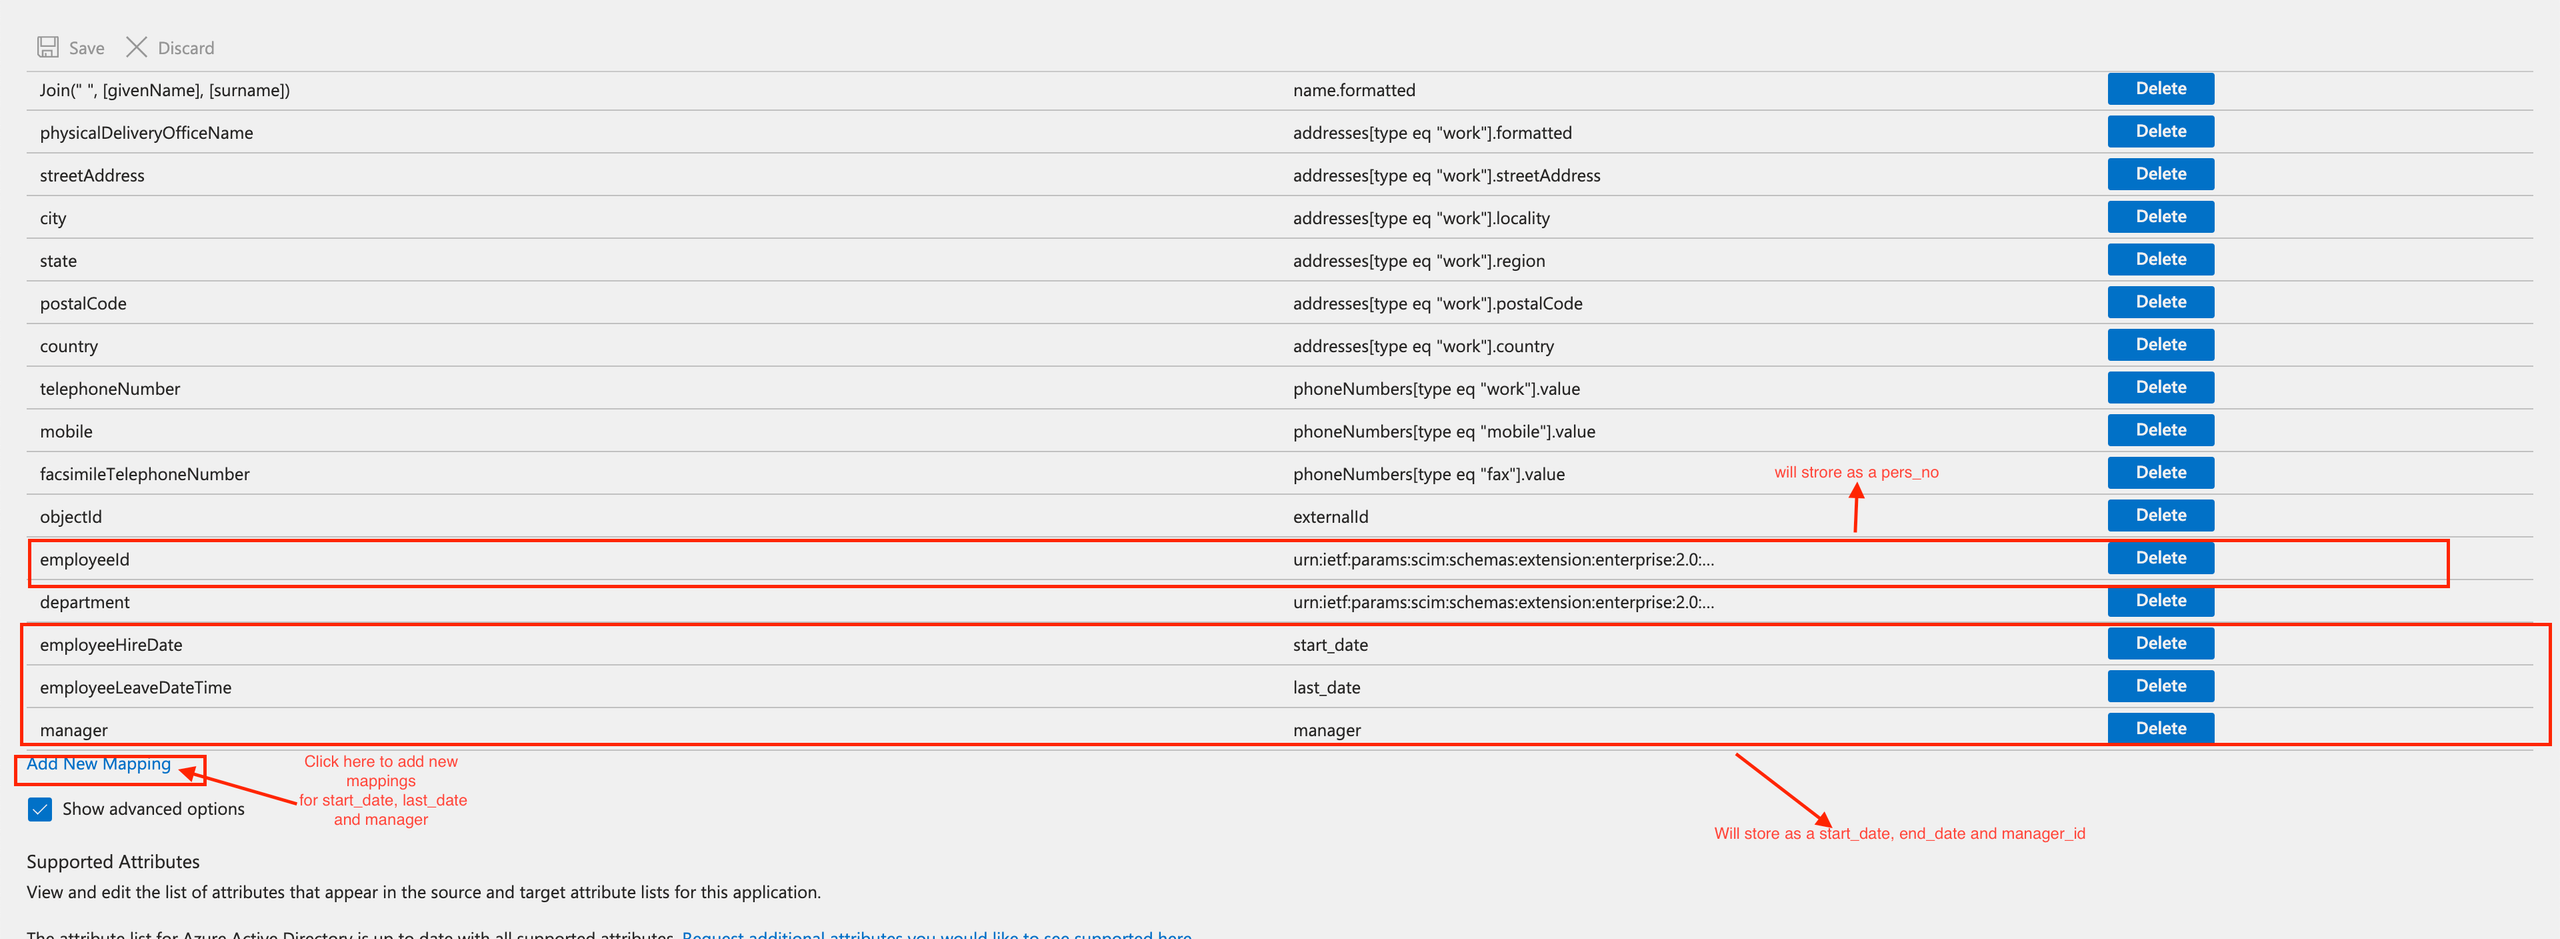
Follow this step if you want to also configure the "employeeHireDate" ("EntraID Field"), "employeeLeaveDateTime" ("EntraID Field") or the "Manager" ("EntraID Field") or any other field from EntraID to Timly.
- Click on “Show advances options”
- Click on “Edit attribute list for customappsso”
- Typically the following attributes are added
a. "timly_start_date"
b. "timly_last_date"
c. "timly_manager" (must be set as "String" and not "Reference") - You can add additional attributes using the same style: timly_#attribute_name_as_called_in_timly
- Add the mapping
👆 Create the new attributes

👆 "start_date", "last_date" and "manager" need to be of data type "String". E.g. if "manager" is set to reference, the wrong values will be submitted.
Add the new attributes to the attributes list, that are synchronized.
Step 8

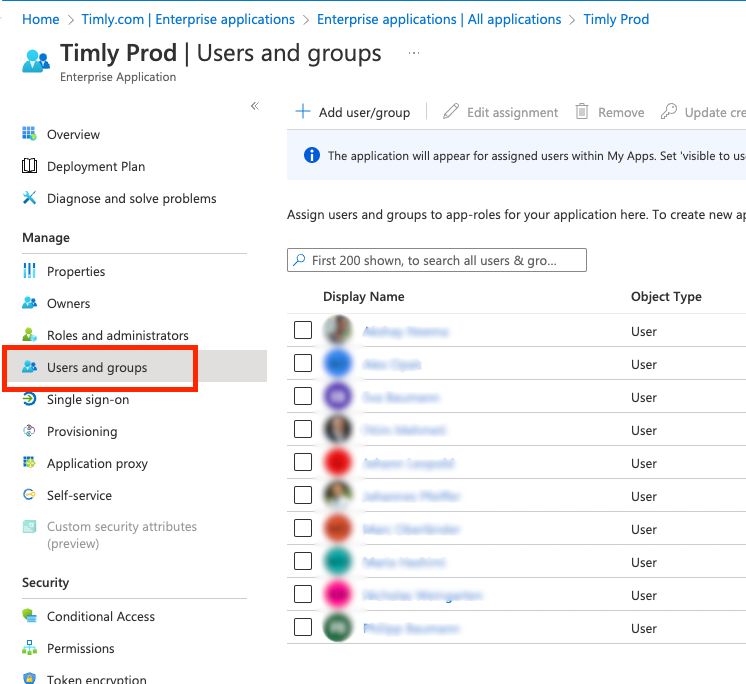
IMPORTANT! You can only provision users, which you have selected under “Users and groups”.
Start Provisioning.
- Click on "Start Provisioning".
- Click on "Provision on demand" to provision some users (optional - just to test if it works).
🛜 Timly-App
Set the proper Person mapping to Timly Locations.
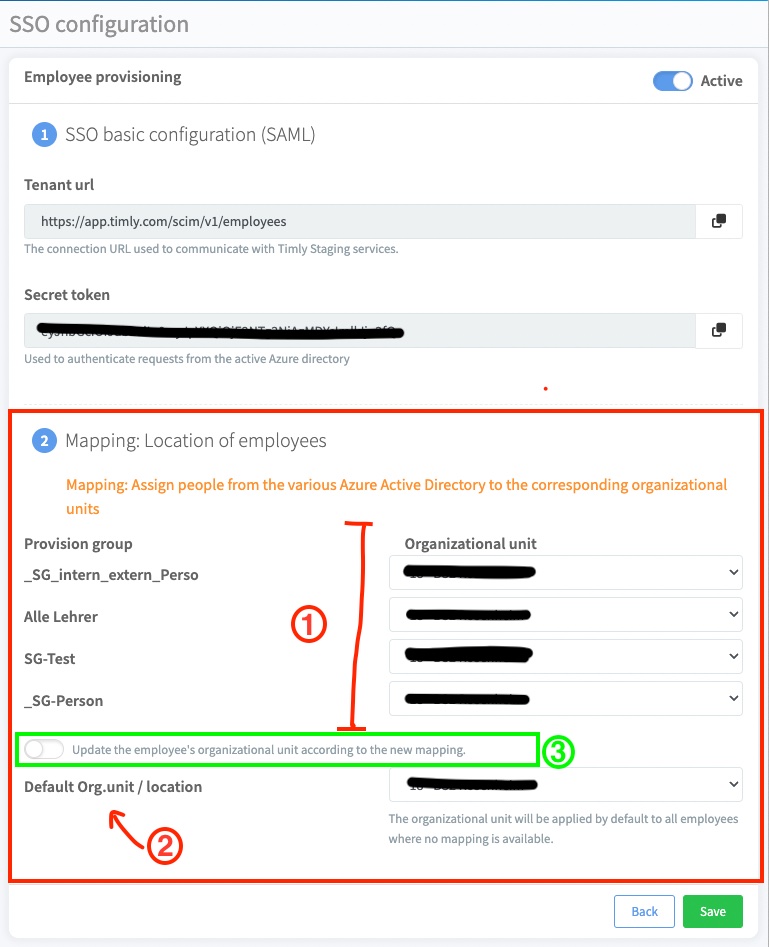
In Timly, all Persons have to be mapped to an organizational unit / location, which is not necessarily given directly from the AD. To ensure a proper mapping, in your AD you can set individual groups for each organization unit. Set the mappings:
- Set the appropriate mappings from your EntraID AD Groups to your locations.
- If a user in the AD is assigned directly (and not within a group), or you haven’t set a mapping for a specific group, then the mapping for “Default Org.unit” is applied.
- Should already some users have been provisioned and incorrect mapping settings were saved, you can trigger a remapping for changed mapping settings.
IMPORTANT! Unfortunately, Microsoft doesn’t give you the option of manually provisioning AD Groups. Therefore, you have to wait up to 45 minutes until they have synchronized.
📚 Weitere Ressourcen
- Helpcenter: F.1 - How to configure SSO
- Helpcenter: F.2 - How to configure user provisioning
📩 Interessiert daran, mehr über unsere SSO-Funktion zu erfahren? Vereinbaren Sie eine kostenlose und unverbindliche Demo mit einem unserer Experten. Bei Fragen können Sie sich gerne an [email protected] wenden.

