
2023-02 | Custom Roles
Enhance Data Security with Granular User Permissions
📲 What's New?
Timly now offers enhanced flexibility in managing access to the information about your assets and personnel stored within the system. You can customize user permissions to fit individual needs, limiting access to specific locations and categories of inventory. For managing access across groups of users, the role management feature enables you to create and apply detailed access permission templates to multiple users.
🎯 Key Benefits
- Optimize Data Access: Ensure employees have access only to essential records for their daily tasks.
- Safeguard Against Data Mishaps: Limit permissions on shared records to prevent unintended misuse and alterations.
- Consolidate Data Security: Establish clear roles and specify corresponding access privileges.
💡 Why Is This Important?
As you store more and more information in Timly, you amass a wealth of data, ranging from employee records to how effectively your company's equipment is deployed and functioning. Not all your employees benefit from access to all this information. Large datasets can muddy searches and increase the chance of mix-ups. Additionally, the broader the access to sensitive data, the greater the risk of its misuse, intentional or not.
Granting unnecessary permissions, like allowing editing when only viewing is needed, heightens the risk of accidental misuse. With Timly's flexible permissions settings, you can make sure your employees only access data they need. In other words, you can define each user's access levels to shared resources as needed for them to carry out their tasks and responsibilities.
⚙️ How Does It Work?
Limiting Individual User Access
- Log in as an administrator and navigate to the main menu in the top right corner.
- Scroll down to "User management".
- Choose the user whose permissions you want to restrict.
- Under "Limit access to specific organisational units / locations," pick the desired locations from the drop-down list.
- Under "Limit access to specific root categories," select the required category from the drop-down list.
Setting Up User Roles
- Log in as an administrator and navigate to the main menu in the top right corner.
- Scroll down to "User management."
- Select the "Role Management" tab.
- Choose "New user role" to create a role. Tip: Name it according to the job function, such as "Inventory" or "HR & Training".
- Use the option to copy permissions from existing roles like "User", "Advanced User", or "Power User."
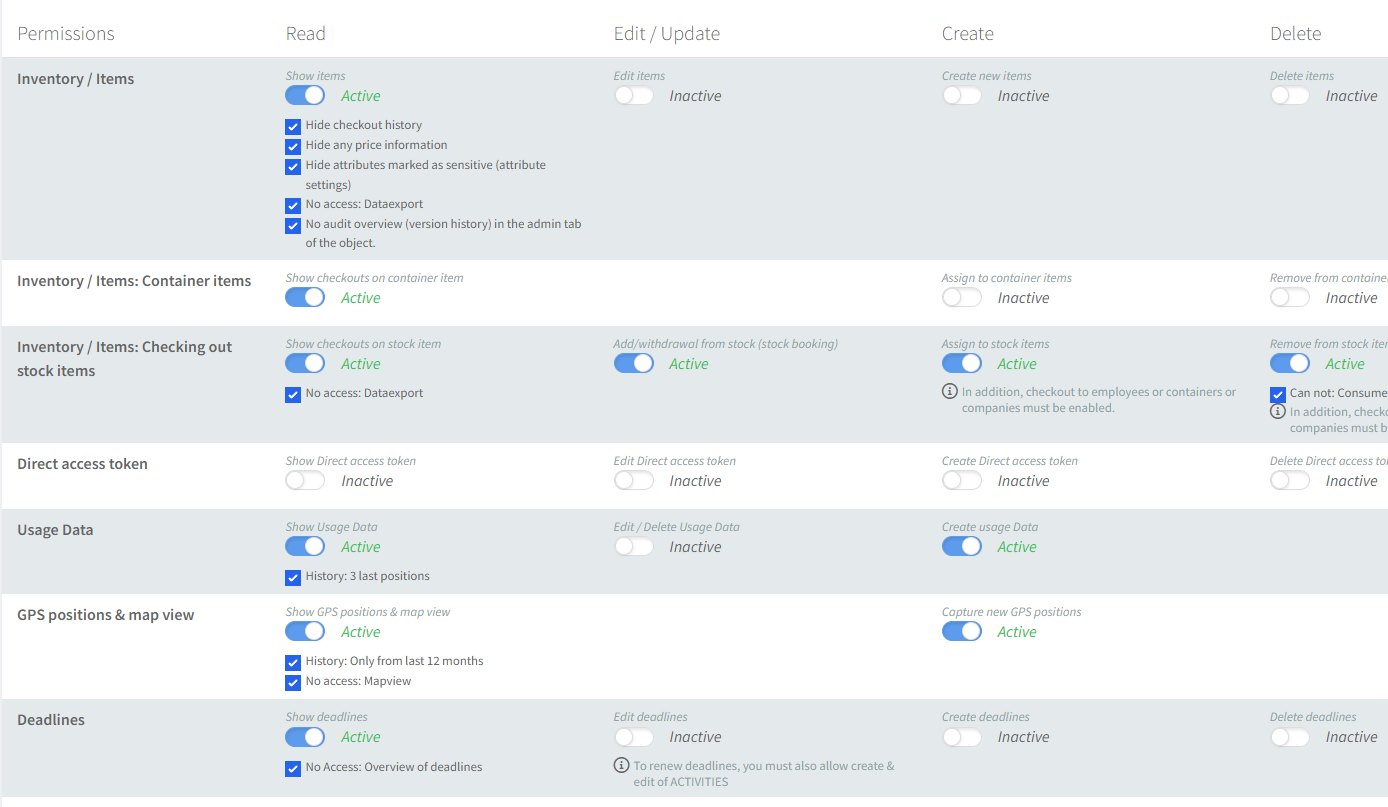
- This will open the permissions window, allowing you to fine-tune the new role's permissions. This includes not only Read, Edit, Create, and Delete permissions but also specific permissions for checkout, stocktaking, scheduling, categories, and more.
- After clicking "Save", you will be able to assign the newly created user role to an individual.
📚 More Resources
- Find out more about how your data is kept secure with Timly
- Check out Help Center entry on managing your user permissions
- Keep your Timly account safe with Two-Factor Authentication
📩 If you still have any questions or want to speak to one of our experts about keeping your data safe, contact us now at [email protected]. Or if you're not a customer yet, book a free, no-obligation online demo.