
3.7 - CSV Importer: How can I import existing databases into Timly?
The Timly CSV Importer is a powerful tool designed to quickly and efficiently upload data from a CSV file in just a few clicks. It is particularly useful when importing large volumes of data, especially during the initial setup of your Timly account. The CSV Importer helps you save valuable time when setting up and managing your inventory.
In this article, you will find a detailed step-by-step guide, a practical example, a FAQ, and all the information you need to complete your import on your own.
⚙️ Steps
|Step 0: Navigate To The CSV Importer
Select the type of data you want to import and upload the corresponding file.
- To access the CSV Importer, click on "Settings," then "CSV Data Import."
Timly’s CSV Importer allows you to perform various types of imports. You can choose to import data in order to create or update the following:
- Items
- People
- Places
- Assignments and Return
- Organisational Units
- Tickets
Note:
The available import types in the CSV Importer depend on your contracted services with Timly.
💡 To perform your import, you can either use your own CSV file or download our pre-formatted CSV template.
Please note that each pre-formatted template is unique, as it includes:
- Timly’s default attributes (e.g. “item_id”, “item_name”, etc.)
- Your custom attributes
|Step 1: Select and Upload Data
Step 1 – Summary:
Download and upload your CSV file.
Step 1 – Guide:
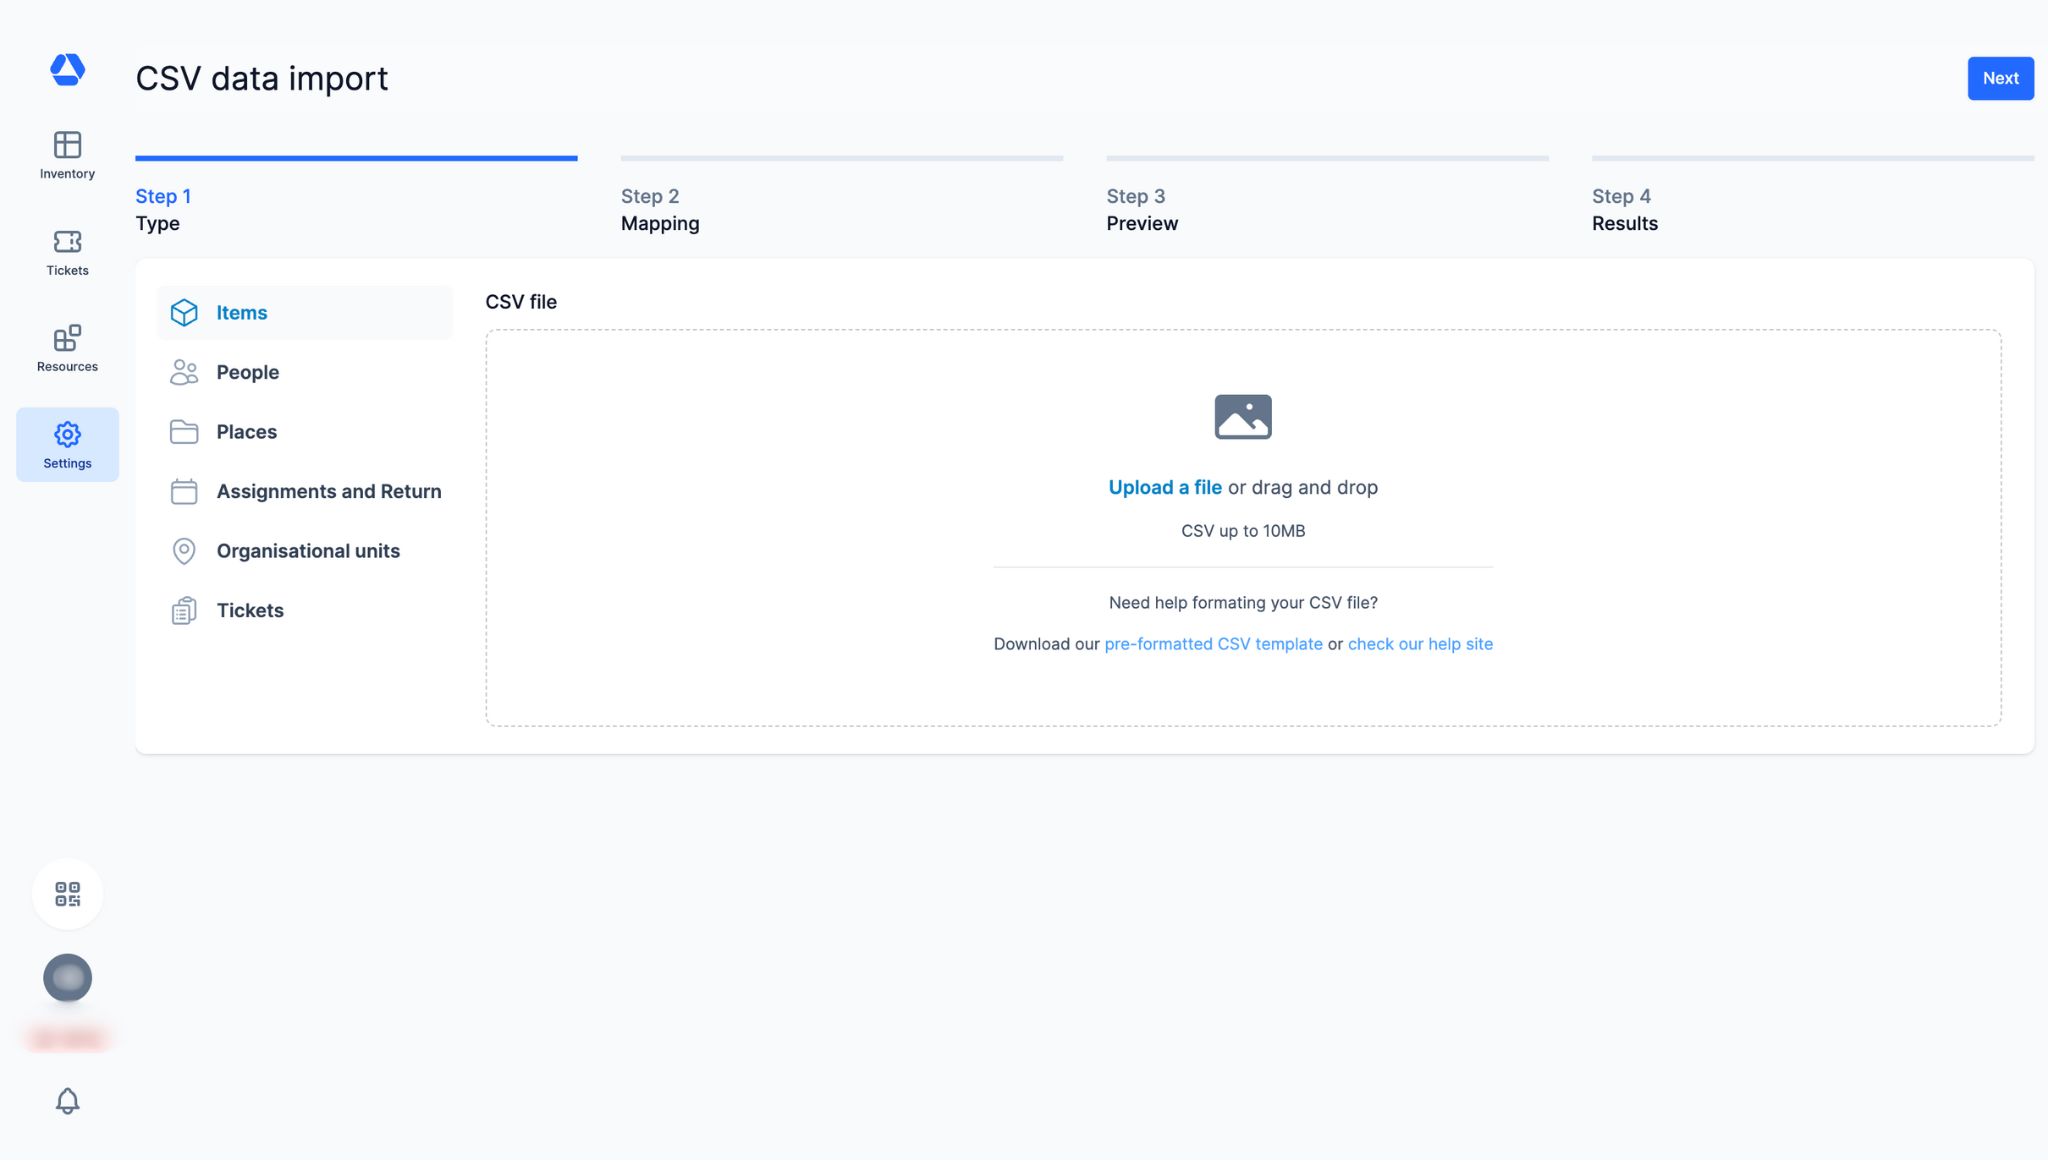
- Optional: Download a pre-formatted CSV template.
- Open your file in Excel.
- Fill in the relevant data.
- Save the file in UTF-8 format.
- Upload your file into Timly’s CSV Importer.
- Optional: To add an additional file, click "Upload another."
- Click "Next" to proceed.
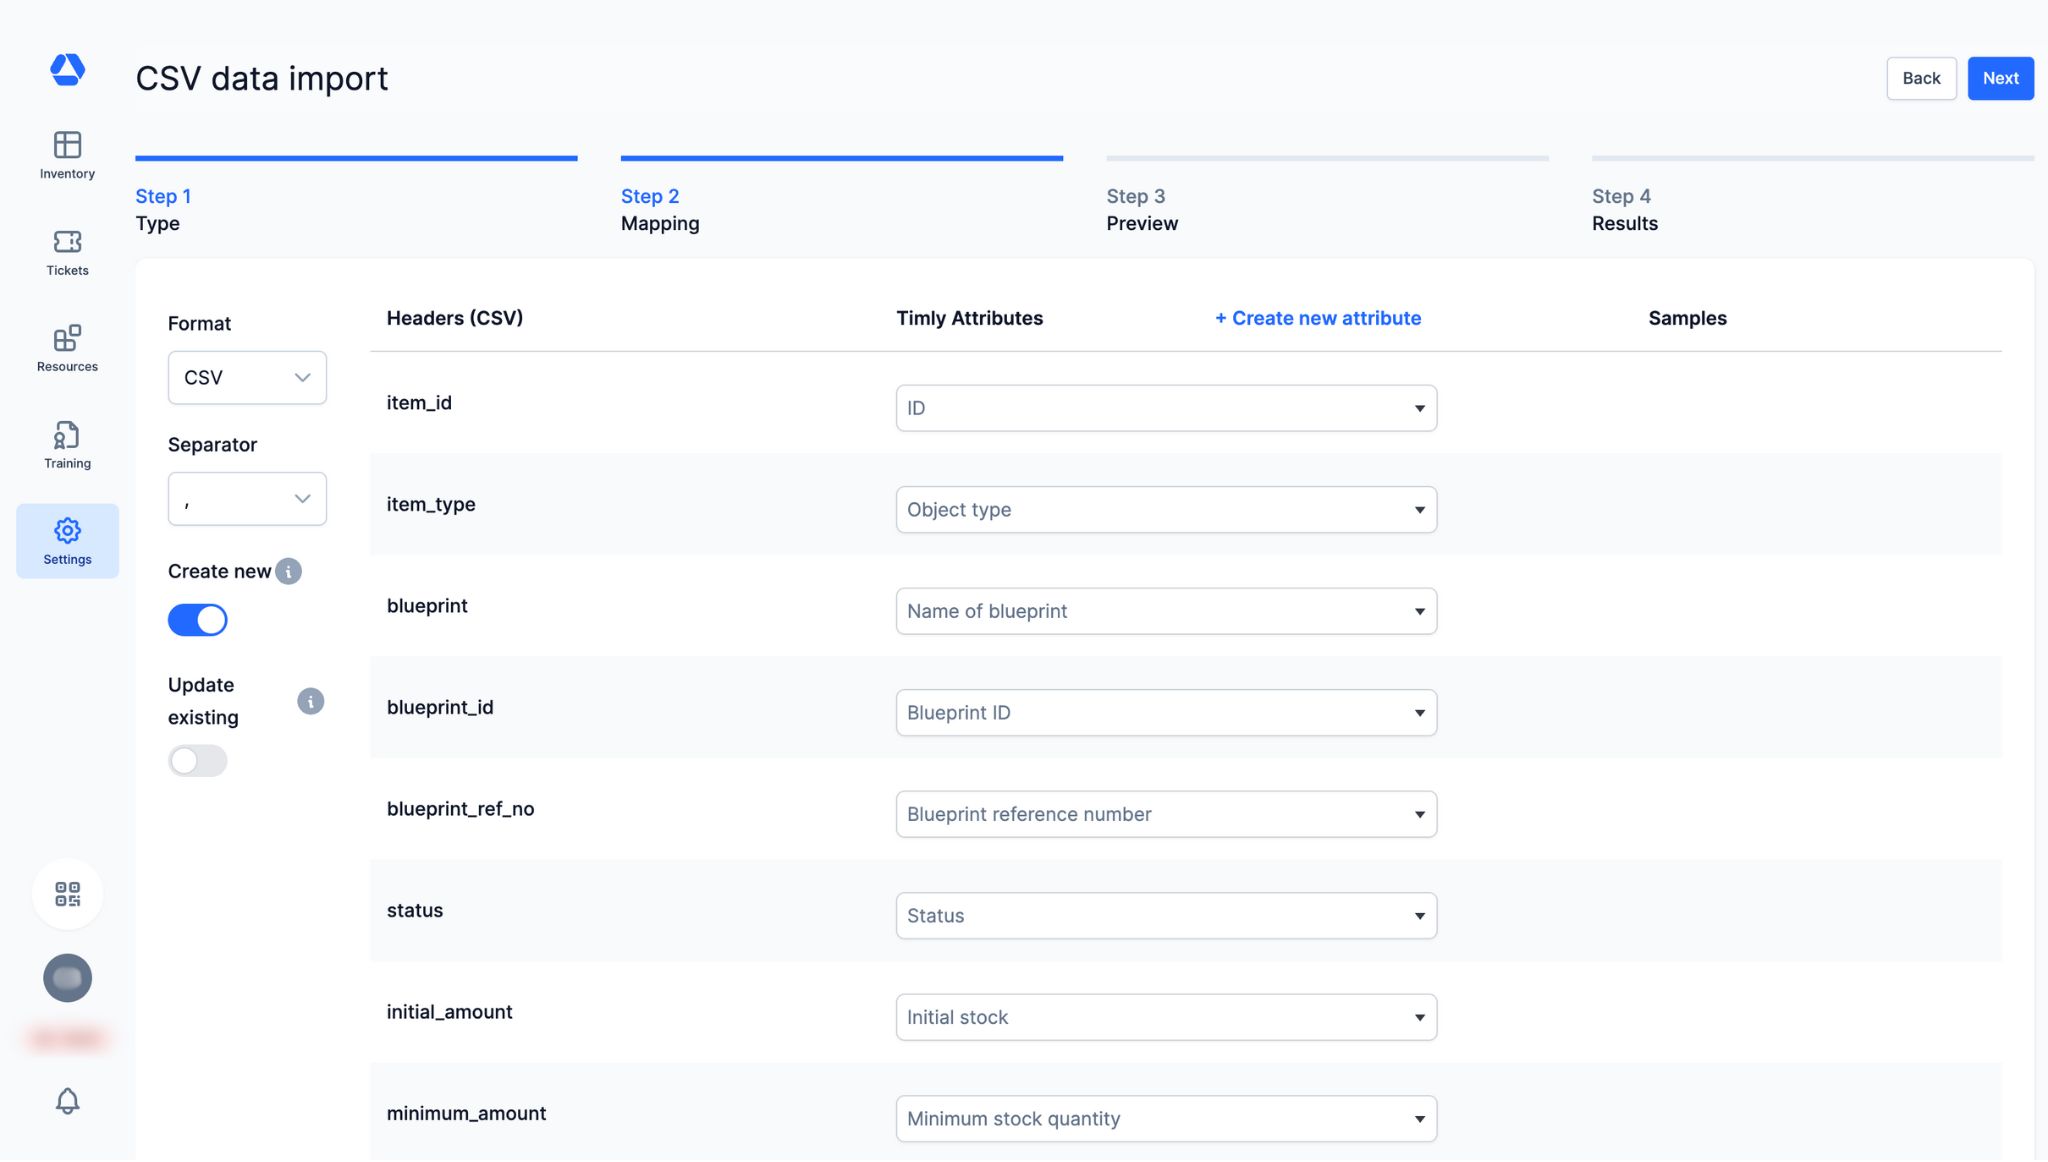
|Step 2: Mapping
Step 2 – Summary:
Map your data.
Step 2 – Guide:
-
Mapping Columns
All column headers from your file are listed under "Headers (CSV)." Next to each header, you'll see a "Timly Attributes" column, where you can define how each column maps to the corresponding attribute in Timly.
- Automatic Mapping:
If you use the provided template, mapping will be done automatically based on the default names. However, it is necessary to explicitly pair each column in your CSV.
- Excluding Columns:
If you do not wish to import a specific column, you can either delete it from your CSV or select the option “Do not import.”
- Sample Data:
Under the "Samples" column, you can view the first three rows of each column to get an overview of the data present in that column.
- Additional Options:
- Toggles to choose whether to create, update, or perform both actions.
- An advanced option to select the type of separator used in your file (default is “;”).
- An option to create new attributes: By clicking on “+ Create new attributes,” you can add new attributes that will be incorporated into the system. For instance, if you create an attribute called “Brand,” it will be added to all relevant categories during import.
|Step 3: Preview
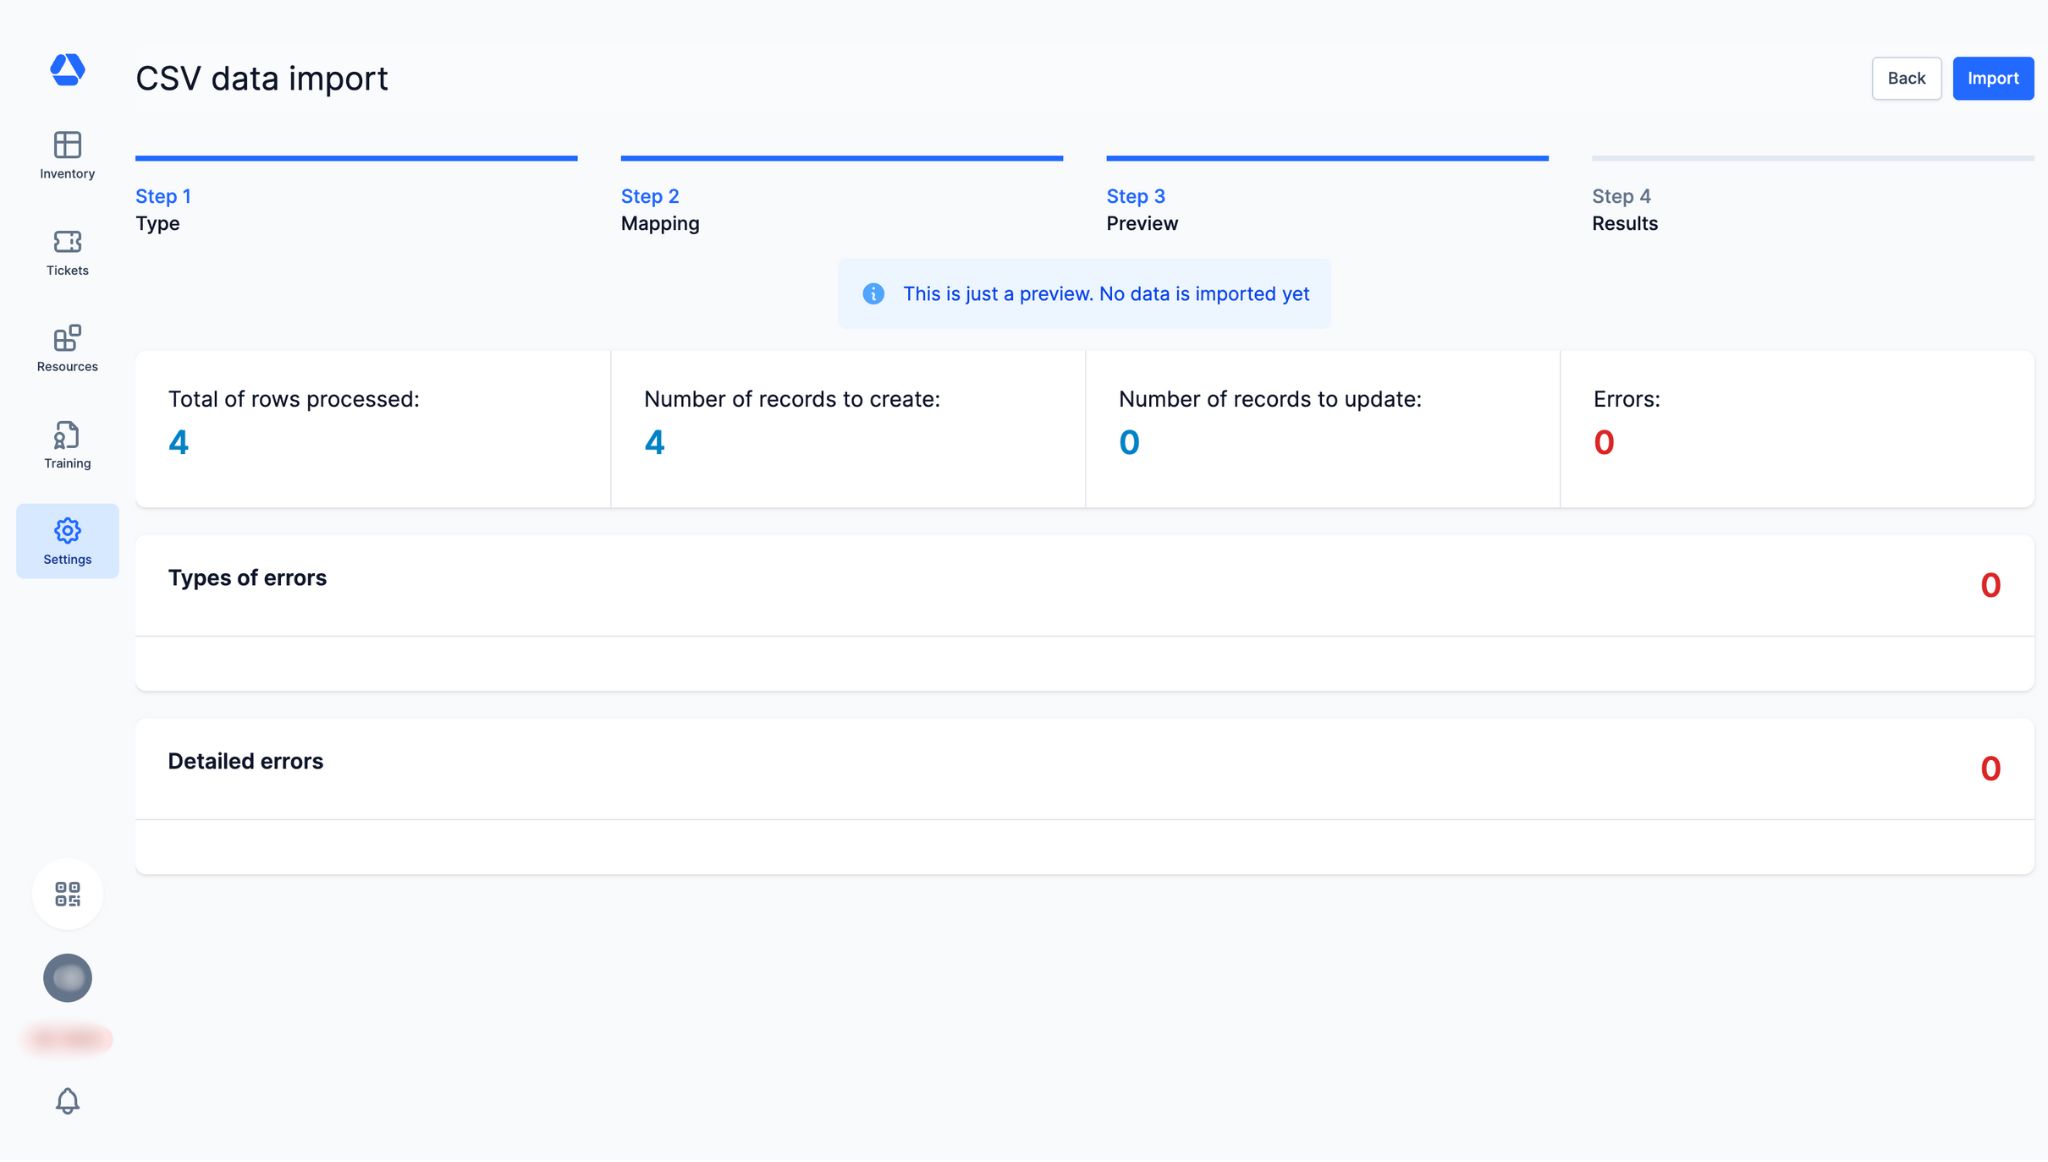
Step 3 – Summary:
Get a preview of your import and identify any errors that need to be corrected.
Step 3 – Guide:
- Overview of Outcomes
At this stage, you will see a summary that includes:
The number of rows processed from your file
The number of records that will be created and/or updated once the import is completed
The number of errors detected, if your file contains blocking issues
- Error Details
Below the summary, detailed error messages will be displayed — including the type of error and the specific rows concerned — allowing you to correct them before proceeding with the import. You can go back to steps 1 or 2 to correct any errors. Records will only be created or updated once you click the “Import” button. This action is irreversible and cannot be undone — a confirmation prompt will be displayed before proceeding.
|Step 4: Results
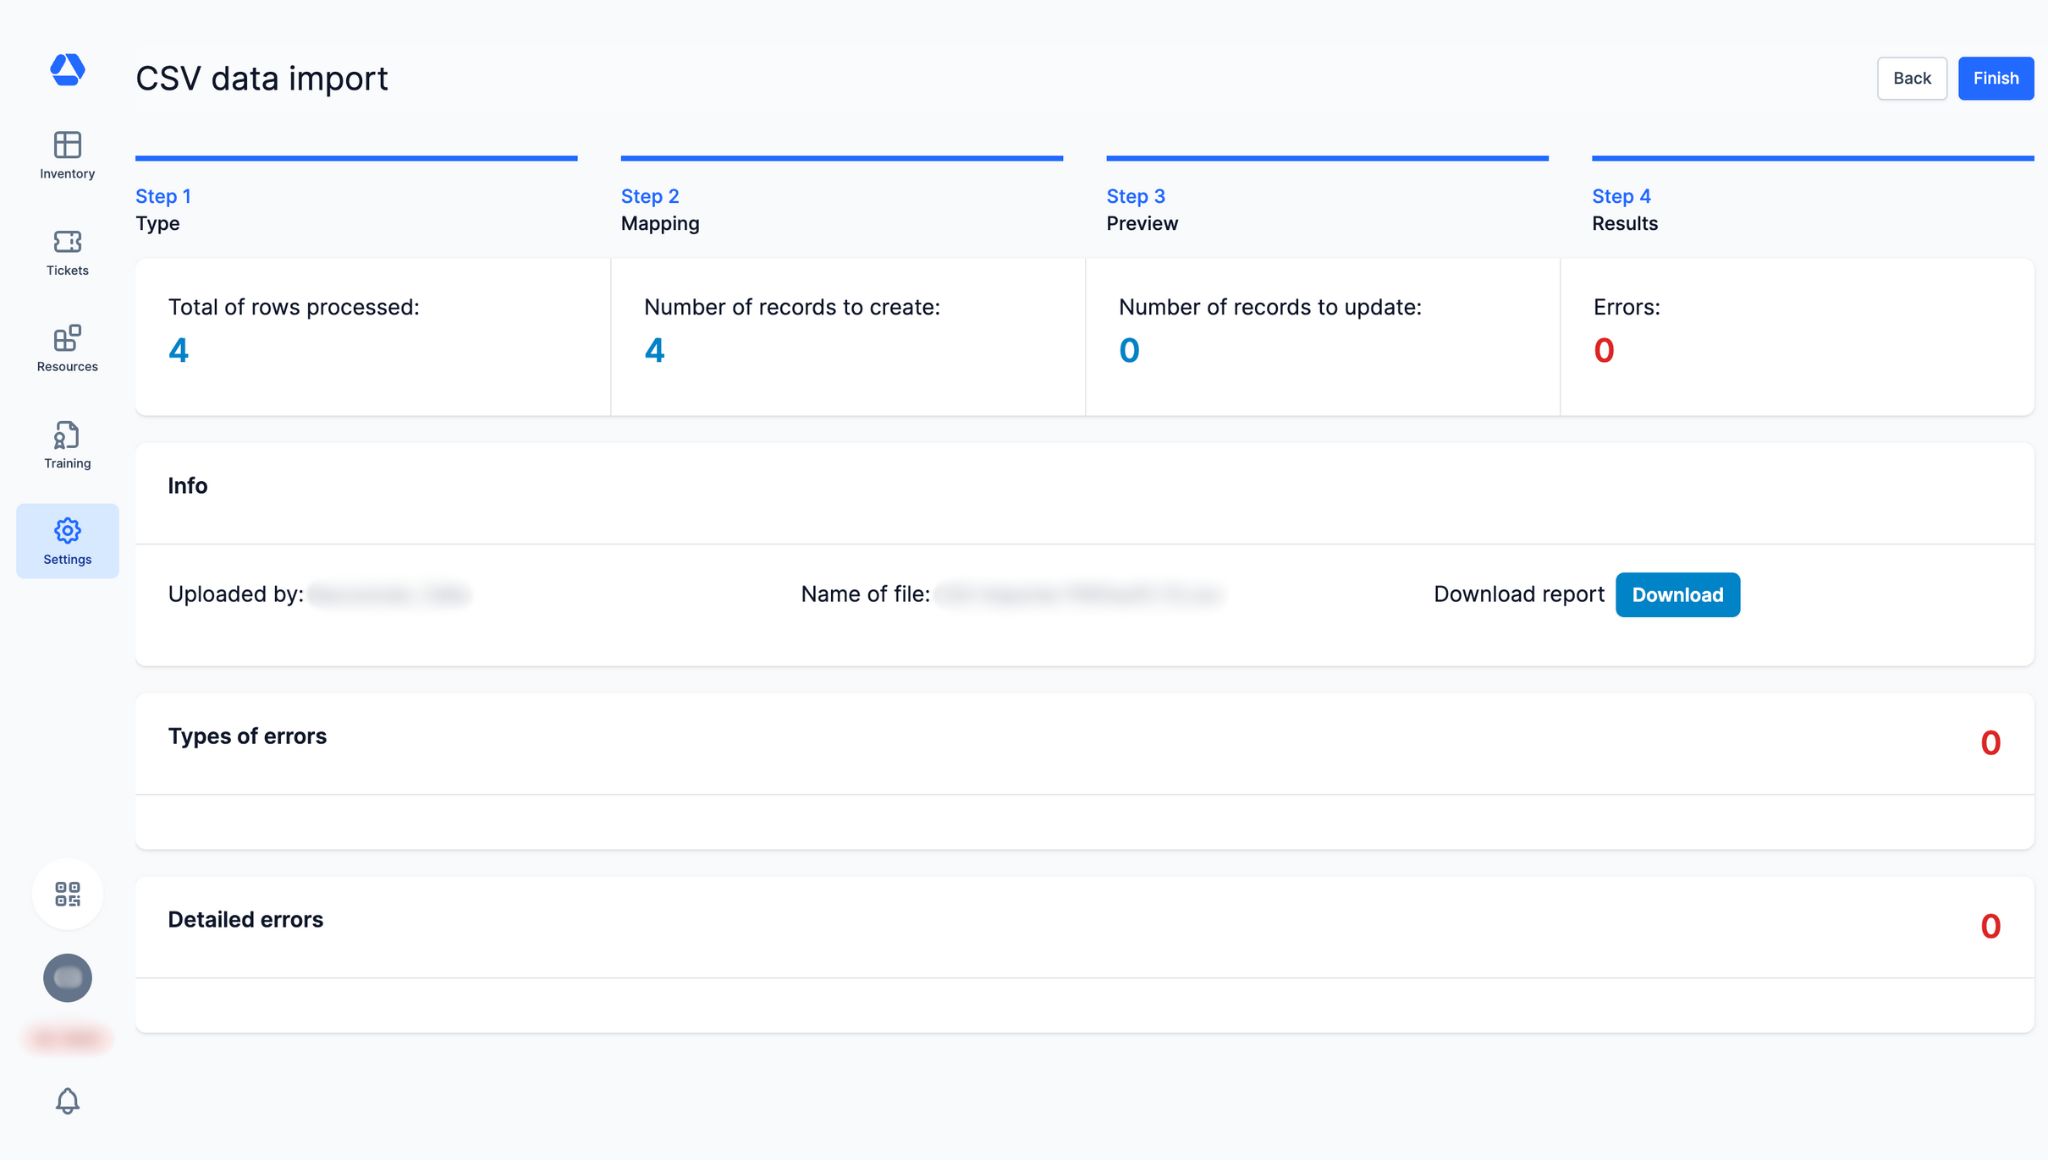
Step 4 – Summary:
Get a detailed summary of your import.
Step 4 – Guide:
- Confirmation Information: This page contains similar information as the preview but confirms that the import was successful.
- PDF Report: You will have the option to download a PDF report that includes all information displayed in this step.
- Considerations: If this is your first import, it is highly recommended to conduct a trial import with just 1 or 2 resources (items or places). We encourage using the template provided by Timly, which will also include your custom attributes.
✅ Import Sample
Would you like to see a concrete example of a CSV import?
This section walks you through how to import a sample CSV file into Timly.
Here are the steps to follow:
- Click on “Settings,” then on “CSV data import.”
- Select the type of import (in this example: “Items”).
- Download the pre-formatted CSV template.
- Open the template in Excel.
- Fill in the required columns: “Root category,” “Name”, and “Location" (Org. Unit).
- Root category: This refers to the category under which the item will be created (one category per row). To define the target category, enter the name of the Timly category — e.g., “IT assets”. 💡 You can identify the category either by its name (e.g., “IT assets”) or its ID number (e.g., “42640”). To find a category ID, simply hover over the category name.
- Name: This is the name you wish to assign to your item
- Location (Organisational Unit): Required only if your Timly account includes multiple units. The item will be created under the specified organisational unit (one per row).
- Upload your completed CSV file (ensure it is saved in UTF-8 format).
- Click “Next.”
- Choose whether you want to create and/or update items.
- Map the attributes. If you don’t want to import a specific column, select “Do not import” from the dropdown menu.
- Click “Next."
- Review your import.
- If no errors are detected, click “Import.”
- Optionally, download the PDF summary of your import.
📥 Types of import
Each import is introducing new items to your Timly system, and each type of item has different requirements. For example, to create new items, some attributes are mandatory. However, to update, other attributes are required. To help you navigate the process, we have created a list of the system attributes that you can find and how to use them in the process.
|Items
🆕 To create new items: The following attributes are necessary:
- Main category
- Name
- Org. Unit* (only if applicable)
🔄 To update existing items: One of the following attributes is required:
- item_id
- ref_no
- barcode
The Org. Unit is necessary only if you have more than one.
| ATTRIBUTE NAME | TYPE | REQUIRED? | INFORMATION |
|---|---|---|---|
| item_id | Integer | To update | This ID is unique and is automatically generated by the system. |
| ref_no | String | To update | This ID is unique and it is generated by you , the user. You can use it as a personal identification number, or if you are coming from another system (for example SAP). When you create an item, you can specify a ref_no, which will help you update in the future. |
| item_name | String | To create / To update | It represents the item name. It is necessary to create an item, and it can be used to update an item, however, since it is not a unique attribute, it is possible to have 2 items with the same name, which will cause a problem in the update. It is recommended to use other identifier to update. |
| barcode | String | To update | The barcodes are unique. Hence, it can be used to update an existing item. |
| org_unit_nickname | String | To create | *Only relevant if you have more than one Org. Unit in your Timly contract. It is necessary to specify the Org. Unit of the item in order to create it. |
| category | String | To create | Specifies which category the item belongs to. If the value introduced does not exist in Timly, Timly will create the new category and the attributes that this item has. It is really helpful to create your first structure in Timly. |
| subcategory | String | To create | Specifies the subcategory of the item. Depending on the rules on your account, if you do not want to make subcategories mandatory, it will be saved as “Uncategorized” if there is no value in subcategory. |
| item_type | String (Limited to defined types) | Not required | Normal, blueprint, twin, stock item. If left empty, it is assumed “Normal” item. |
| Responsible | String/Integer | Not required | Specifies the person responsible for the item. Can be specified as Surname, Name - Name Surname - or by using the person_id |
| blueprint_name | String | Not required (Only if you want to create a twin) | If you want to create a twin item, it is necessary to specify which blueprint it is attached to. You can do that by including either the blueprint_name, the blueprint_id or the blueprint_ref_no. Be aware that the blueprint_name is not unique, in case of multiple equal names, the import will fail. |
| blueprint_id | Integer | Not required (Only if you want to create a twin) | If you want to create a twin item, it is necessary to specify which blueprint it is attached to. You can do that by including either the blueprint_name, the blueprint_id or the blueprint_ref_no. |
| blueprint_ref_no | String | Not required (Only if you want to create a twin) | If you want to create a twin item, it is necessary to specify which blueprint it is attached to. You can do that by including either the blueprint_name, the blueprint_id or the blueprint_ref_no. |
| Status | String (Limited to defined types) | Not required | If not filled, the status will be assumed “Active”. The possible states are, Active, Inactive, Defective, Missing, and custom status introduced by the user. |
| remarks | String | Not required | Comments that you would like to add to the item. |
| price_without_vat | Double | Not required | The price of the item before taxes |
| price_with_vat | Double | Not required | The price of the item after taxes |
| vat | Double | Not required | The imposed taxes of the item. If the price without vat and with vat has been introduced, vat is calculated automatically. |
| purchase_date | Date | Not required | Indicates the date when the item was bought. Recommended format: dd.mm.yyyy |
| initial_amount | Double | Not required (Only if you want to create a stock item) | Determines the original quantity of a stock. |
| minimum_amount | Double | Not required | Set a quantity to trigger an alert. If the stock falls under that quantity, the corresponding user will receive an email. |
| consumable | String (Limited to defined types) | Not required | Can be filled with a yes/no. It will determine if the stock item can be consumed. (Is depleted when used). |
| assigned_consumable | String (Limited to defined types) | Not required | Can be filled with a yes/no. It will determine if the stock item is consumed upon assignment. |
| custom_attributes | Depends on the attribute | Not required | There will be one column for each of your existing custom_attributes that you want to update. |
|Persons
| ATTRIBUTE NAME | TYPE | REQUIRED? | INFORMATION |
|---|---|---|---|
| person_id | Integer | To update | This ID is unique and is automatically generated by the system. |
| ref_no | String | To update | This ID is unique and it is generated by you - the user. You can use it as a personal identification number, or if you are coming from another system (for example SAP). When you create a person, you can specify a ref_no, which will help you update in the future. |
| person_name | String | To create / To update | The name of the person. In order to update, it is required to also put the surname. In case that it is not unique the import would fail. |
| person_surname | String | To create / To update | The surname of the person. In order to update, it is required to also put the name. In case that it is not unique the import would fail. |
| barcode | String | To update | The barcodes are unique. Hence, it can be used to update an existing item. |
| org_unit_nickname | String | To create | Only relevant if you have more than one Org Unit in your Timly contract. It is necessary to specify the Org Unit of the item in order to create it. |
| person_type | String | To create | Specifies which category the person belongs to. Only relevant if you have more than one category of people. |
| sex | String (Limited to defined types) | Not required | Male/Female. |
| pers_no | String | To update | It can be used to identify a person. However, it is not unique, so it can cause the update to fail if there are more than one person with the same pers_no. |
| date_of_birth | Date | Not required | Format recommended: “dd.mm.yyyy” |
| start_date | Date | Not required | Format recommended: “dd.mm.yyyy”. Indicates the first working day of the person. |
| last_date | Date | Not required | Format recommended: “dd.mm.yyyy”. Indicates the last working day of the person. |
| manager_id | Integer | Not required | It would be the person_id of the manager. Indicates who is the manager of this person. |
| manager_first_name | String | Not required | Indicates the first name of the manager, it requires the last in order to update. If it is not unique, it will cause an error, and it is recommended to use the person_id. |
| manager_last_name | String | Not required | Indicates the last name of the manager, it requires the name in order to update. If it is not unique, it will cause an error, and it is recommended to use the person_id. |
| custom_attributes | Depends on the attribute | There are custom attributes that depend on on how they are defined by the user. |
|Assignments and Returns
With this import, you can create new records of assignments or returns, as well as schedules. In Timly, you can assign items to persons or places. Hence, in order to make an import, if you want to create a record or import items, it is necessary to specify which item is being updated, either by the item_id, the item_ref_no, or the item_name. Additionally, it is necessary to use an identifier for the resource to which it is being assigned/returned, hence, it will be necessary to use either the resource_id or the resource_ref_no, where the resource could be a person, a place, or a container_item.
| ATTRIBUTE NAME | TYPE | REQUIRED? | INFORMATION |
|---|---|---|---|
| item_id | Integer | To create / To update | This ID is unique and is automatically generated by the system. |
| item_ref_no | String | To create / To update | This ID is unique and it is generated by you - the user. You can use it as a personal identification number, or if you are coming from another system (for example SAP). When you create a person, you can specify a ref_no, which will help you update in the future. |
| item_name | String | To create / To update | It represents the item name, since it is not a unique attribute, it is possible to have 2 items with the same name - which will cause a problem in the update. It is recommended to use other identifiers to update. |
| container_id | Integer | To create / To update | This ID is unique and is automatically generated by the system. |
| container_ref_no | String | To create / To update | This ID is unique and is generated by you - the user. You can use it as a personal identification number, or if you are coming from another system (for example SAP). When you create a person, you can specify a ref_no, which will help you update in the future. |
| container_name | String | To create / To update | It represents the place name, since it is not a unique attribute, it is possible to have 2 items with the same name - which will cause a problem in the update. It is recommended to use other identifiers to update. |
| container_item_id | Integer | To create / To update | This ID is unique and is automatically generated by the system. |
| container_item_ref_no | String | To create / To update | This ID is unique and is generated by you - the user. You can use it as a personal identification number, or if you are coming from another system (for example SAP). When you create a person, you can specify a ref_no, which will help you update in the future. |
| person_id | Integer | To create / To update | This ID is unique and is automatically generated by the system. |
| person_ref_no | String | To create / To update | This ID is unique and is generated by you, the user. You can use it as a personal identification number, or if you are coming from another system (for example SAP). When you create a person, you can specify a ref_no, which will help you update in the future. |
| person_name | String | To create / To update | Indicates the first name of the person to be assigned to, it requires the name in order to update. In case of not being unique, it will cause an error and it is recommended to use the person_id. |
| person_surname | String | To create / To update | Indicates the last name of the person to be assigned to, it requires the name in order to update. In case of not being unique, it will cause an error and it is recommended to use the person_id. |
| quantity | Double | To create / To update | Necessary in case of a stock item. |
| assign_date | Date | To create / To update | Format recommended: “dd.mm.yyyy” It is mandatory to put either assign/return or the scheduled date. |
| return_date | Date | To create / To update | Format recommended: “dd.mm.yyyy” It is mandatory to put either assign/return the schedule. It is however possible to not have a return date. |
| schedule_assign_date | Date | To create / To update | Format recommended: “dd.mm.yyyy” It is mandatory to put either assign/return or the scheduled date. |
| schedule_return_date | Date | To create / To update | Format recommended: “dd.mm.yyyy” It is mandatory to put either assign/return or the scheduled date. It is however possible to not have a scheduled return date. |
| remarks | String | Not required | Comments for the assignment/schedule. |
|Places
💡 Note:
What we now call "places" were previously referred to as "containers".
| ATTRIBUTE NAME | TYPE | REQUIRED? | INFORMATION |
|---|---|---|---|
| container_id | Integer | To update | This ID is unique and is automatically generated by the system. |
| ref_no | String | To update | This ID is unique and is generated by you, the user. You can use it as a personal identification number, or if you are coming from another system (for example SAP). When you create an org_unit, you can specify a ref_no, which will help you update in the future. |
| container_name | String | To create /To update | The name of the place. |
| barcode | String | To update | The barcodes are unique. Hence, it can be used to update an existing item. |
| org_unit_nickname | String | To create | Only relevant if you have more than one Org. Unit in your Timly contract. It is necessary to specify the Org. Unit of the item in order to create it. |
| container_type | String | To create | Specifies which container_type the place belongs to. |
| subcontainer | String | To create | Specifies which subcategory of a place the person belongs to. Depending on the rules on your account, if you do not want to make subcategories for places mandatory, it will be saved as “Uncategorized” if there is no value in the subcategory. |
| start_date | Date | Not required | Format recommended: “dd.mm.yyyy”. Indicates the first working day of the person. |
| last_date | Date | Not required | Format recommended: “dd.mm.yyyy”. Indicates the last working day of the person. |
| active | String (Limited to defined types) | Not required | Limited to Active/Inactive |
| Custom attributes | There are custom attributes that depend on on how they are defined by the user. |
|Organisational units
| ATTRIBUTE NAME | TYPE | REQUIRED? | INFORMATION |
|---|---|---|---|
| org_unit_id | Integer | To update | This ID is unique and is automatically generated by the system. |
| ref_no | String | To update | This ID is unique and is generated by you, the user. You can use it as a personal identification number, or if you are coming from another system (for example SAP). When you create an organisational unit, you can specify a ref_no, which will help you update in the future. |
| org_unit_name | String | To create / To update | The name of the organisational unit. |
| Custom attributes | There are custom attributes that depend on on how they are defined by the user. |
|Tickets
| ATTRIBUTE NAME | TYPE | REQUIRED? | INFORMATION |
|---|---|---|---|
| id | Integer | no - for creating new tickets yes - for updating tickets | Unique ticket ID generated by the system |
| name | String | no | If no name is provided, the newly created tickets will inherit the name of the template |
| due_on | Date (DD.MM.YYYY) | yes - for creating repeatable tickets | Due date can also be provided for one-time tickets, but it's not required. To create a repeatable ticket, a due date must be provided |
| ticket_template | Integer/String | yes - for creating tickets no - for updating tickets | New tickets can only be created if they are connected to a template. All attributes defined on the template are inherited by the ticket. Either template ID or template name can be used. |
| responsible_id | String | yes - for creating tickets if the responsible is not defined in the template | Unique user ID of person assigned to the ticket |
| item_id | Integer | yes - for creating tickets | Only one item per row is allowed. The org unit of the item will determine the org unit of the ticket |
| custom fields (each field in a separate column) | Depends on the field value type | yes - if template requires values in any custom fields to create or close a ticket | The full list of custom fields connected to the entity can be downloaded with the example csv file. |
| costs_activity_name | String | yes - if costs_activity_duration_in_hours or costs_activity_price_per_hour have a value | name of the ticket costs activity |
| costs_activity_duration_in_hours | Integer/Float | yes - if costs_activity_name or costs_activity_price_per_hour have a value | duration of the activity in hours |
| costs_activity_price_per_hour | Integer/Float | yes - if costs_activity_name or costs_activity_duration_in_hours have a value | hourly price of the activity |
| costs_material_name | String | yes - if costs_material_unit_amount or costs_material_price_per_unit have a value | name of the material used to complete the ticket |
| costs_material_unit_amount | Integer/Float | yes - if costs_material_name or costs_material_price_per_unit have a value | number of units of the material |
| costs_material_price_per_unit | Integer/Float | yes - if costs_material_name or costs_material_unit_amount have a value | unit price of the material |
Important to note:
- Tickets can only be created from templates. A template ID is required for each ticket entry.
- The template ID determines whether the ticket is created as a one-time or recurring ticket.
- During ticket creation, the following values are inherited from the template if they are not provided in the CSV: ticket name, recurrence settings, notifications, assignment, and custom fields (including default values where applicable).
- The same validation rules used in the user interface are applied during ticket creation and updates.
- Appropriate permissions are required to create or update tickets.
- Access to the relevant organizational unit and item category is required for any items referenced in a ticket.
- The ticket template specified in the CSV must be valid for the organizational unit and item category defined in the same row.
Regarding custom fields:
- Custom fields are currently not shared across templates. This may result in a large number of columns, depending on the setup. Improvements are planned.
Regarding ticket closure via CSV:
- Closing tickets via CSV importer is not recommended.
- If used, values for all required custom fields must be provided in the import file.
- Tickets requiring a signature cannot be closed via CSV importer.
Regarding ticket costs:
- Ticket cost attributes are available only if cost tracking is enabled.
- Ticket costs data can only be added to an existing ticket - it cannot be added during ticket creation.
- costs_activity_name and costs_material_name are unique per ticket:
- If the user imports two rows with same costs_activity_name or same costs_material_name - the last row overwrites the previous one.
- If the ticket already has costs record with value of costs_activity_name or costs_material_name - the value from the csv file updates the existing value - it does not add to the existing record, and it does not add another record with same name.
- Limitations compared to the UI:
- Users can add 1 activity and 1 material cost per row. If there are more than 1 activity or more than 1 material costs - users must create new rows with same ticket id
- Each cost is always stored as a sum for all items added to the ticket - users do not have the option to add costs per item
💡 FAQ
|How should CSV files be formatted?
Standard CSV file conventions apply. The records to be inserted must be listed line by line with a delimiter between attributes. Acceptable delimiters are semicolon, comma, TAB, and the vertical bar. Additionally, a header with the respective column names must be present. Empty column contents are allowed; in this case, the attribute will not be populated in the object.
|Why is mapping so important?
Timly interprets the content separated by delimiters as individual attributes. These are the characteristics and additional information of each object. Therefore, you must specify for each column which attribute in the respective Timly category it corresponds to. If you want to import content that cannot be mapped to any existing attribute, you can create new attributes in step 2 of the import process.
|Where can I find possible attributes for CSV import?
After opening the CSV Import function, the possible attribute names for the category to be imported are displayed in an overview below the selection area of the input mask. You can also download sample files with prefilled attribute headers in step 1.
|Is it possible to import from other data formats?
CSV is both simple and universal, as many applications support it and it can be edited with basic tools. Additionally, many other file formats can easily be converted into CSV files. Therefore, Timly currently focuses on CSV import. If you need to import from other formats, feel free to contact our support team for a custom solution.
|I receive an error message during import – what could be the reason?
In most cases, this is due to an incorrectly formatted CSV file. The file must meet the specifications for automated processing precisely in order to avoid generating inconsistent data sets. The most common error is the absence of one of the required attribute categories.
|Can I update or supplement existing records?
It is also possible to supplement existing records. To do this, select the "Update existing" option in step 2 during the attribute mapping. The easiest way to update is to first export data from Timly using the "Inventory CSV" option for the items you want to update. In this case, the tables are already correctly formatted, and you can easily add the desired records.
Note: Before importing, it may be necessary to delete the row above the attribute names, as translations are automatically included there.
|Can I undo imports?
Except for the "Assignment and Returns" category, it is not possible to undo imports. Therefore, CSV import files should be carefully checked. Additionally, control mechanisms in steps 3 and 4 of the import process will display errors in the input file. If you have any questions, please contact our support team in advance. If an incorrect import occurs, please retain the import file so our support team can review it.