
2026 | Ticketing System 2.0 for Users With the Deadline Feature
Explore the Ticketing System 2.0
➡️ Your Ticketing System Is Evolving
Today, we’re introducing a major update that's been in the making for months. In early 2026, Timly will enter a new era with the launch of an upgraded ticketing system—now fully integrated with deadline management for a smoother, more efficient workflow.
This new system delivers a unified, intuitive interface designed to simplify how you create, track, and manage tickets.
We will guide you step by step through this evolution to give you all the tools and knowledge you need to make the most of your new ticketing system.
👉 Click here to watch the Ticketing System 2.0 in action! 👈
TUTORIALS: The Current Ticketing System
- Ticket Category Creation -

The process for creating ticket categories in the current ticketing system:
- Go to “Settings” → “Ticket categories”
- Click “+ Create new”, fill in the fields, and configure the settings for each ticket category
➡️ To explore the ticket category creation process in the new ticketing system click here.
- Ticket Templates Creation -

The process for creating ticket templates in the current ticketing system:
- Go to “Settings” → “Ticket templates”
- Click “+ New template”, fill in the fields, and configure the settings for each ticket template

Ticket template creation page (current ticketing system)
➡️ To explore the ticket template creation process in the new ticketing system, click here.
- Ticket Creation -

The process for creating a ticket in the current ticketing system:
- Go to “Tickets” → “+ Ticket”
- Select a ticket category

Ticket creation page (current ticketing system)
➡️ To explore the ticket creation process in the new ticketing system, click here.
- Repeatable Ticket Creation -

The process for creating a repeatable ticket in the current ticketing system:
- Go to “Tickets” → “+ Repeatable Ticket”
- Select a ticket template

Repeatable ticket creation page (current ticketing system)
➡️ To explore the repeatable ticket creation process in the new ticketing system, click here.
TUTORIALS: The New Ticketing System
📚 Creating a Ticket Category and a Ticket Template
Note:
- Ticket categories and ticket templates are now managed on a single page
As a Timly administrator, the first step before creating tickets is to create ticket categories and ticket templates.
- Ticket categories help structure tickets
- Ticket templates help standardize and simplify ticket creation
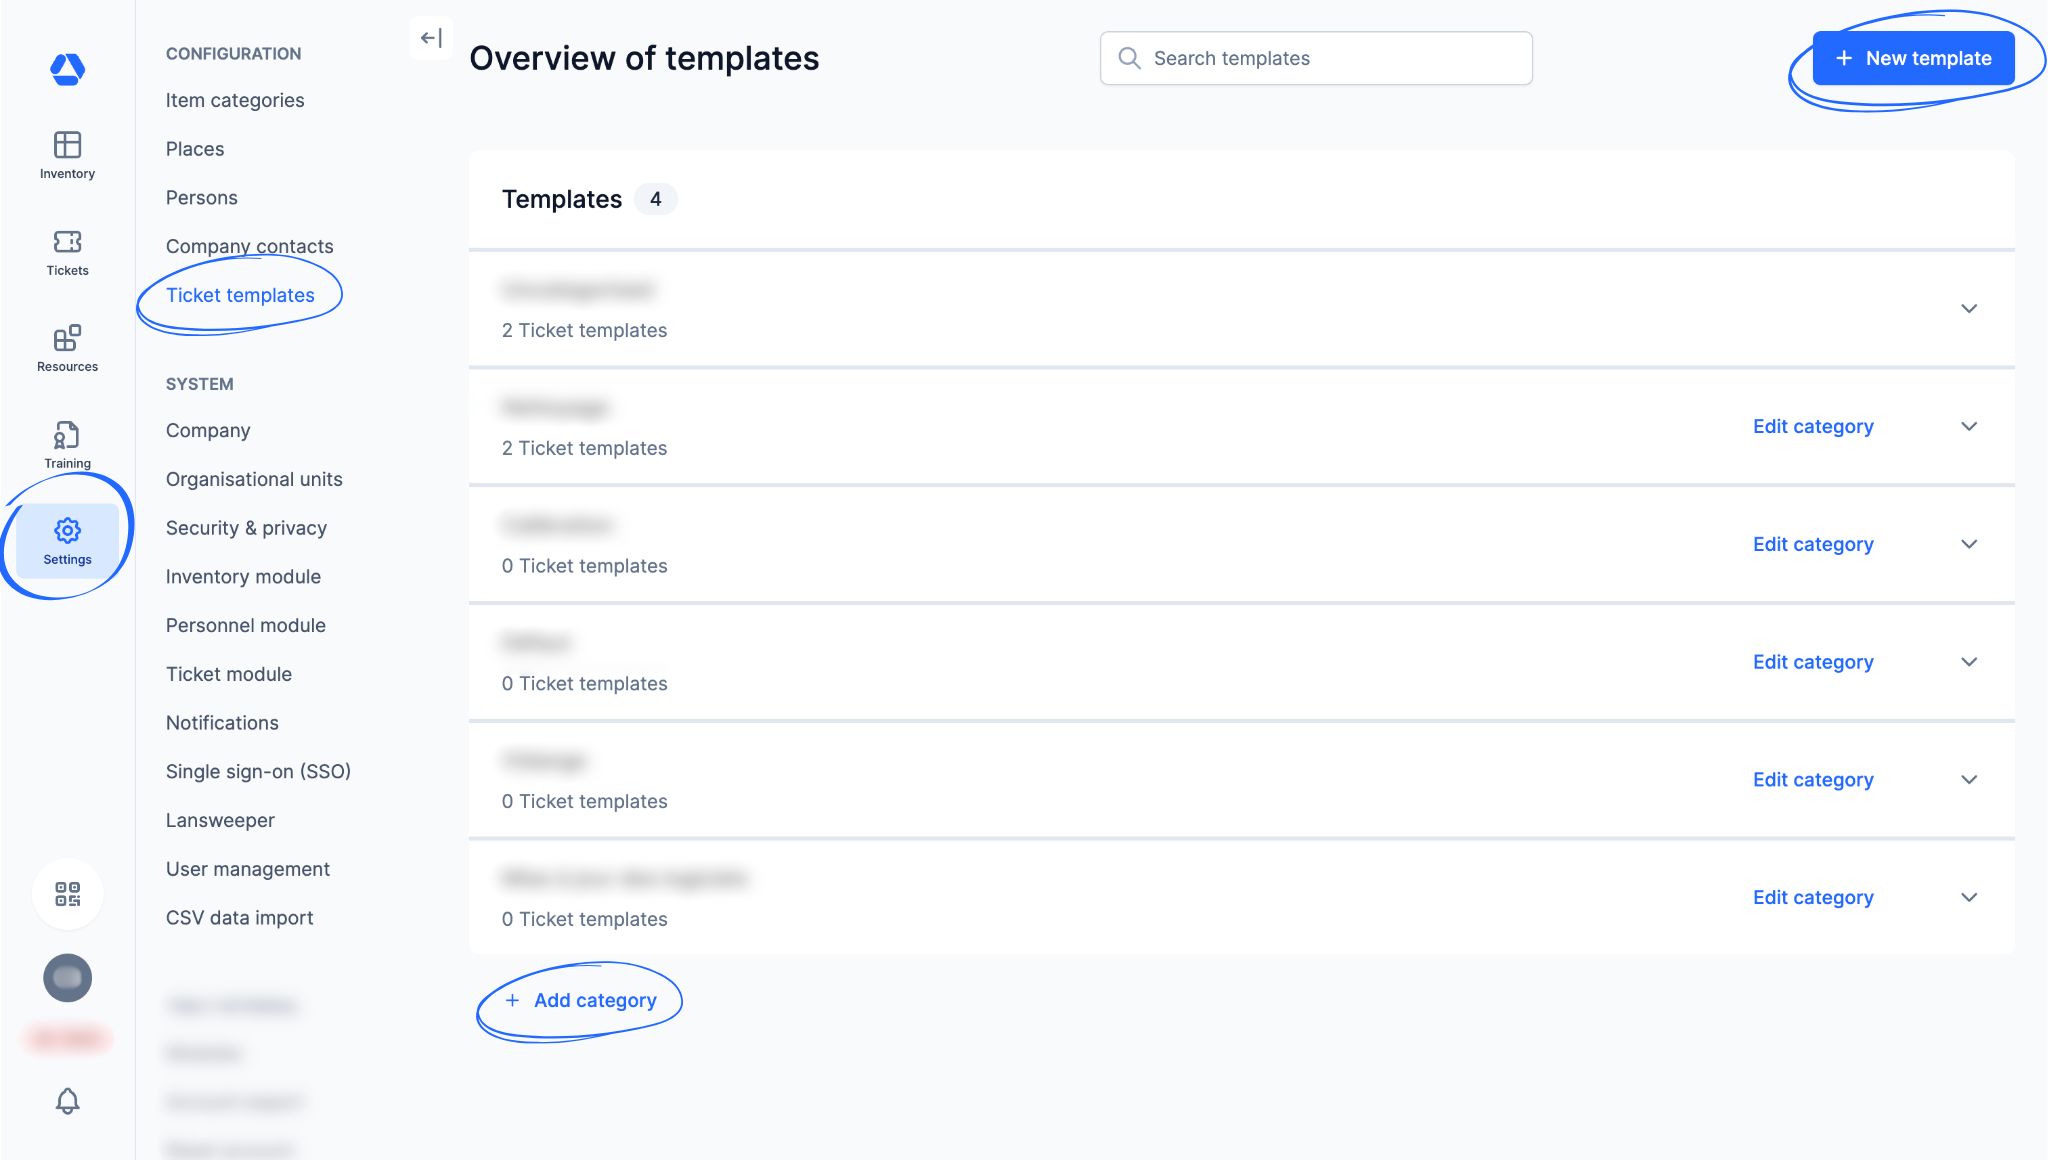
To create your ticket categories and templates, click "Settings", then "Ticket templates"
Step 1: Create a Ticket Category
Examples of ticket categories:
- Inspections
- IT
- Maintenance
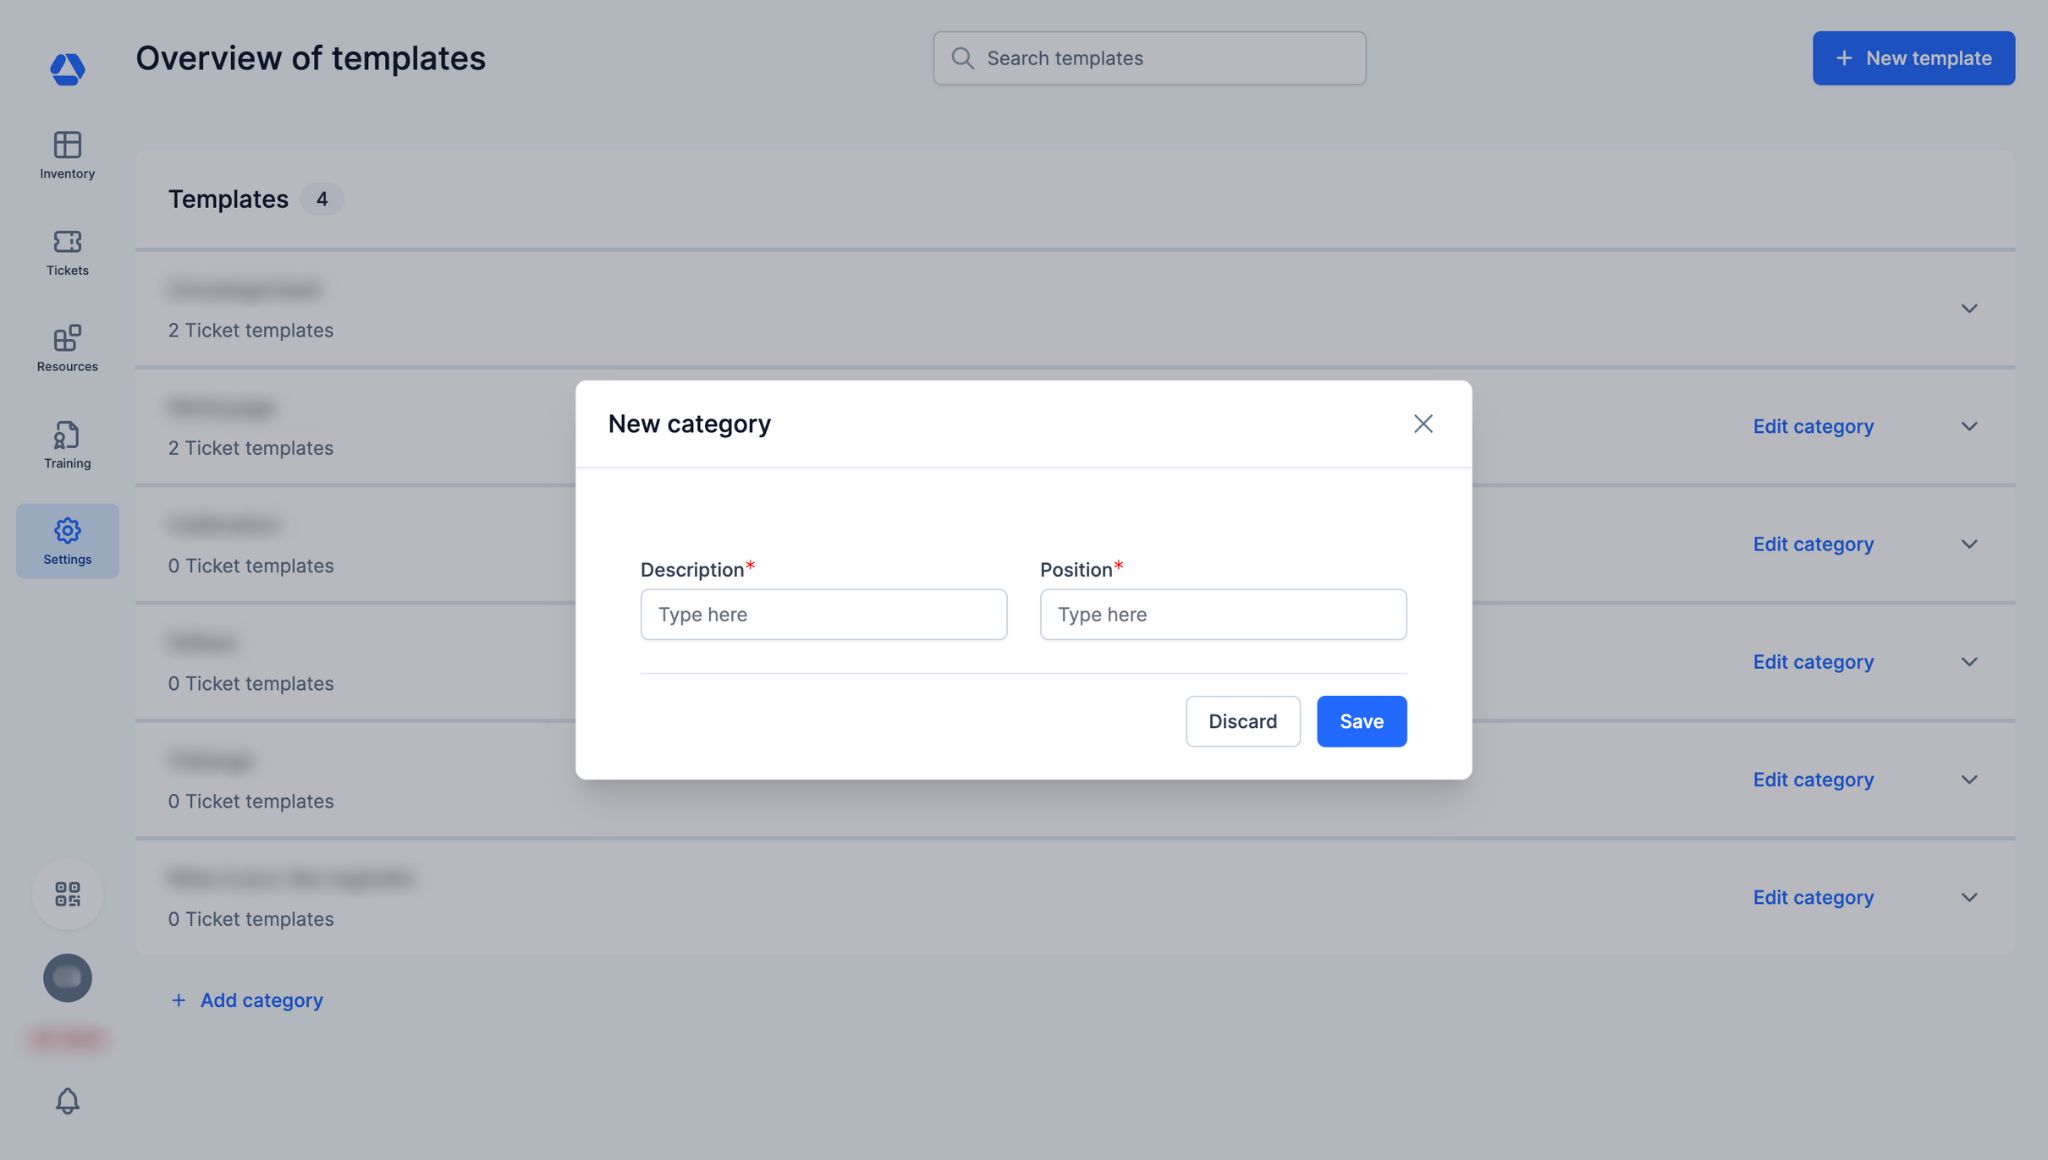
To create a ticket category:
- Click "Add Category" in the template overview
- Enter the category name in the "Description" tab
- Set its position by entering the corresponding number in the "Position" tab
Step 2: Create a Ticket Template
Examples of ticket templates:
- Incident report
- Maintenance request
- Software update request
- Periodic general inspection
To create a ticket template:
- Click "New Template" in the template overview
- Fill in the fields
"Overview" Tab:
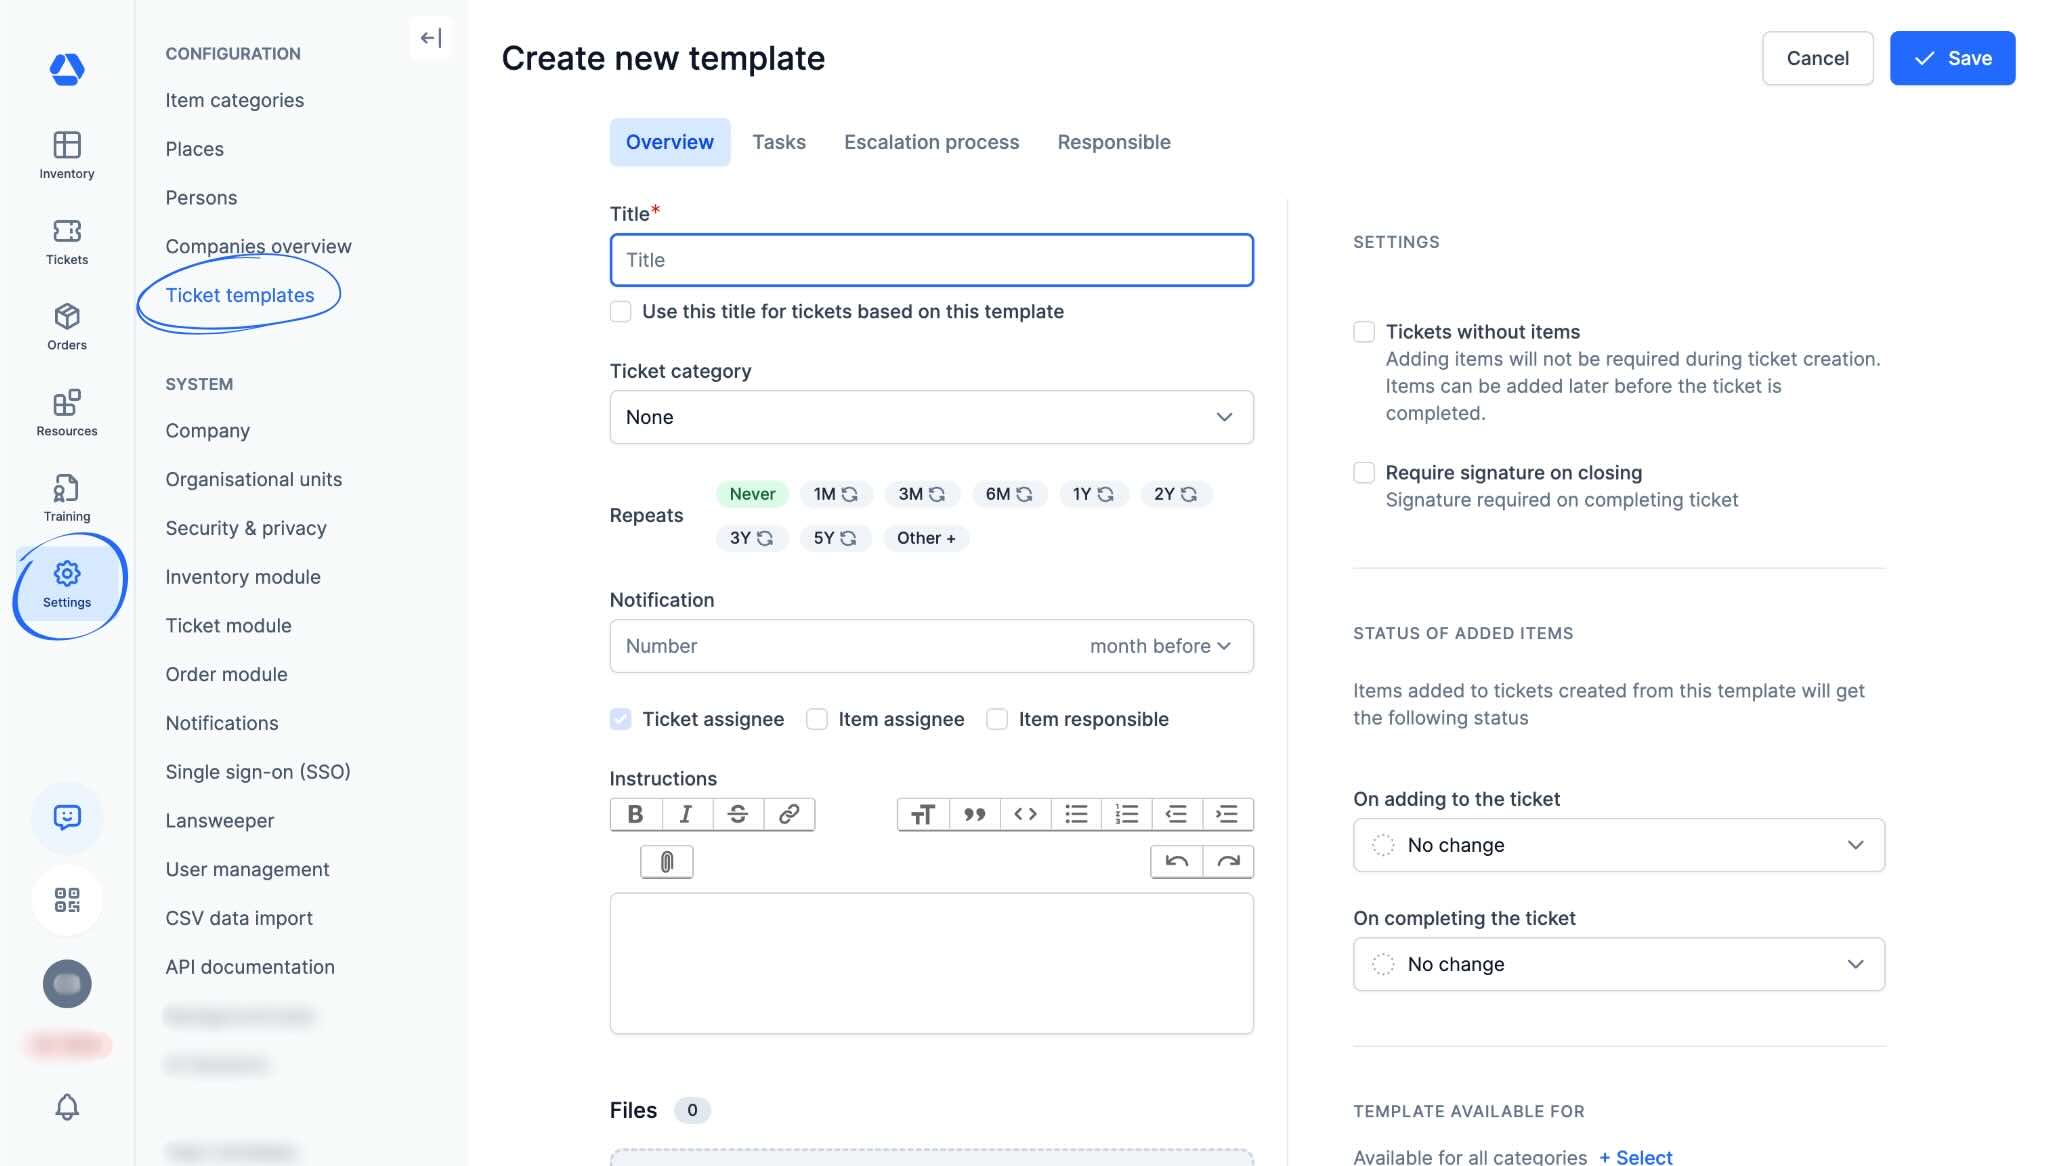
- "Title": Enter the title for your ticket template
- "Category": Select the ticket category for this template. If no category is selected, the template will default to “Uncategorized”
- "Repetitions": If this template is for repeatable tickets, select the desired frequency. For a custom frequency, click "Other" and specify the duration
- "Notification": Set when responsible people should be notified before the ticket’s due date
- The checkboxes "Ticket assignee", "Item assignee", and "Item responsible" allow you to choose who will receive the email notification
- "Instructions": Add any instructions you want to appear in each ticket created from this template
- "Files": Add files—documents, photos, etc.—to automatically include them in tickets created from this template
"Tasks" Tab:
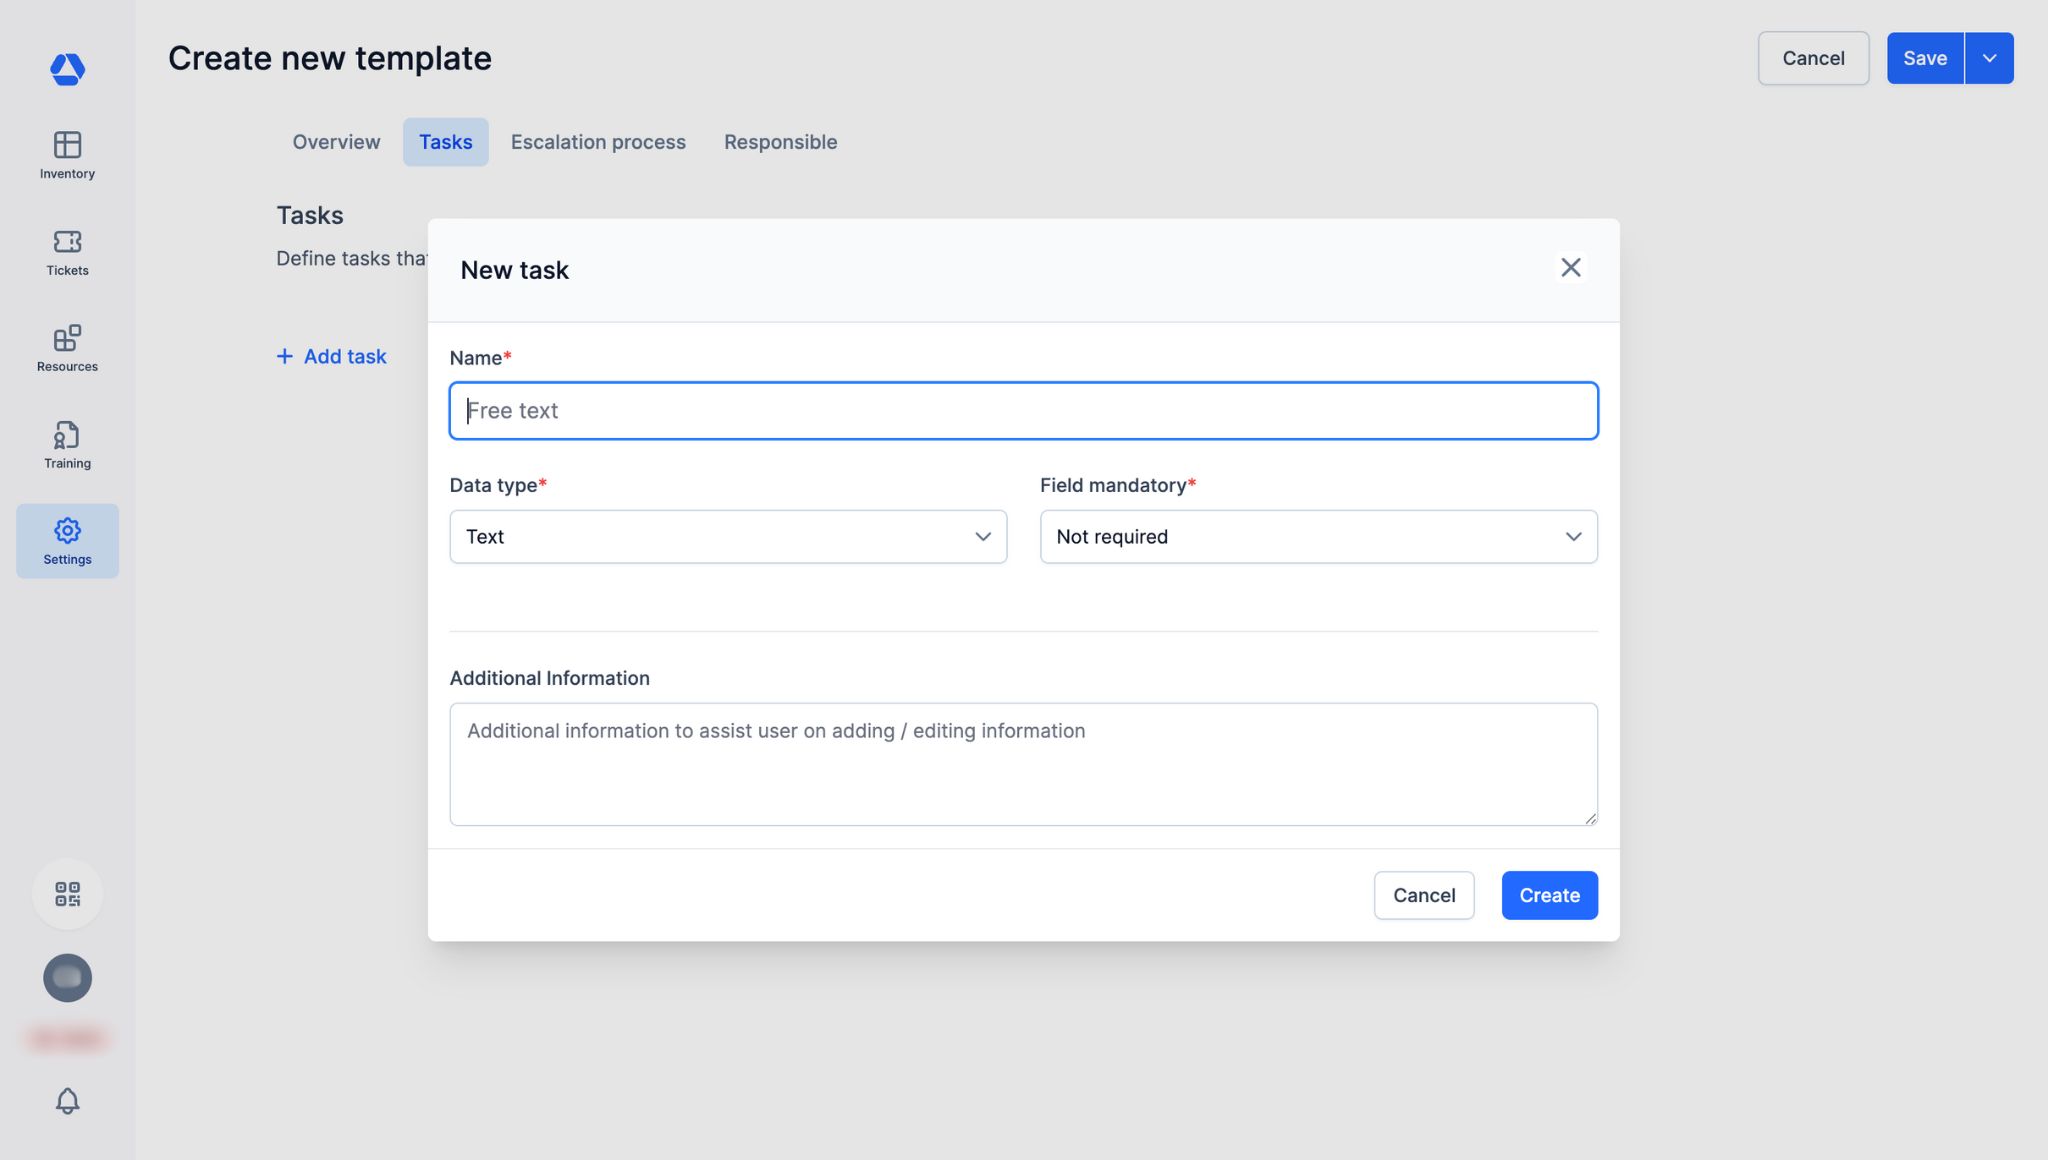
Note: Ticket “fields” are now called “tasks”.
- Click "Add task"
- "Name": Enter the task name
- "Data type": Select the data type—checkbox, URL, date, yes/no, etc.—for this task
- "Field mandatory": Specify whether this task is required and, if so, at which step
- "Additional Information": Add instructions if necessary
"Escalation process" Tab:
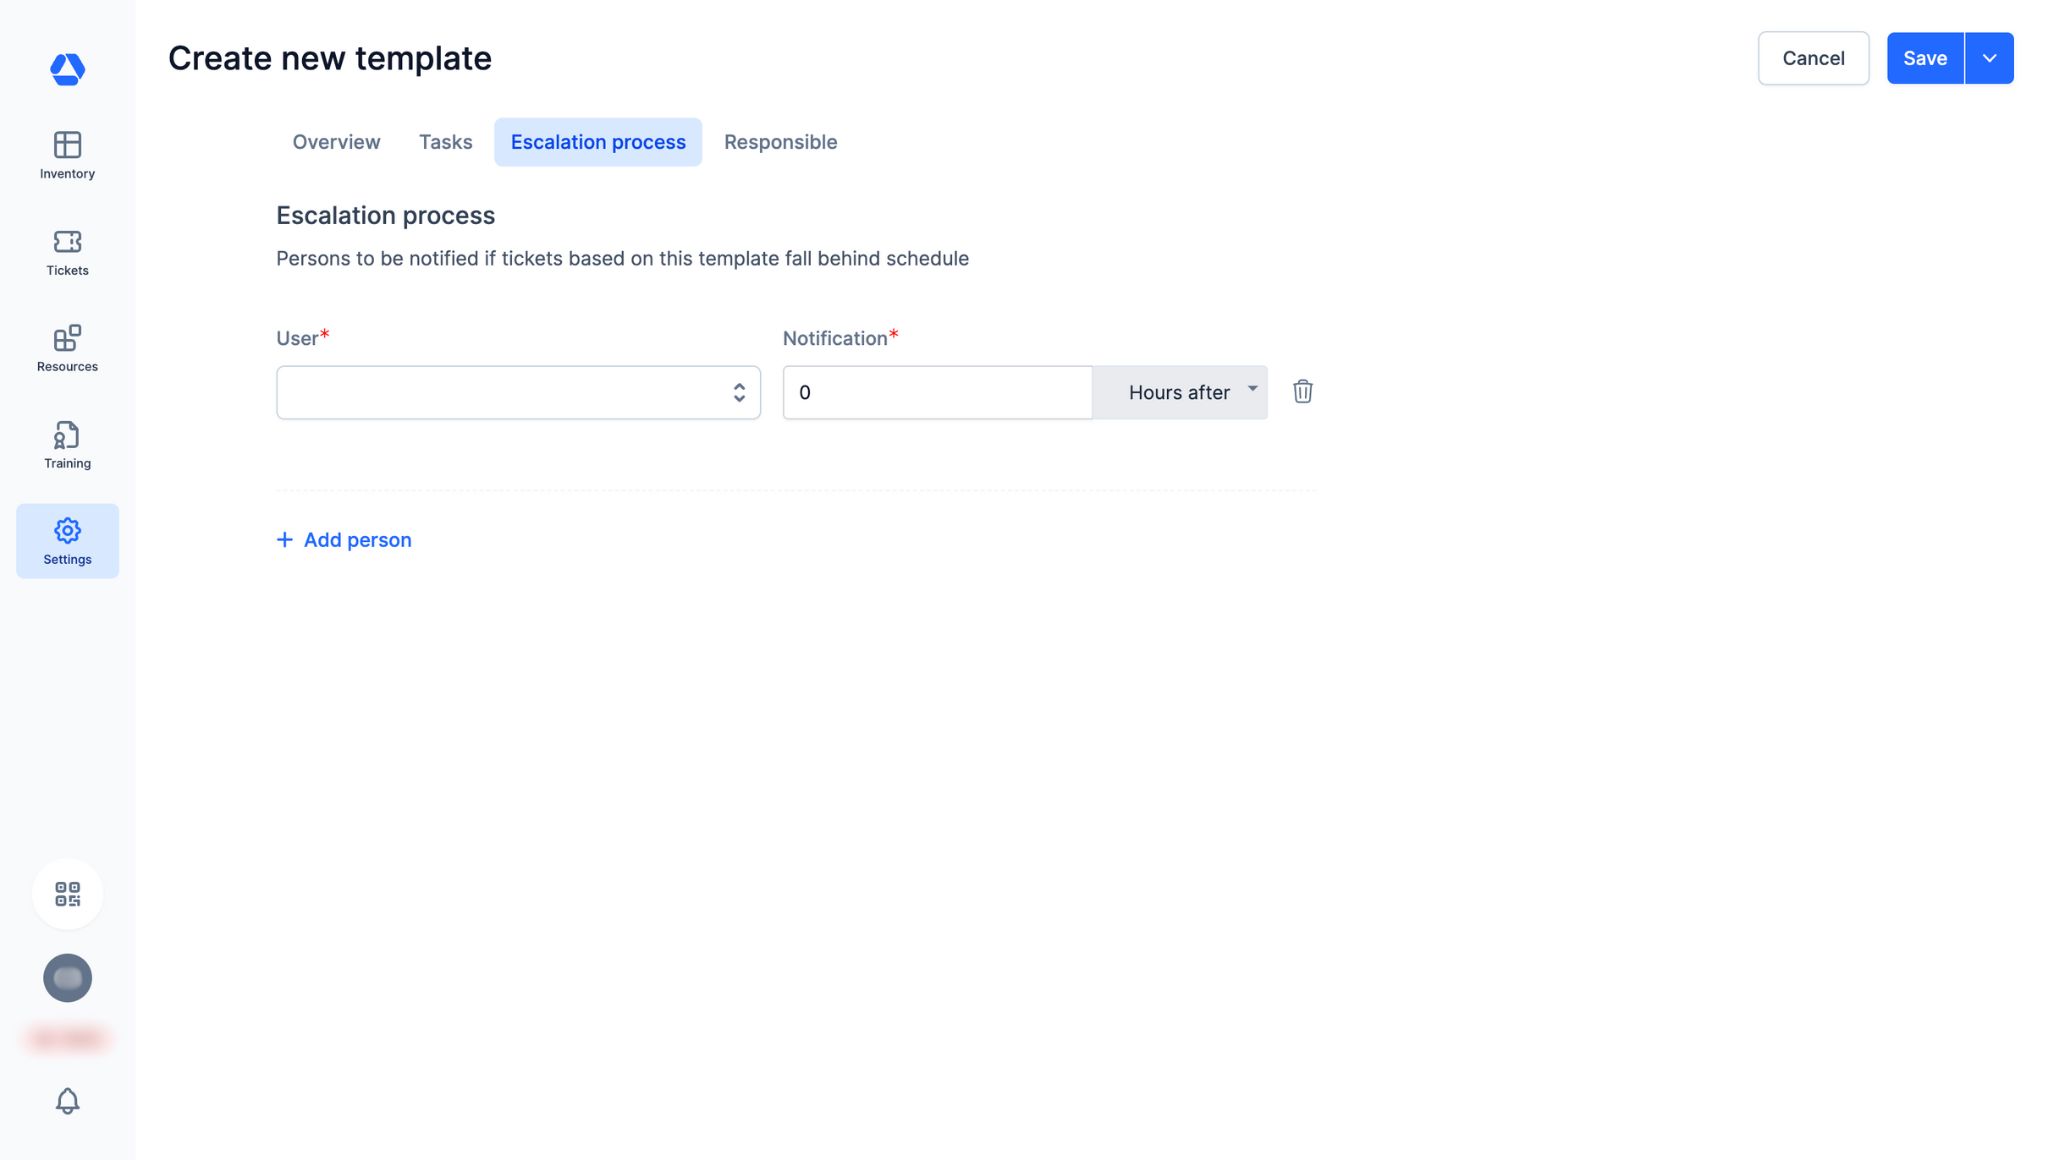
- Click "Add person"
- "User": Select the person to be notified if a ticket created from this template is overdue
- "Notification": Specify when responsible people should be notified if a ticket is late
"Responsible" Tab:

- "Define template responsibles": In the dropdown menu, select the person responsible for this ticket template across all organizational units
- "Responsibles per org unit": Click "Add a responsible by organizational unit" to assign a responsible person for each organizational unit
📚 Creating a Ticket
Examples of tickets:
- Report a stolen item
- Repair following a breakdown
Method 1: From an Item Page
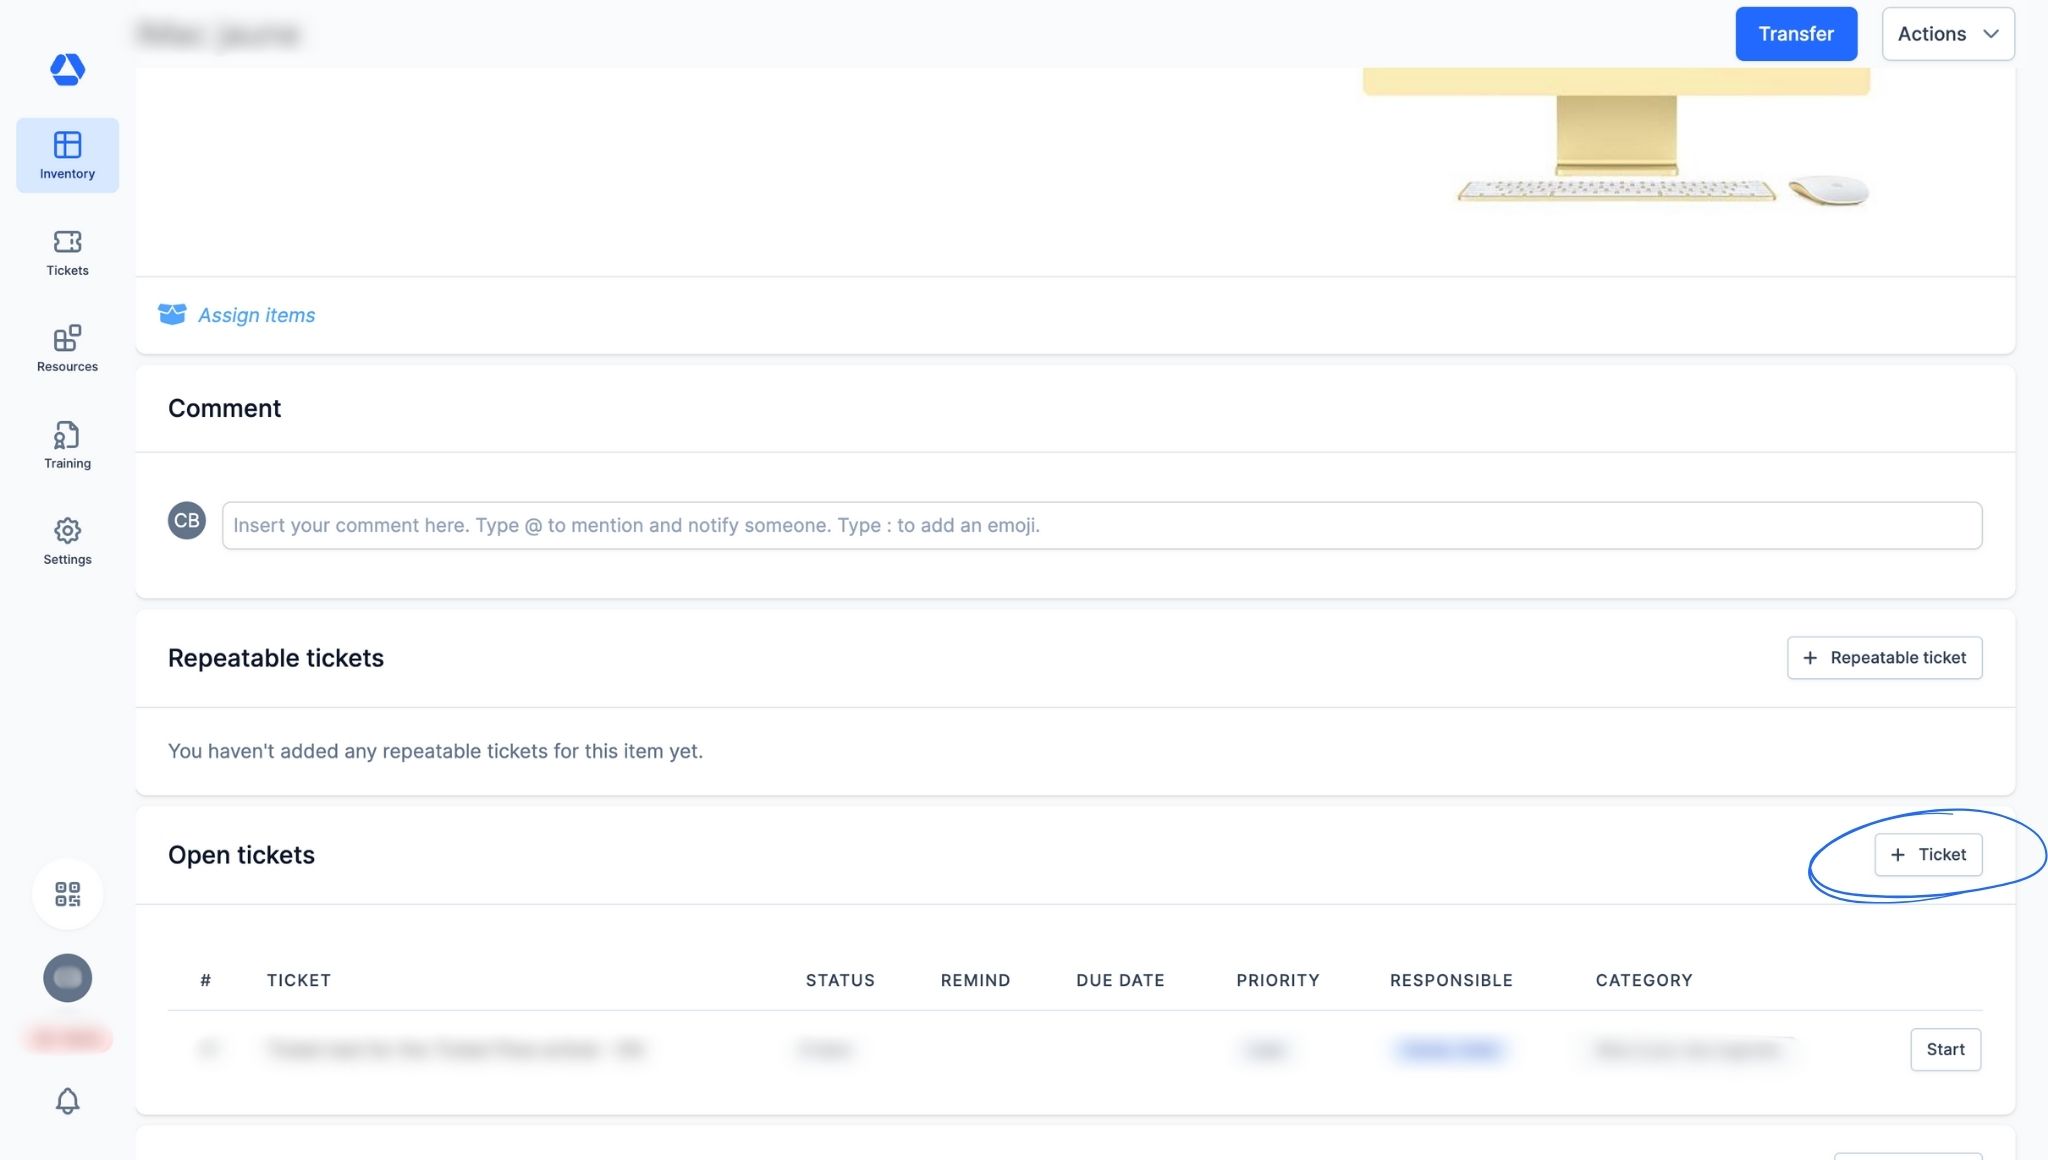
To create a ticket from an item page:
- Go to the item page from the inventory overview or by scanning the item’s QR code)
- Scroll to the "Open Tickets" section
- Click "+ Ticket"

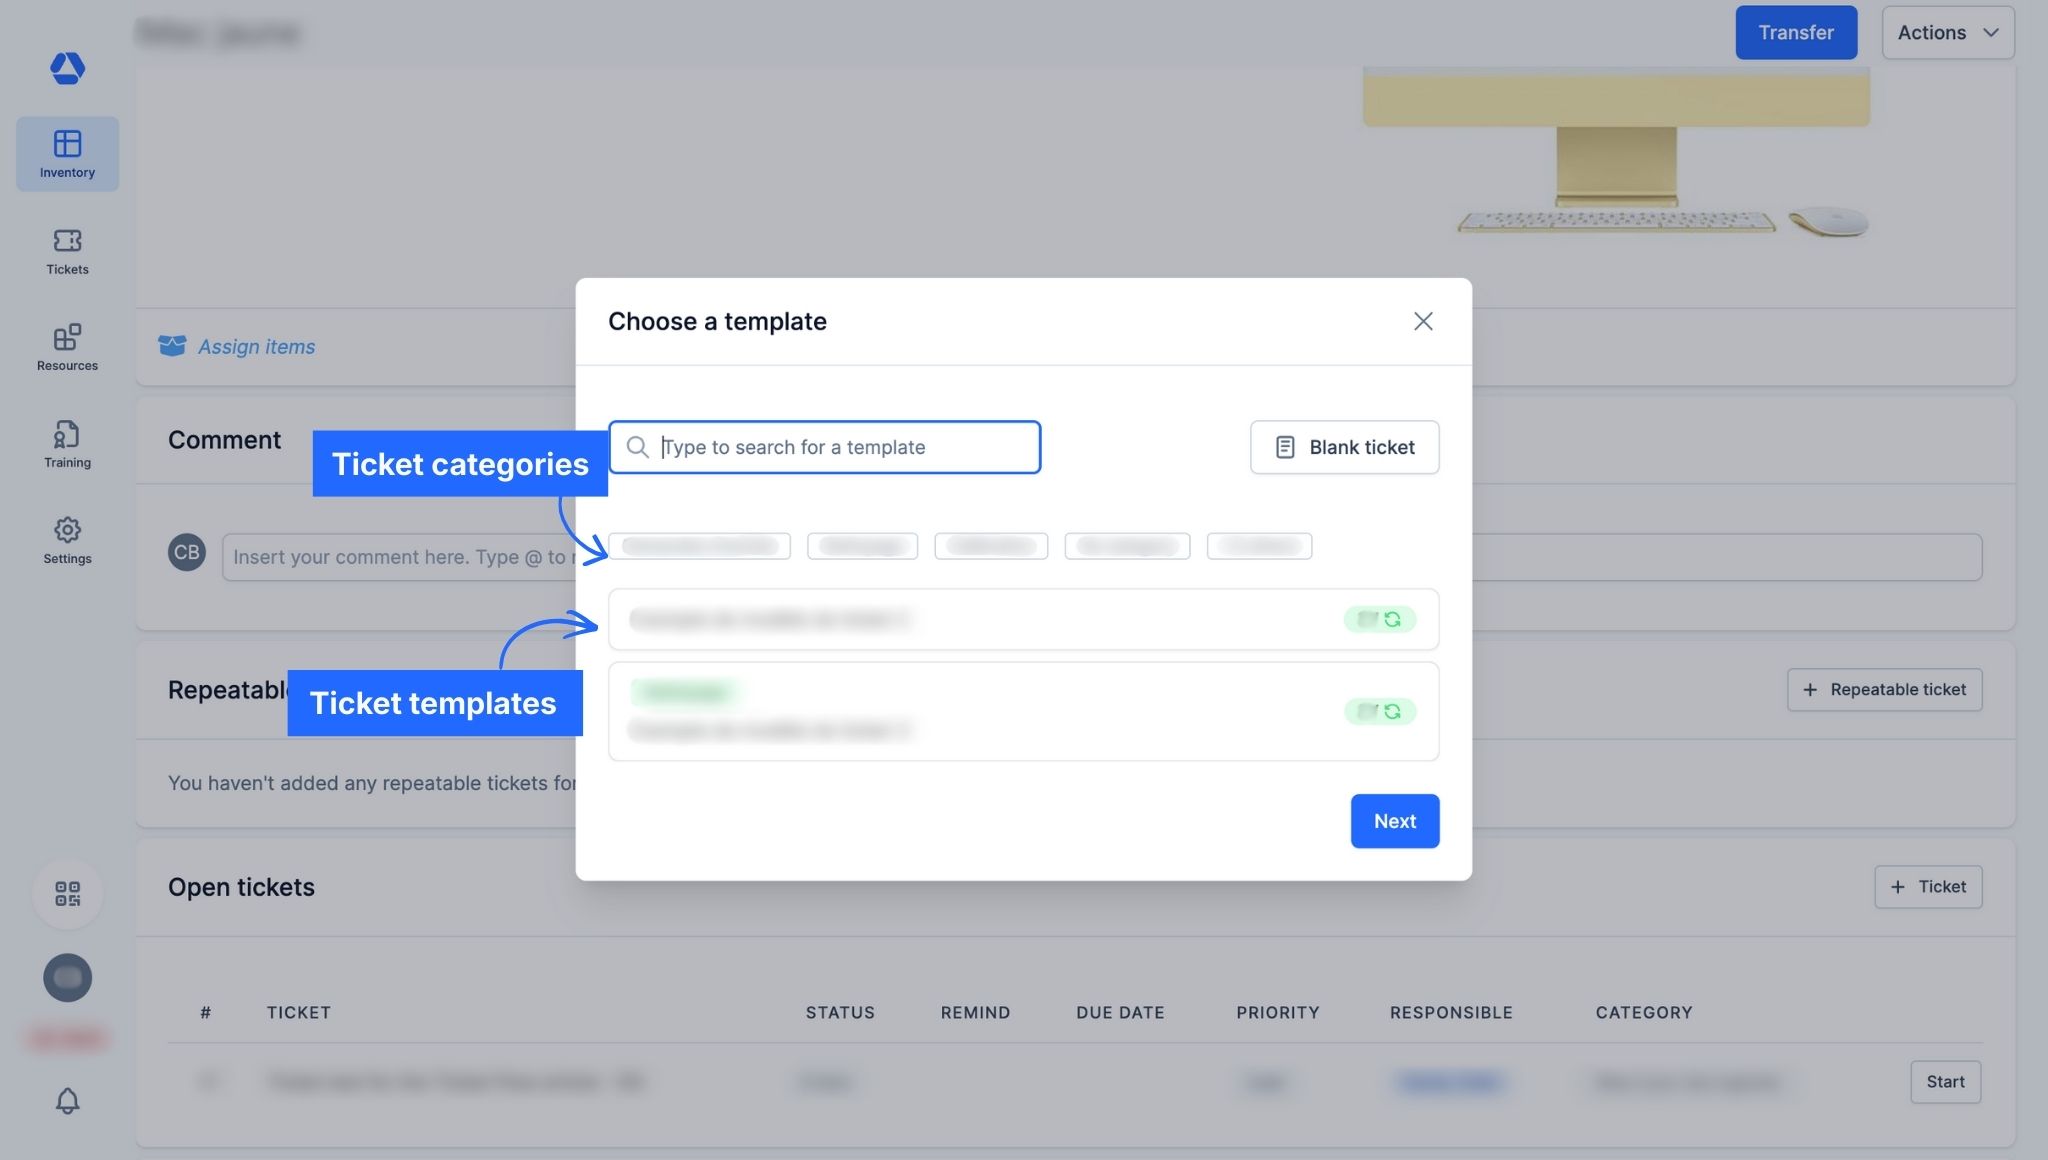
- Choose a ticket template
- Optional: Search for the template name or click a ticket category to find it faster

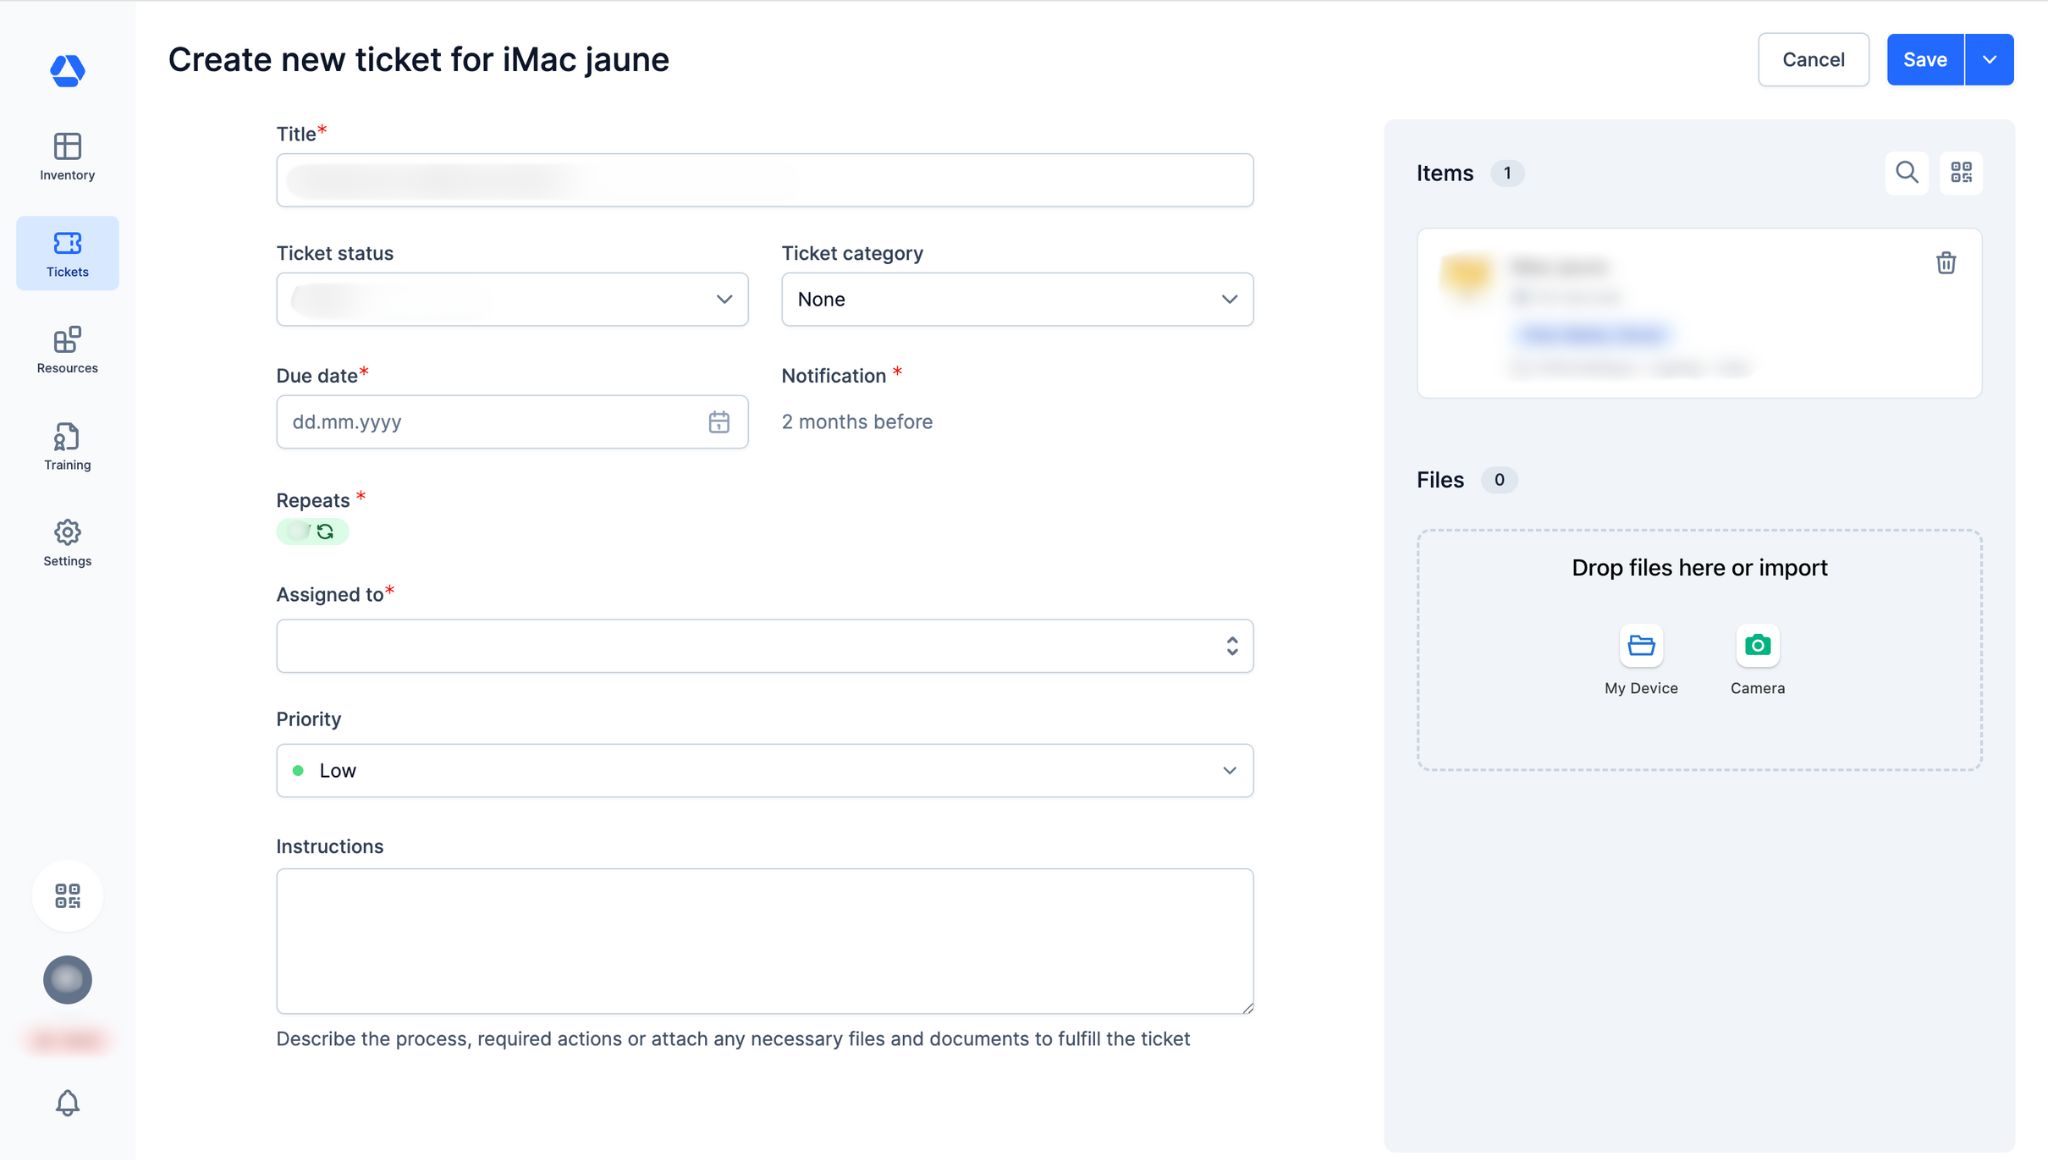
- Fill in the fields:
- "Title": Enter the ticket title
- "Ticket status": Select the ticket status
- "Ticket category": If not done already, choose a ticket category
- "Scheduled Ticket": Check this box if you want to set a due date
- "Due date": Select when the ticket should be completed
- "Notification": Choose how many days, weeks, months, or years in advance to send an email reminder
- "Assigned to": Select one or more responsible people; they will receive the reminder
- "Priority": Set the ticket priority: Low, Medium, or High (tickets can be filtered by priority in the overview)
- "Instructions": Optional; add instructions if necessary
- "Items": Add items to this ticket (search via the magnifying glass or scan the QR code; remove with the trash icon)
- "Files": Add or remove files for this ticket
Method 2: From the Ticket Overview Page
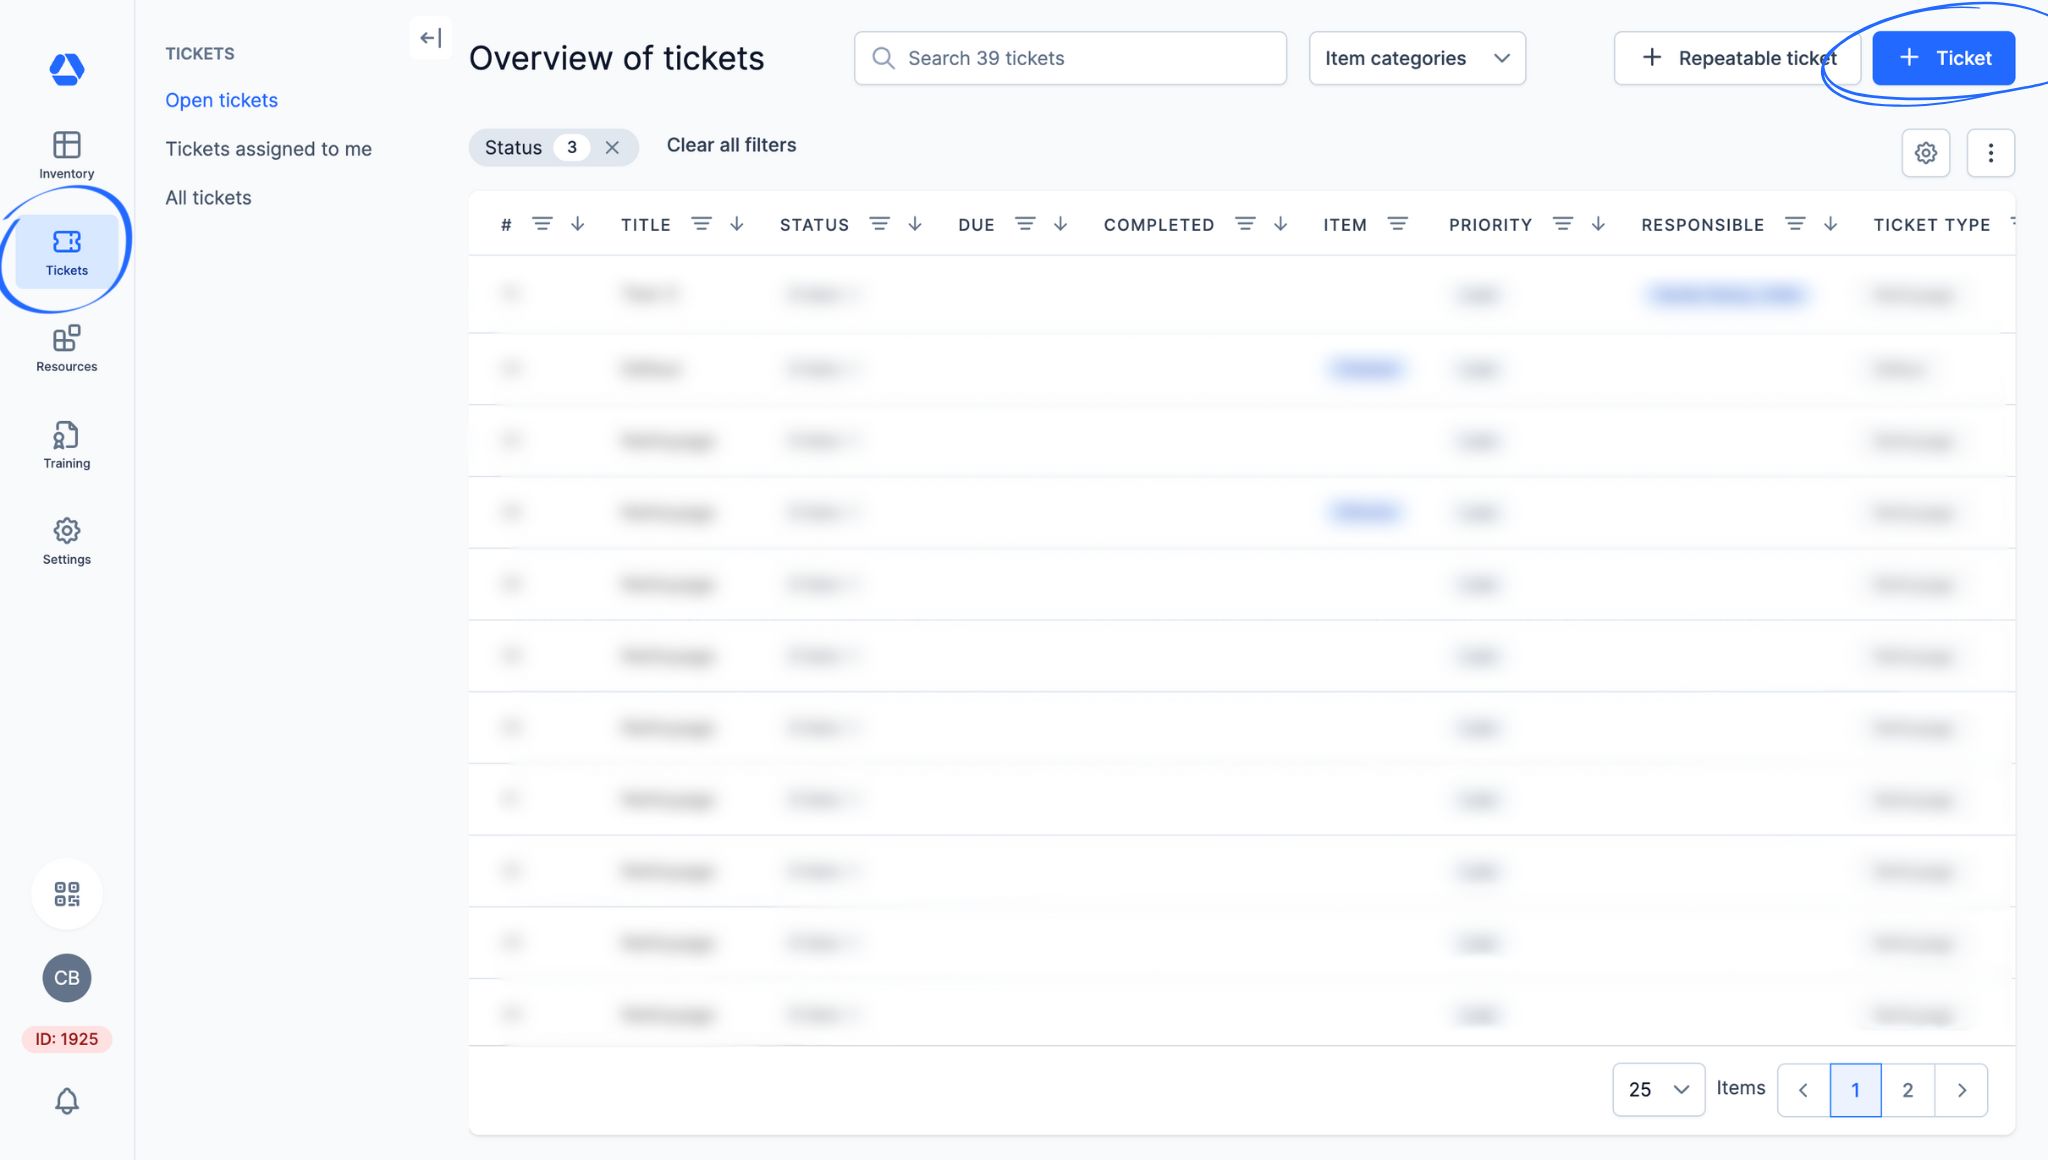
To create a ticket from the ticket overview page:
- Click "Tickets" > "Open Tickets", "Tickets assigned to me", or "All tickets"
- Click "+ Ticket"
- Choose a ticket template
- Optional: Search for the template name or click a ticket category
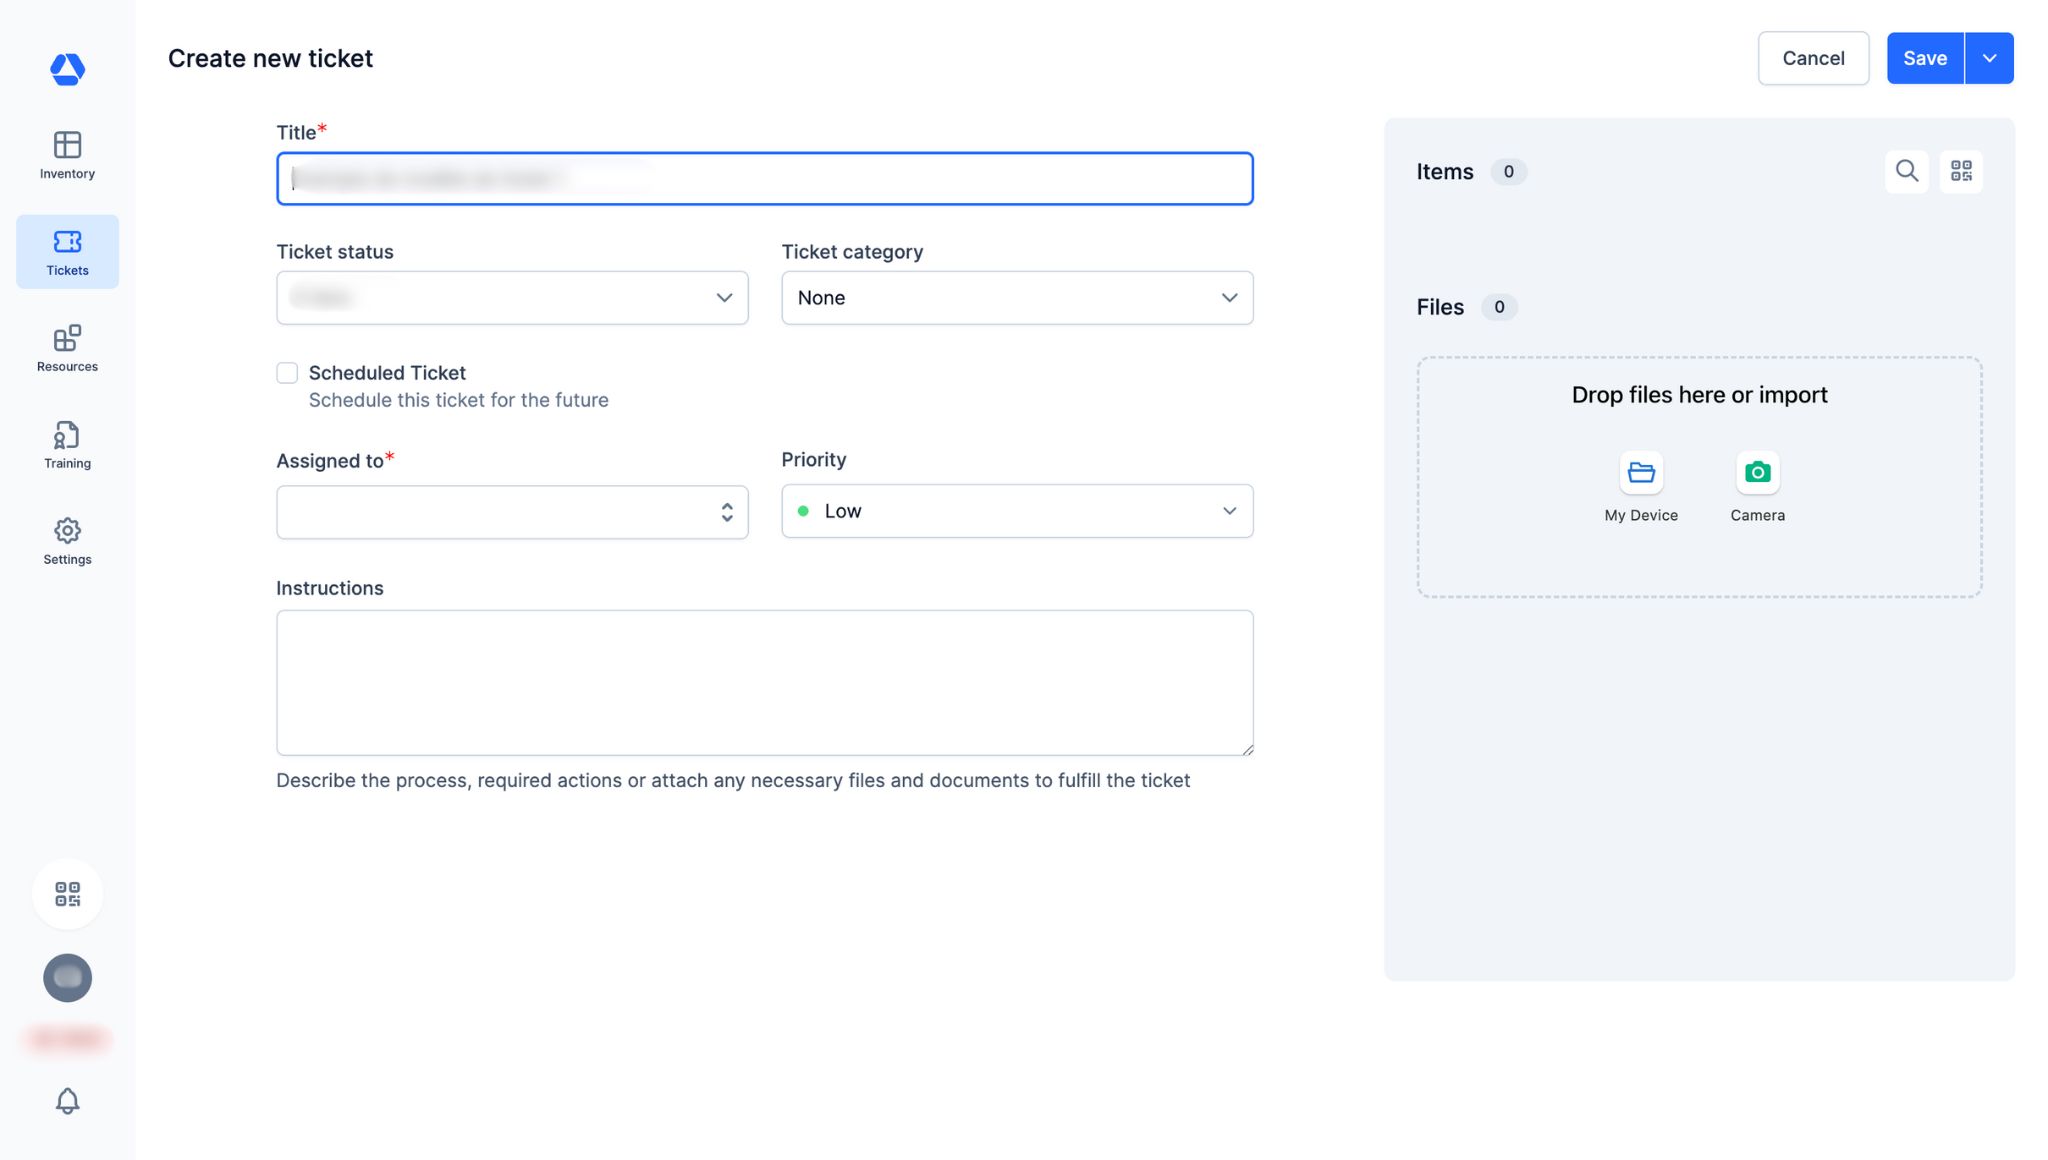
- Fill in the fields:
- "Title": Enter the ticket title
- "Ticket status": Select the ticket status
- "Ticket category": If not done already, choose a ticket category
- "Scheduled Ticket": Check this box if you want to add a due date
- "Due date": Select when the ticket should be completed
- "Notification": Choose how many days, weeks, months, or years in advance to send an email reminder
- "Assigned to": Select one or more responsible people; they will receive the reminder
- "Priority": Set the ticket priority: Low, Medium, or High (tickets can be filtered by priority in the overview)
- "Instructions": Optional; add instructions if necessary
- "Items": Add items to this ticket (search via the magnifying glass or scan the QR code; remove with the trash icon)
- "Files": Add or remove files for this ticket
📚 Creating a Repeatable Ticket
Examples of repeatable tickets:
- Calibration
- Safety equipment inspection
- Visual inspection
- Monthly preventive maintenance
Method 1: From an Item Page

To create a repeatable ticket from an item page:
- Go to the item page
- Scroll to "Open repeatable tickets"
- Click "+ Repeatable Ticket"
- Choose a repeatable ticket template
- Optional: Search by name or category
- Fill in the fields.
- "Title": Enter the ticket title
- "Ticket status": Select the ticket status
- "Ticket category": If not done already, choose a ticket category
- "Due date": Select when the ticket should be completed
- "Notification": This information is set in the ticket template
- "Repeats": This information is set in the ticket template
- "Assigned to": Select one or more responsible people; they will receive the reminder
- "Priority": Set the ticket priority: Low, Medium, or High (tickets can be filtered by priority in the overview)
- "Instructions": Optional; add instructions if necessary
- "Items": Add items to this ticket (search via the magnifying glass or scan the QR code; remove with the trash icon)
- "Files": Add or remove files for this ticket
Method 2: From the Ticket Overview Page
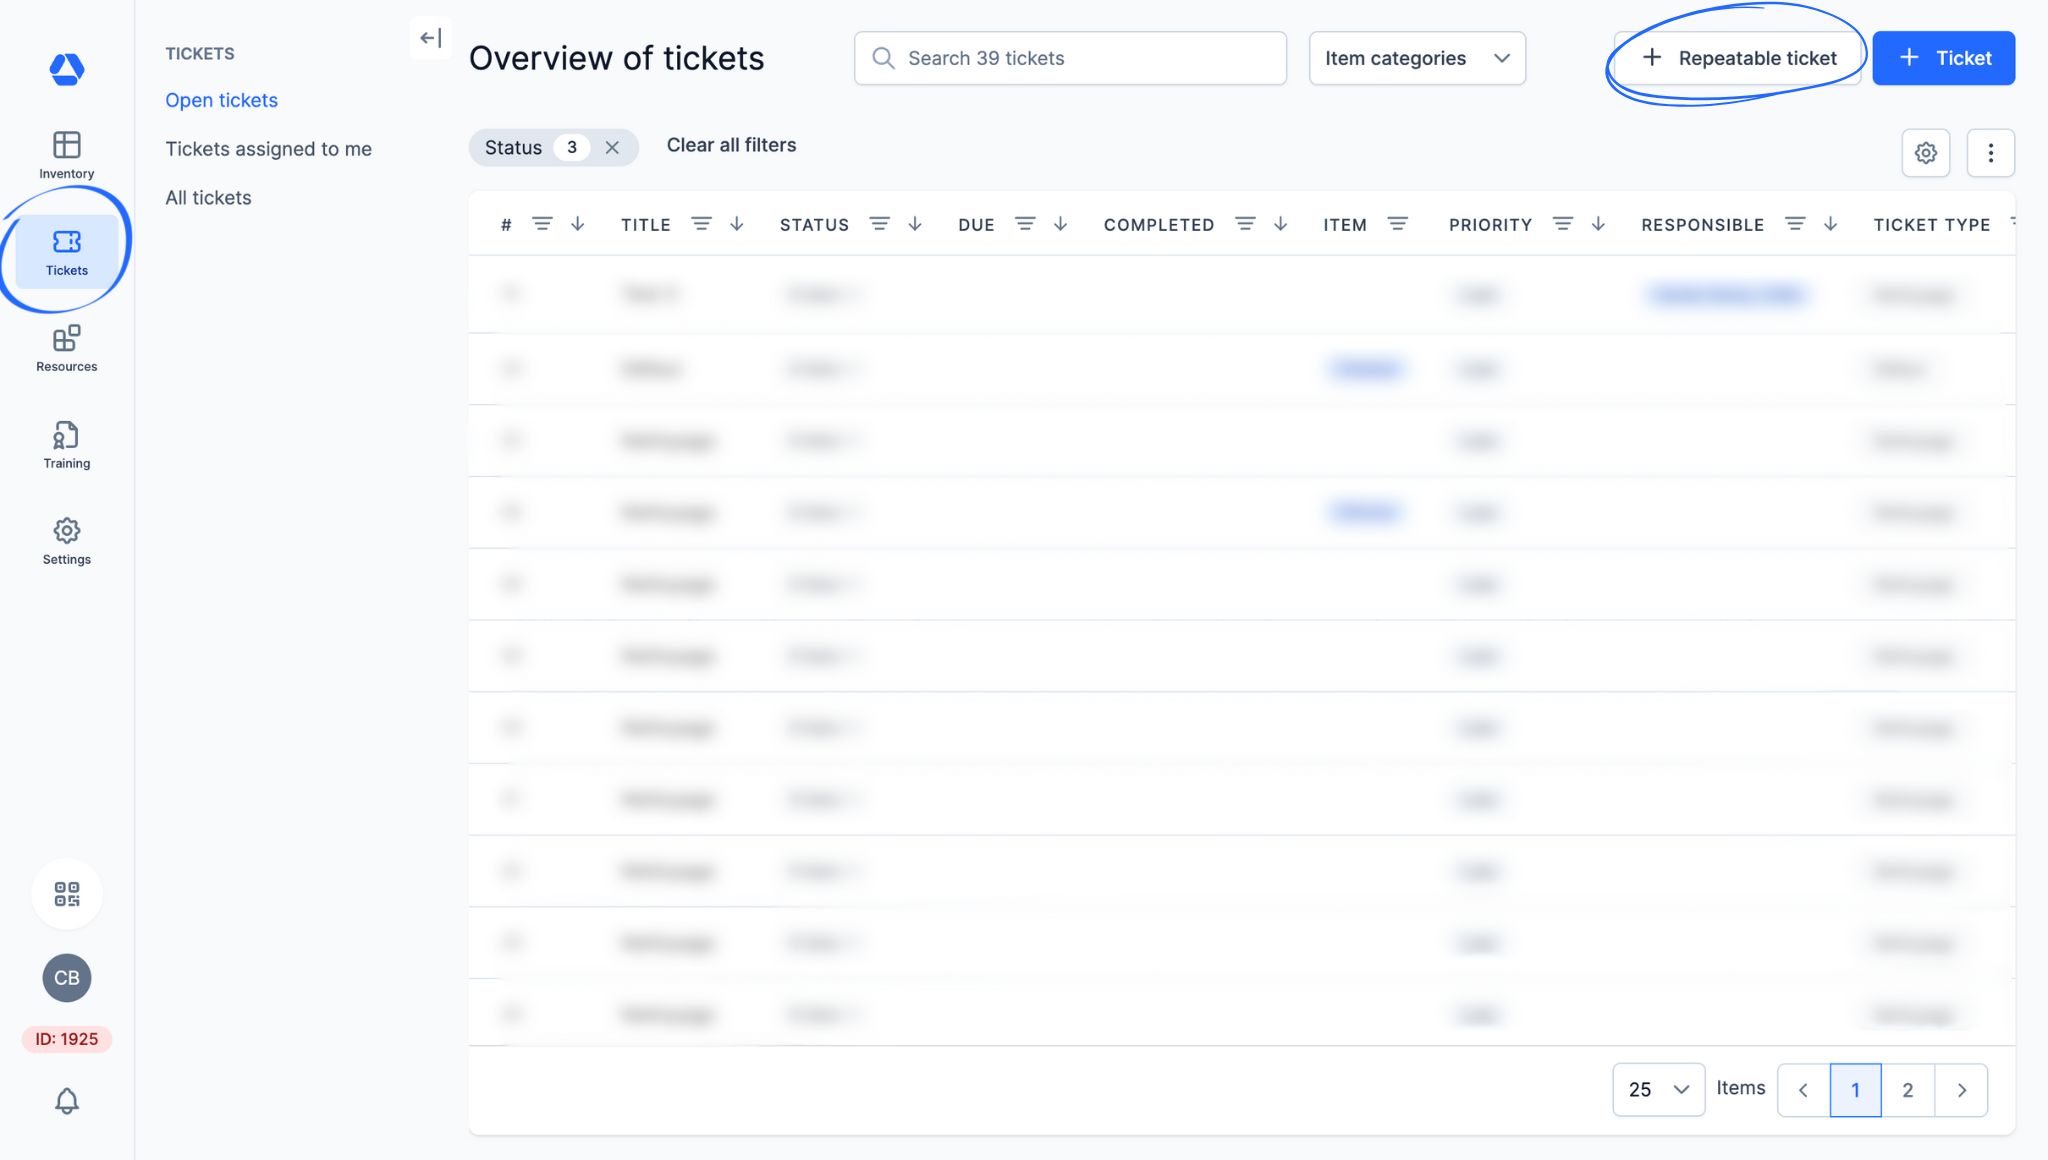
To create a repeatable ticket from the ticket overview page:
- Click "Tickets" > "Open Tickets", "Tickets assigned to me", or "All tickets"
- Click "+ Repeatable ticket"
- Choose a ticket template
- Optional: Search for the template name or click a ticket category
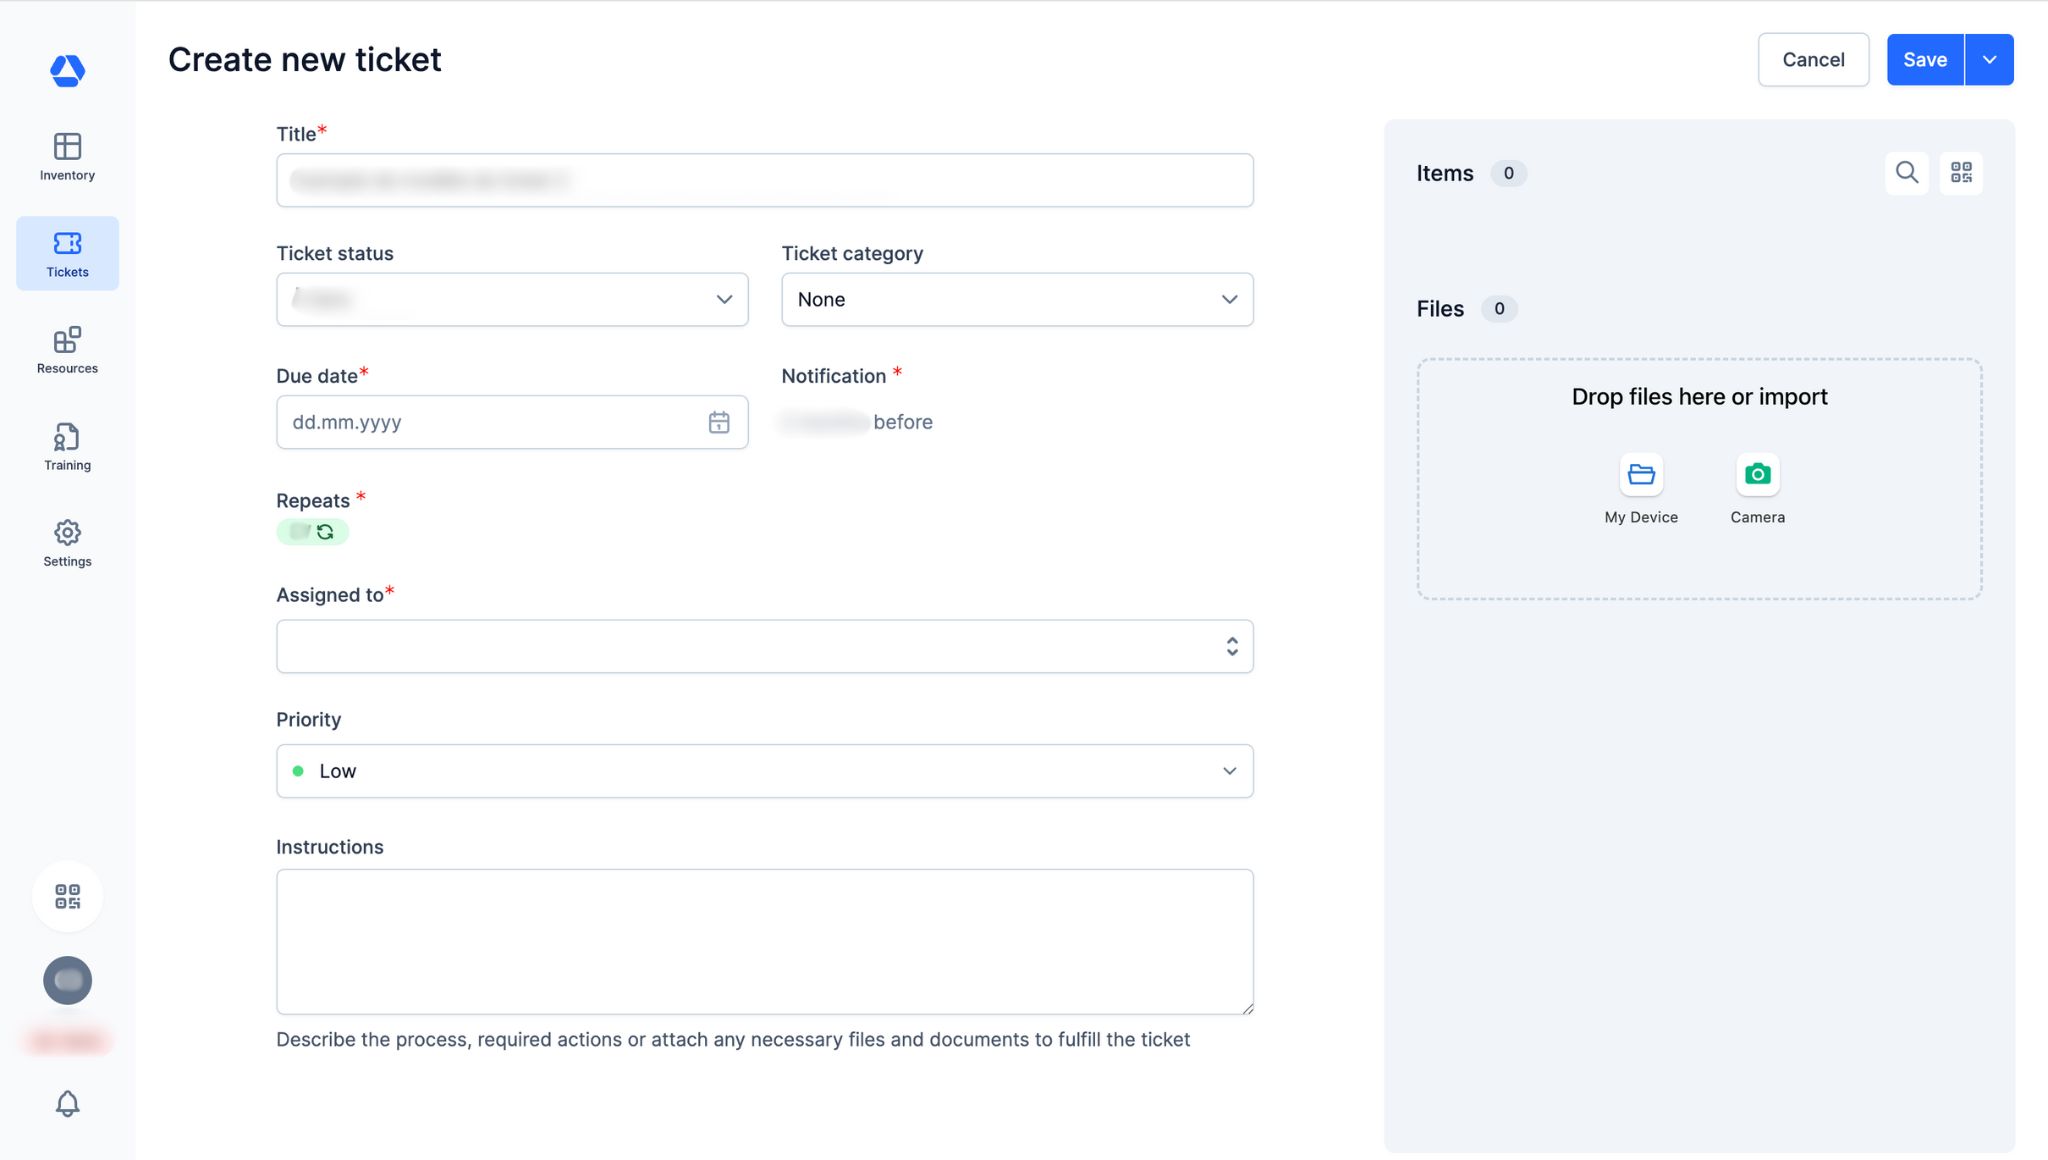
- Fill in the fields.
- "Title": Enter the ticket title
- "Ticket status": Select the ticket status
- "Ticket category": If not done already, choose a ticket category
- "Due date": Select when the ticket should be completed
- "Notification": This information is set in the ticket template
- "Repeats": This information is set in the ticket template
- "Assigned to": Select one or more responsible people; they will receive the reminder
- "Priority": Set the ticket priority: Low, Medium, or High (tickets can be filtered by priority in the overview)
- "Instructions": Optional; add instructions if necessary
- "Items": Add items to this ticket (search via the magnifying glass or scan the QR code; remove with the trash icon)
- "Files": Add or remove files for this ticket
📚 Creating a Blank Ticket (NEW)
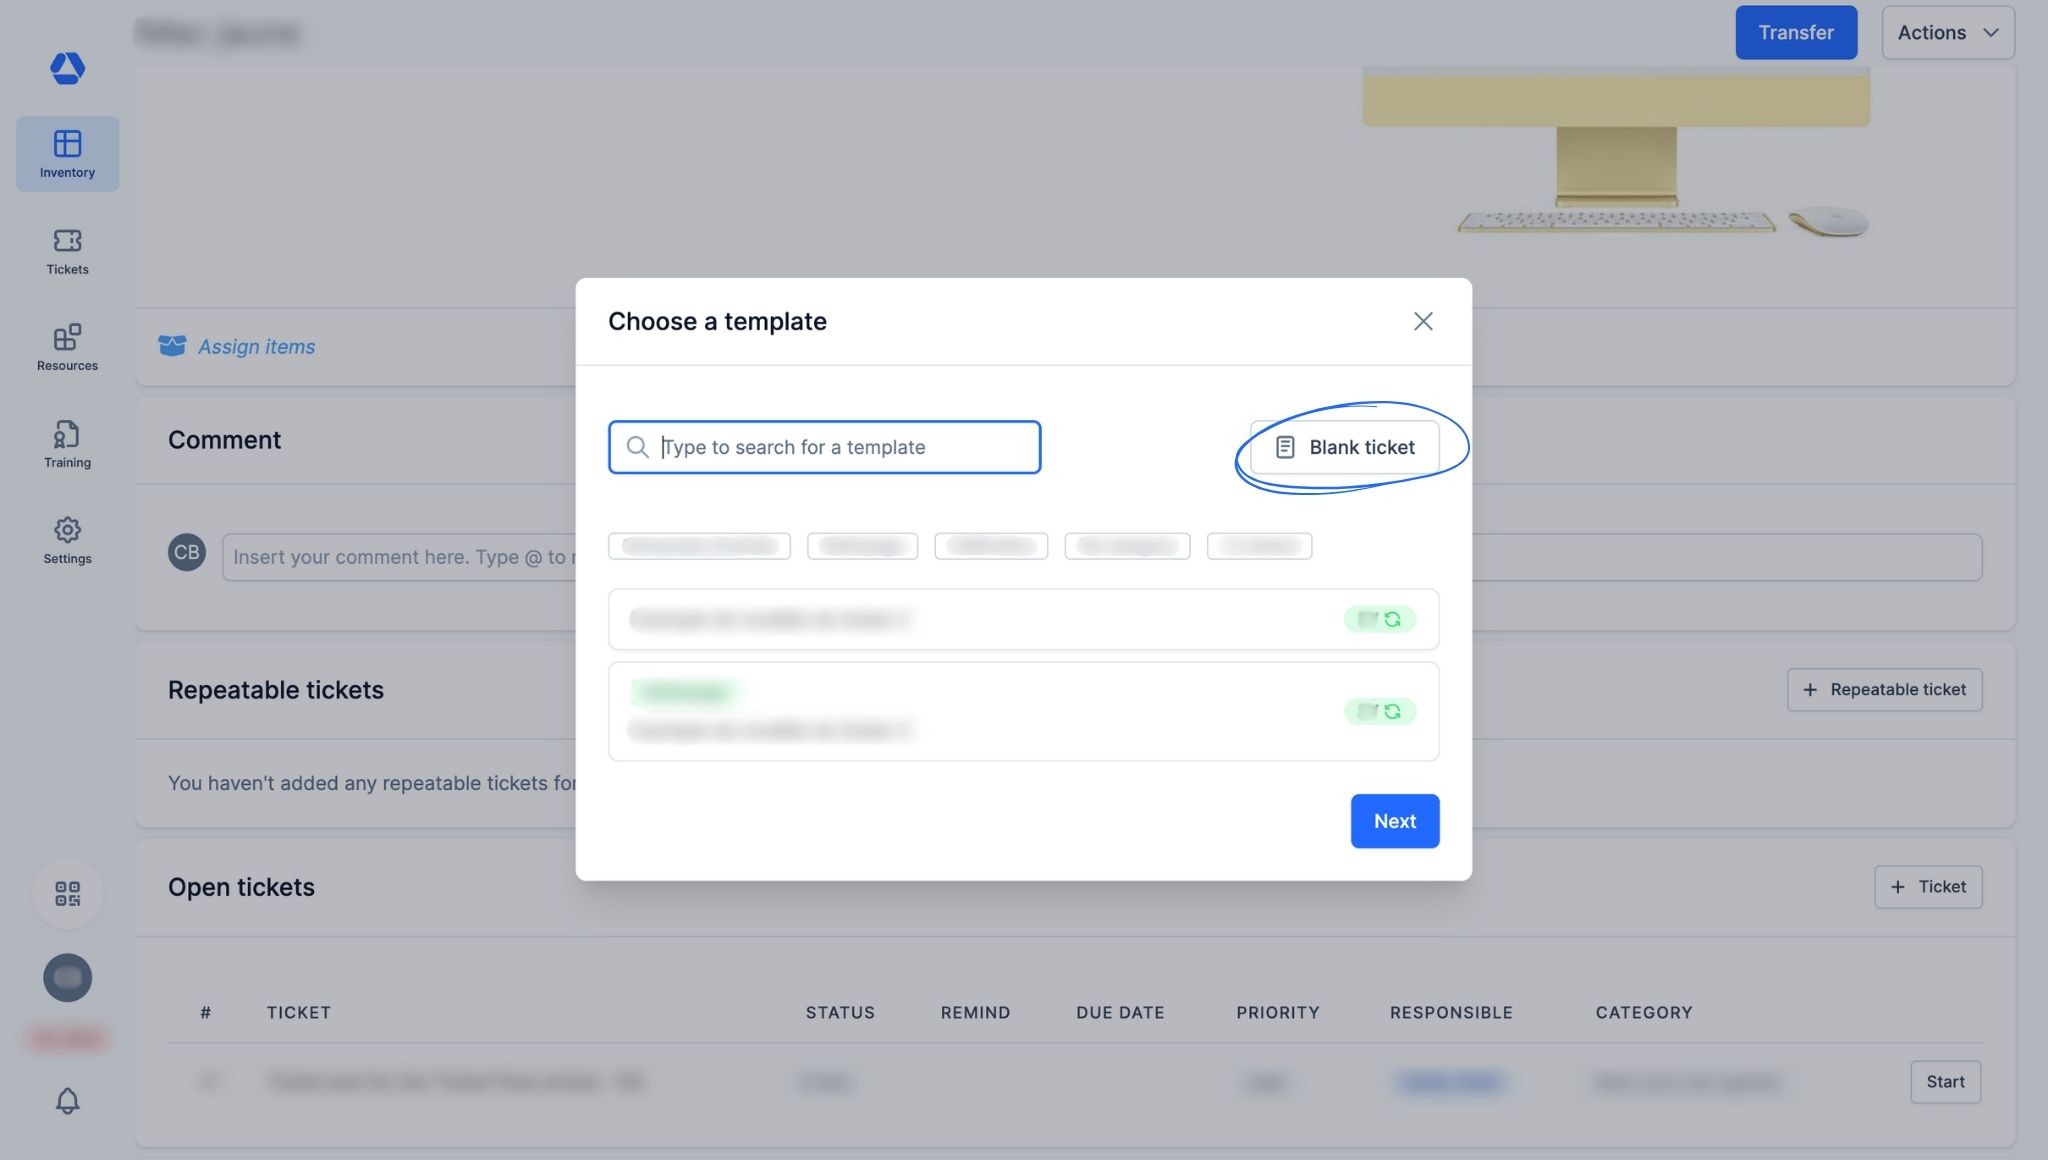
You can now create a blank ticket (repeatable or not), which is not linked to any template or category by default.
Create a blank ticket:
- From an item page:
- Click "+ Ticket" or "+ Repeatable ticket"
- Select "Blank ticket"
- From the ticket overview page:
- Click "+ Ticket" or "+ Repeatable ticket"
- Select "Blank ticket"
Then fill in the ticket according to your needs.
🎥 Ticketing System 2.0: Tour (VIDEO)
🎯 Key information
- Ticket "fields" are now called "tasks"
- NEW: You can now create, manage, and edit your ticket categories and templates on a single page
- NEW: You can now create "blank tickets"
- The interface and user experience are more efficient and intuitive
What is the difference between a ticket and a repeatable ticket?
- Ticket: A ticket is created to manage one-time requests, such as a repair or an exceptional intervention. It does not repeat over time.
- Repeatable ticket: A repeatable ticket is created to ensure regular follow-up, ideal for tasks such as preventive maintenance. Once completed, an identical ticket is automatically created with the same specifications.
⭐ Table: Ticketing System
| Feature | Ticketing System Essential | Ticketing System Standard | Ticketing System Pro |
| Add documents to tickets | ❌ | ✅ | ✅ |
| Add due dates to tickets | ✅ | ✅ | ✅ |
| Add ticket watchers | ❌ | ✅ | ✅ |
| Assign tickets to several persons | ✅ | ✅ | ✅ |
| Automatically assign tickets | ❌ | ✅ | ✅ |
| Automatically mark items as defective | ❌ | ✅ | ✅ |
| Comment on tickets | ❌ | ✅ | ✅ |
| Create categories for ticket templates | ❌ | ✅ | ✅ |
| Create PDF exports | ❌ | ❌ | ✅ |
| Create repeatable tickets (Maintenance Manager) | ❌ | ✅ | ✅ |
| Create tasks | ❌ | ✅ | ✅ |
| Create tickets for single items | ✅ | ✅ | ✅ |
| Create ticket templates | ❌ | ✅ | ✅ |
| Create tickets with multiple items | ❌ | ✅ | ✅ |
| Create tickets without items | ❌ | ✅ | ✅ |
| Require signature to complete tickets | ❌ | ✅ | ✅ |
| Set notification reminders | ✅ | ✅ | ✅ |
| Set notifications reminders to item assignee or item responsible | ❌ | ✅ | ✅ |
| Set ticket priority | ✅ | ✅ | ✅ |
| Set ticket status | ❌ | Default status | Costumizable status |
| Ticket history (audit log) | ❌ | ❌ | ✅ |
| Ticket overview page | ✅ | ✅ | ✅ |
| Ticket templates: Restrict ticket templates to specific item categories | ❌ | ❌ | ✅ |
| Ticket templates: Restrict ticket templates to specific org.units | ❌ | ❌ | ✅ |
| Ticket templates: Set responsible person(s) | ❌ | ✅ | ✅ |
| Ticket templates: Set responsible person(s) per org. unit | ❌ | ❌ | ✅ |
| Track costs | ❌ | ✅ | ✅ |
| View tickets on the item page | ✅ | ✅ | ✅ |
Focus: The Ticketing System Table, Section By Section
- Creation -
| Feature | Ticketing System Essential | Ticketing System Standard | Ticketing System Pro |
| Create tickets for single items | ✅ | ✅ | ✅ |
| Create tickets with multiple items | ❌ | ✅ | ✅ |
| Create tickets without items | ❌ | ✅ | ✅ |
| Create repeatable tickets (Maintenance Manager) | ❌ | ✅ | ✅ |
- Documentation -
| Feature | Ticketing System Essential | Ticketing System Standard | Ticketing System Pro |
| Add documents to tickets | ❌ | ✅ | ✅ |
| Comment on tickets | ❌ | ✅ | ✅ |
| Create tasks | ❌ | ✅ | ✅ |
| Require signature to complete tickets | ❌ | ✅ | ✅ |
- Features -
| Feature | Ticketing System Essential | Ticketing System Standard | Ticketing System Pro |
| Add due dates to tickets | ✅ | ✅ | ✅ |
| Add ticket watchers | ❌ | ✅ | ✅ |
| Assign tickets to several persons | ✅ | ✅ | ✅ |
| Automatically assign tickets | ❌ | ✅ | ✅ |
| Automatically mark items as defective | ❌ | ✅ | ✅ |
| Create ticket templates | ❌ | ✅ | ✅ |
| Create categories for ticket templates | ❌ | ✅ | ✅ |
| Set notification reminders | ✅ | ✅ | ✅ |
| Set notifications reminders to item assignee or item responsible | ❌ | ✅ | ✅ |
| Set ticket priority | ✅ | ✅ | ✅ |
| Set ticket status | ❌ | Default status | Costumizable status |
| Ticket overview page | ✅ | ✅ | ✅ |
| Ticket templates: Set responsible person(s) | ❌ | ✅ | ✅ |
| Track costs | ❌ | ✅ | ✅ |
| View tickets on the item page | ✅ | ✅ | ✅ |
- Pro Features -
| Feature | Ticketing System Essential | Ticketing System Standard | Ticketing System Pro |
| Create PDF exports | ❌ | ❌ | ✅ |
| Ticket history (audit log) | ❌ | ❌ | ✅ |
| Ticket templates: Restrict ticket templates to specific item categories | ❌ | ❌ | ✅ |
| Ticket templates: Restrict ticket templates to specific org.units | ❌ | ❌ | ✅ |
| Ticket templates: Set responsible person(s) per org. unit | ❌ | ❌ | ✅ |